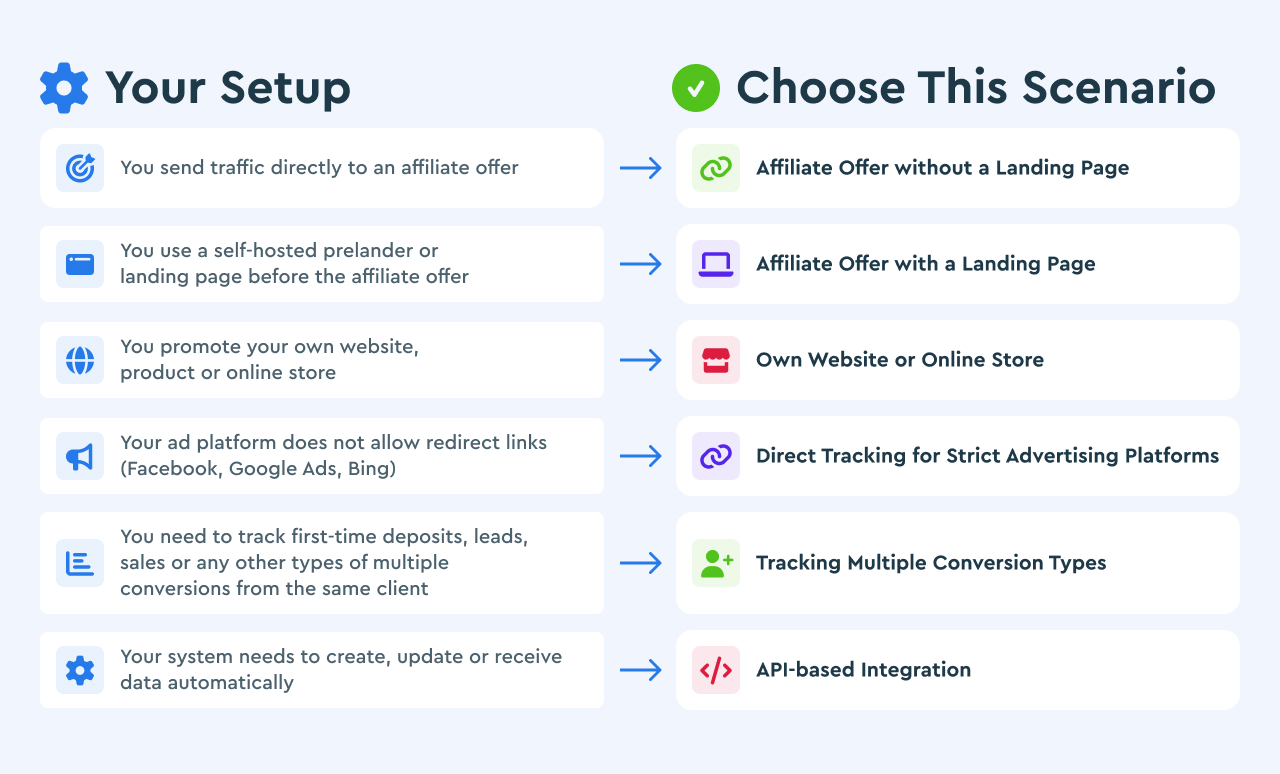
Before you create a campaign, choose the tracking scenario that matches your traffic flow. The right scenario determines which campaign URL to use, whether you need a landing page pixel for the direct tracking and the way how conversions should be sent to BeMob.
Use this page as a starting point.
Each scenario links to a dedicated setup guide with the required fields, URL examples, testing steps and troubleshooting.
¶ Affiliate Offer Without a Landing Page
Choose this scenario when visitors should go directly from your traffic source to an affiliate network offer.
¶ Typical flow

This is the simplest affiliate setup. BeMob receives the visit first, redirects the visitor to the offer, stores the click ID and then attributes a conversion when the affiliate network sends a postback.
¶ Best for
- CPA, CPL and CPS affiliate offers
- Fast campaign launches
- A single offer with no pre-landing page
- Traffic sources where redirects are allowed
¶ You need
- A traffic source with a tracking template or destination URL field
- An affiliate network offer URL
- A postback URL from BeMob added to your affiliate-network offer settings
- A supported click ID parameter, usually passed through the offer URL
¶ What you will configure
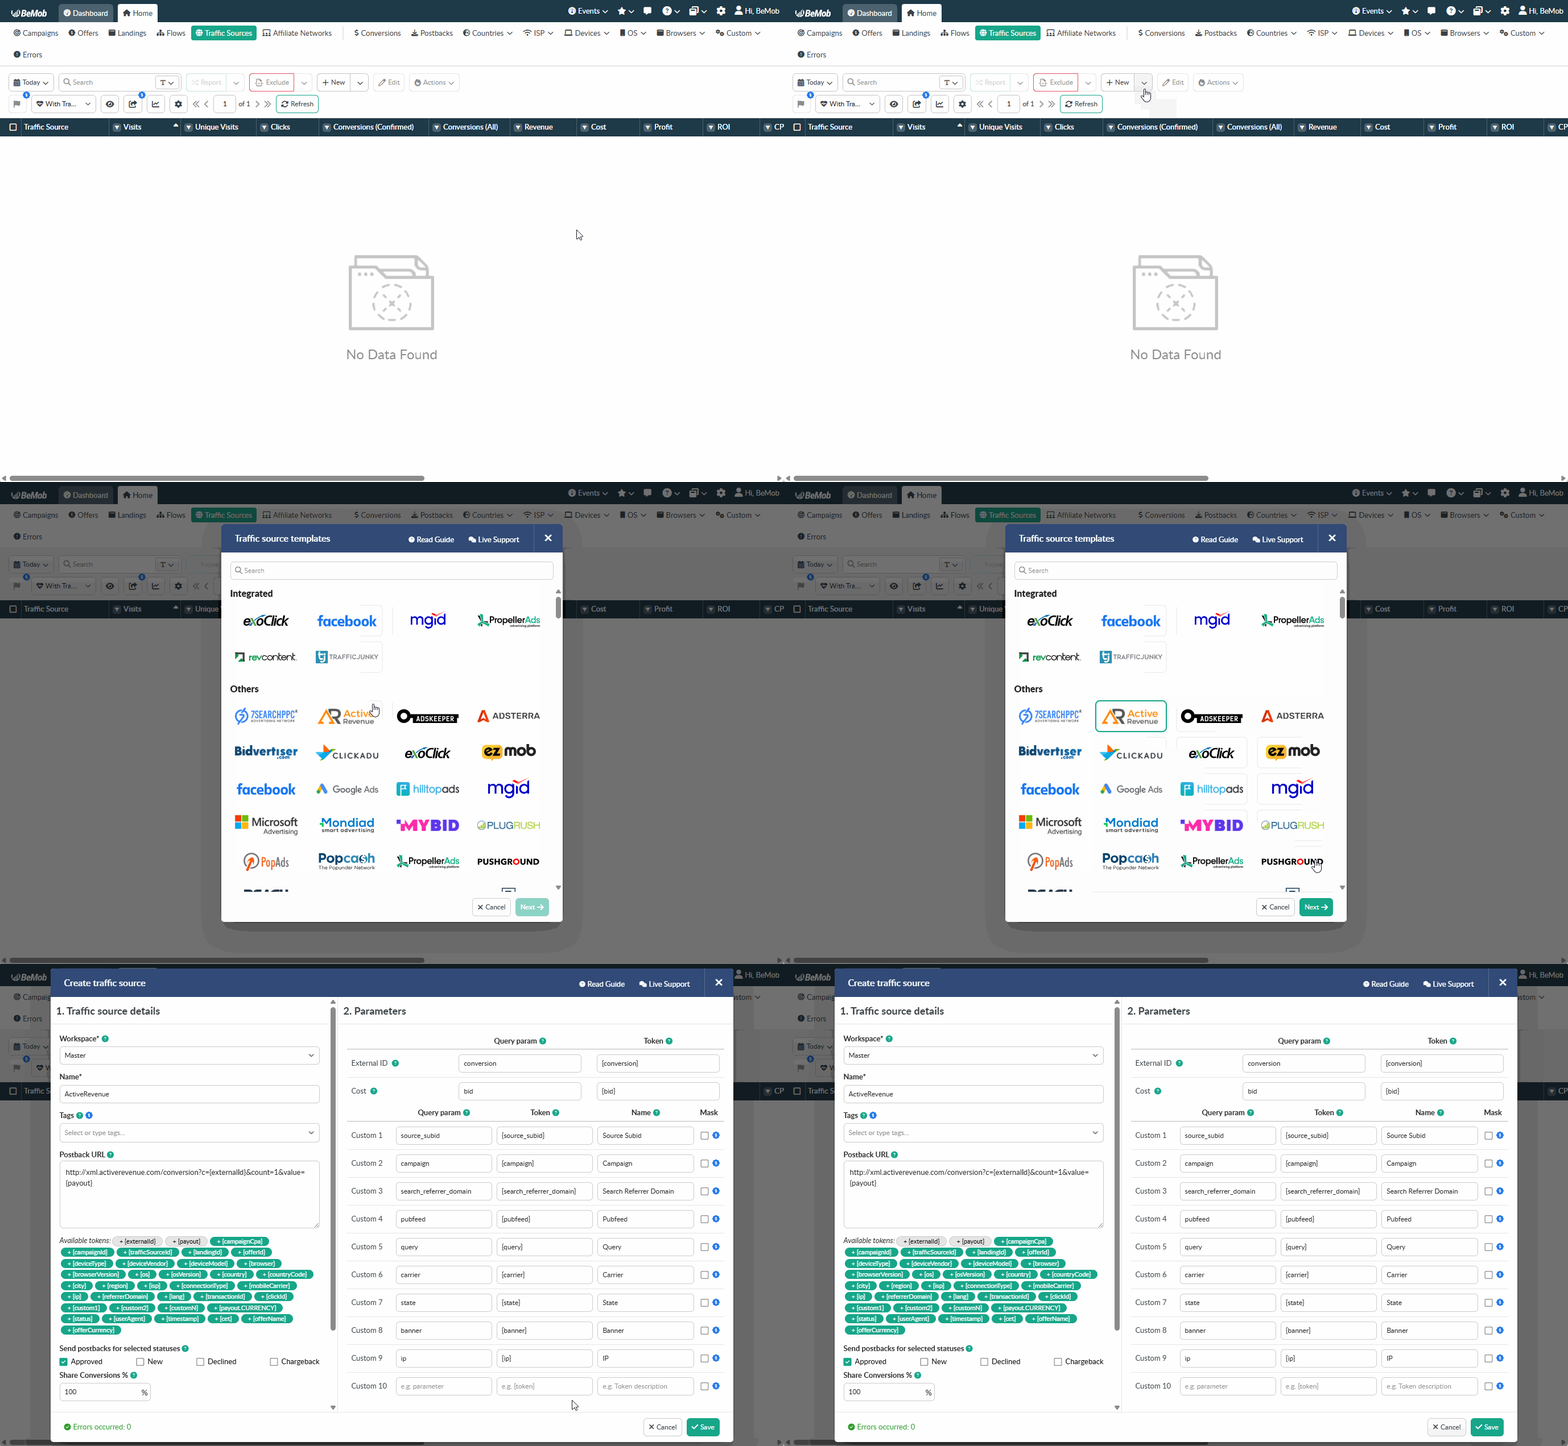
1. Add your traffic source and its available macros.
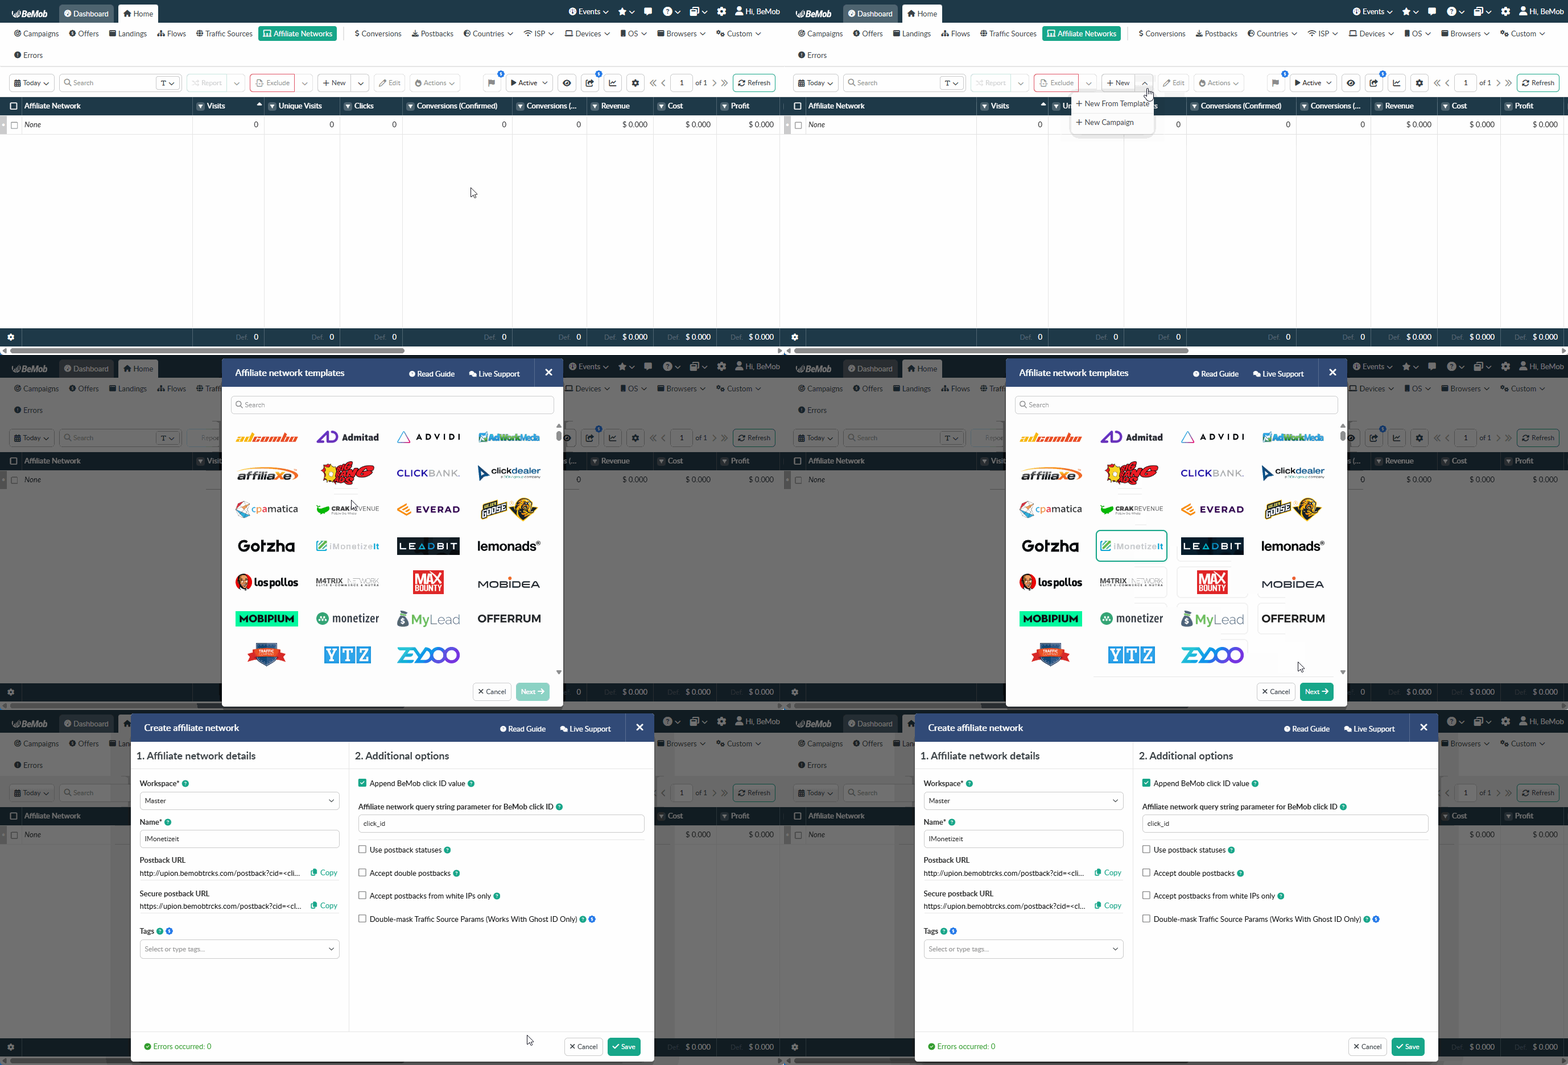
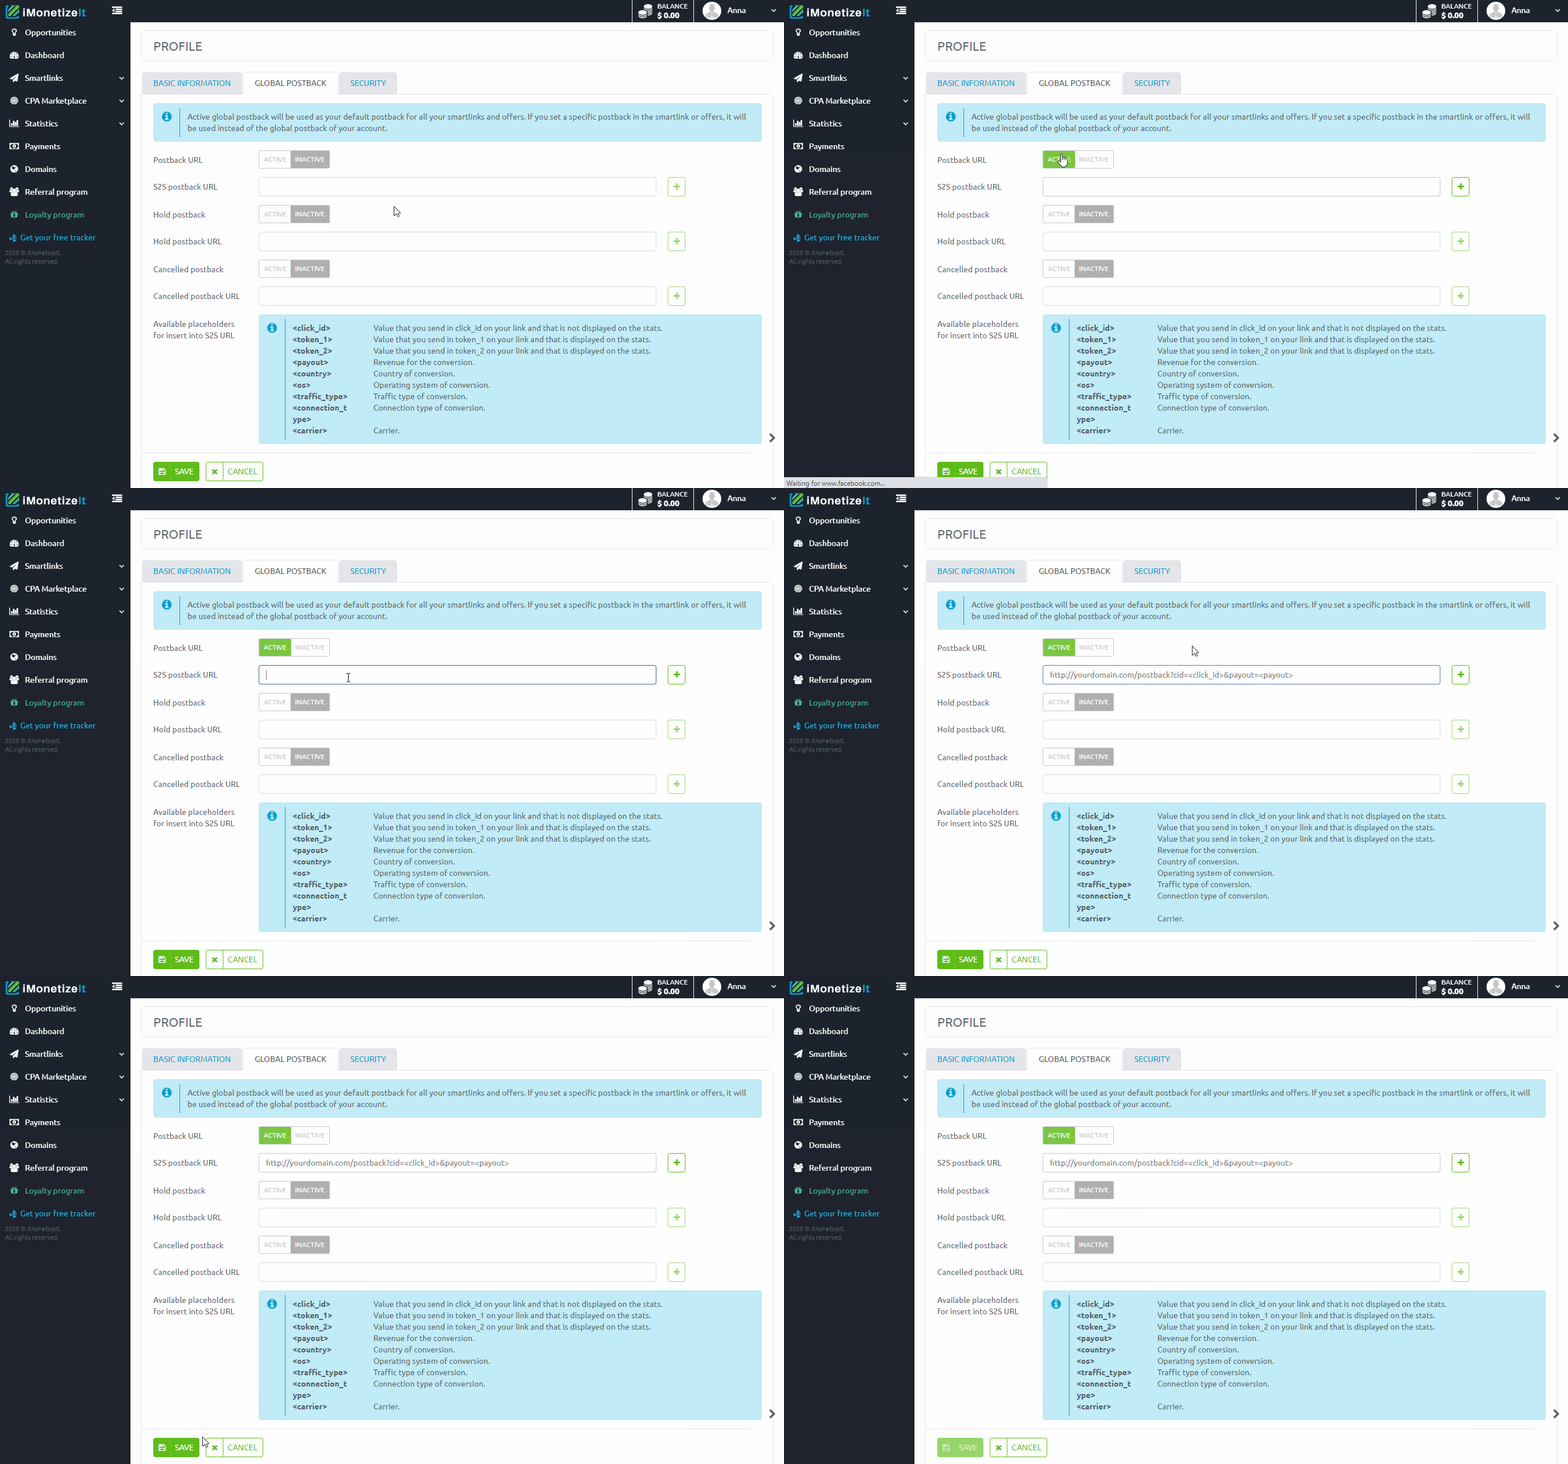
2. Add the affiliate network and its postback settings.
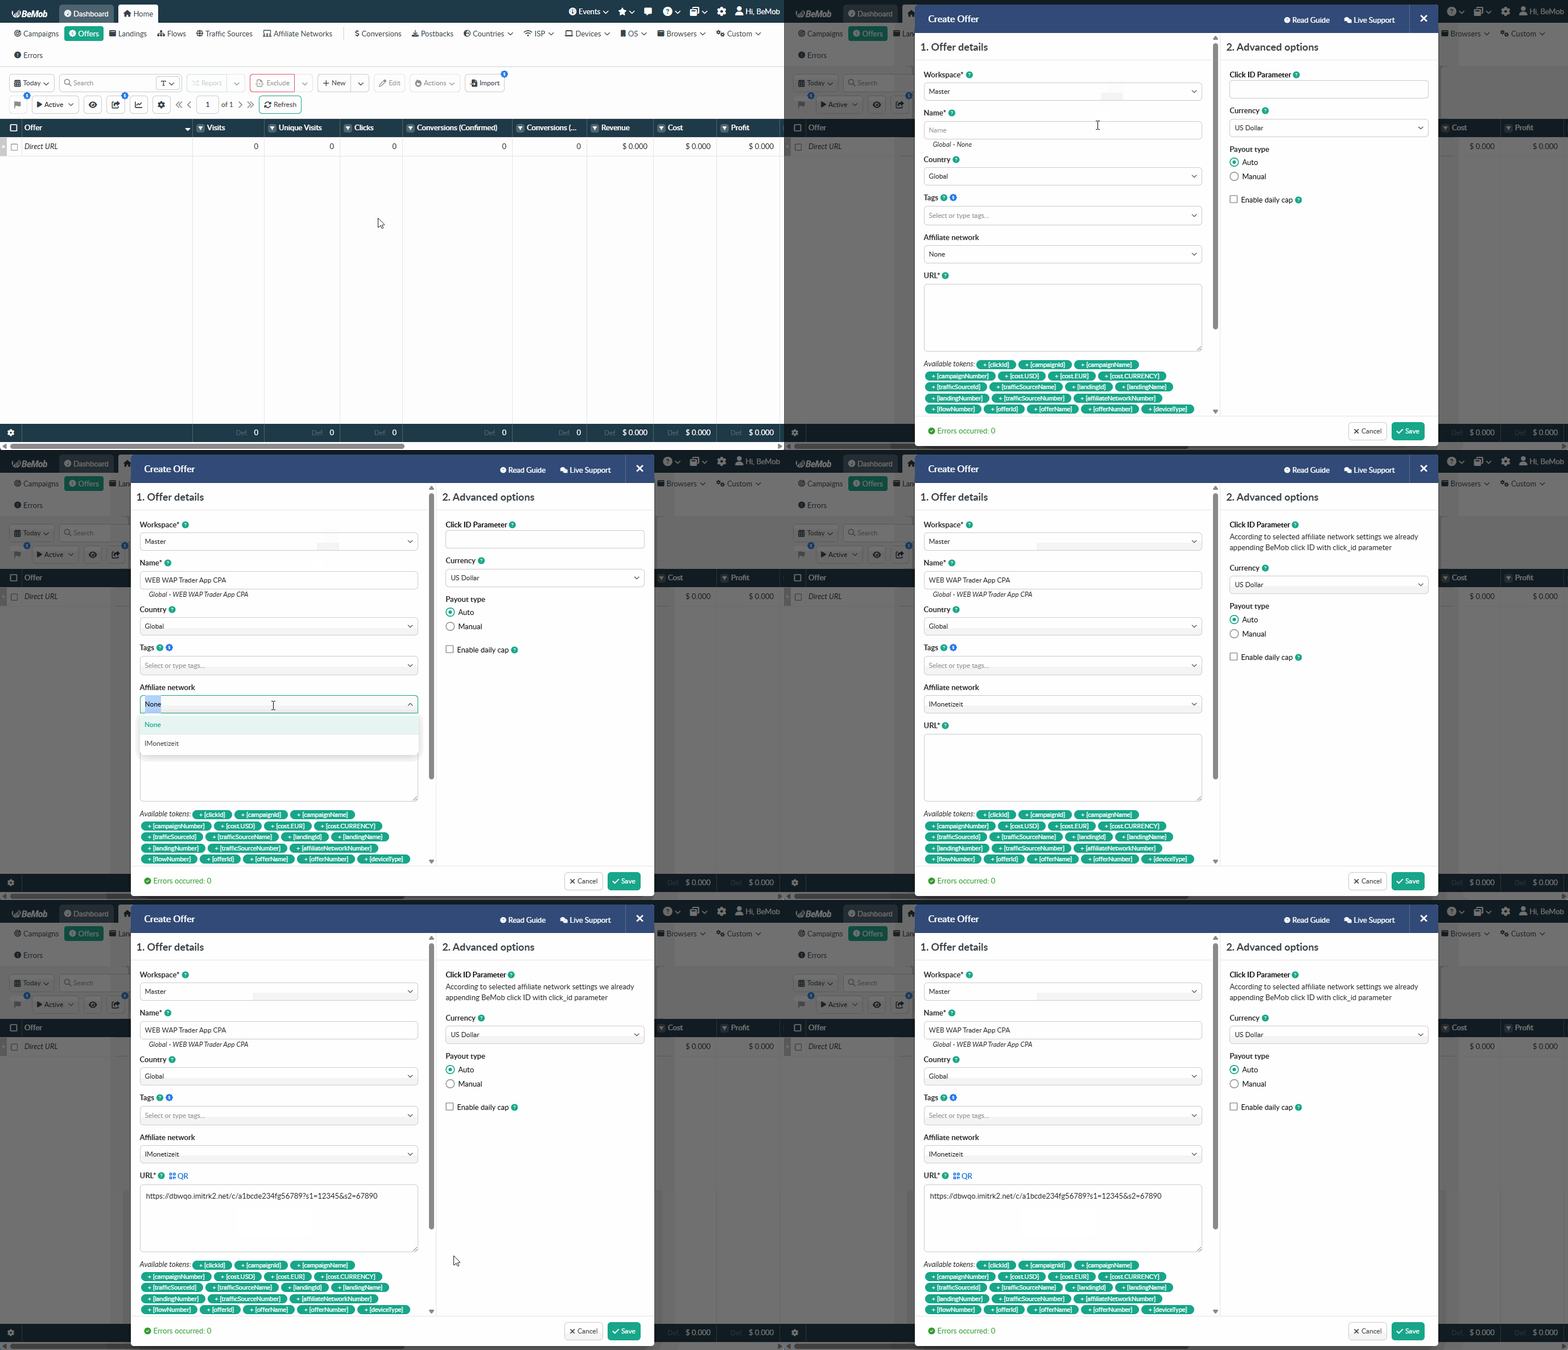
3. Add the offer URL.
4. Add the postback to the affiliate network.
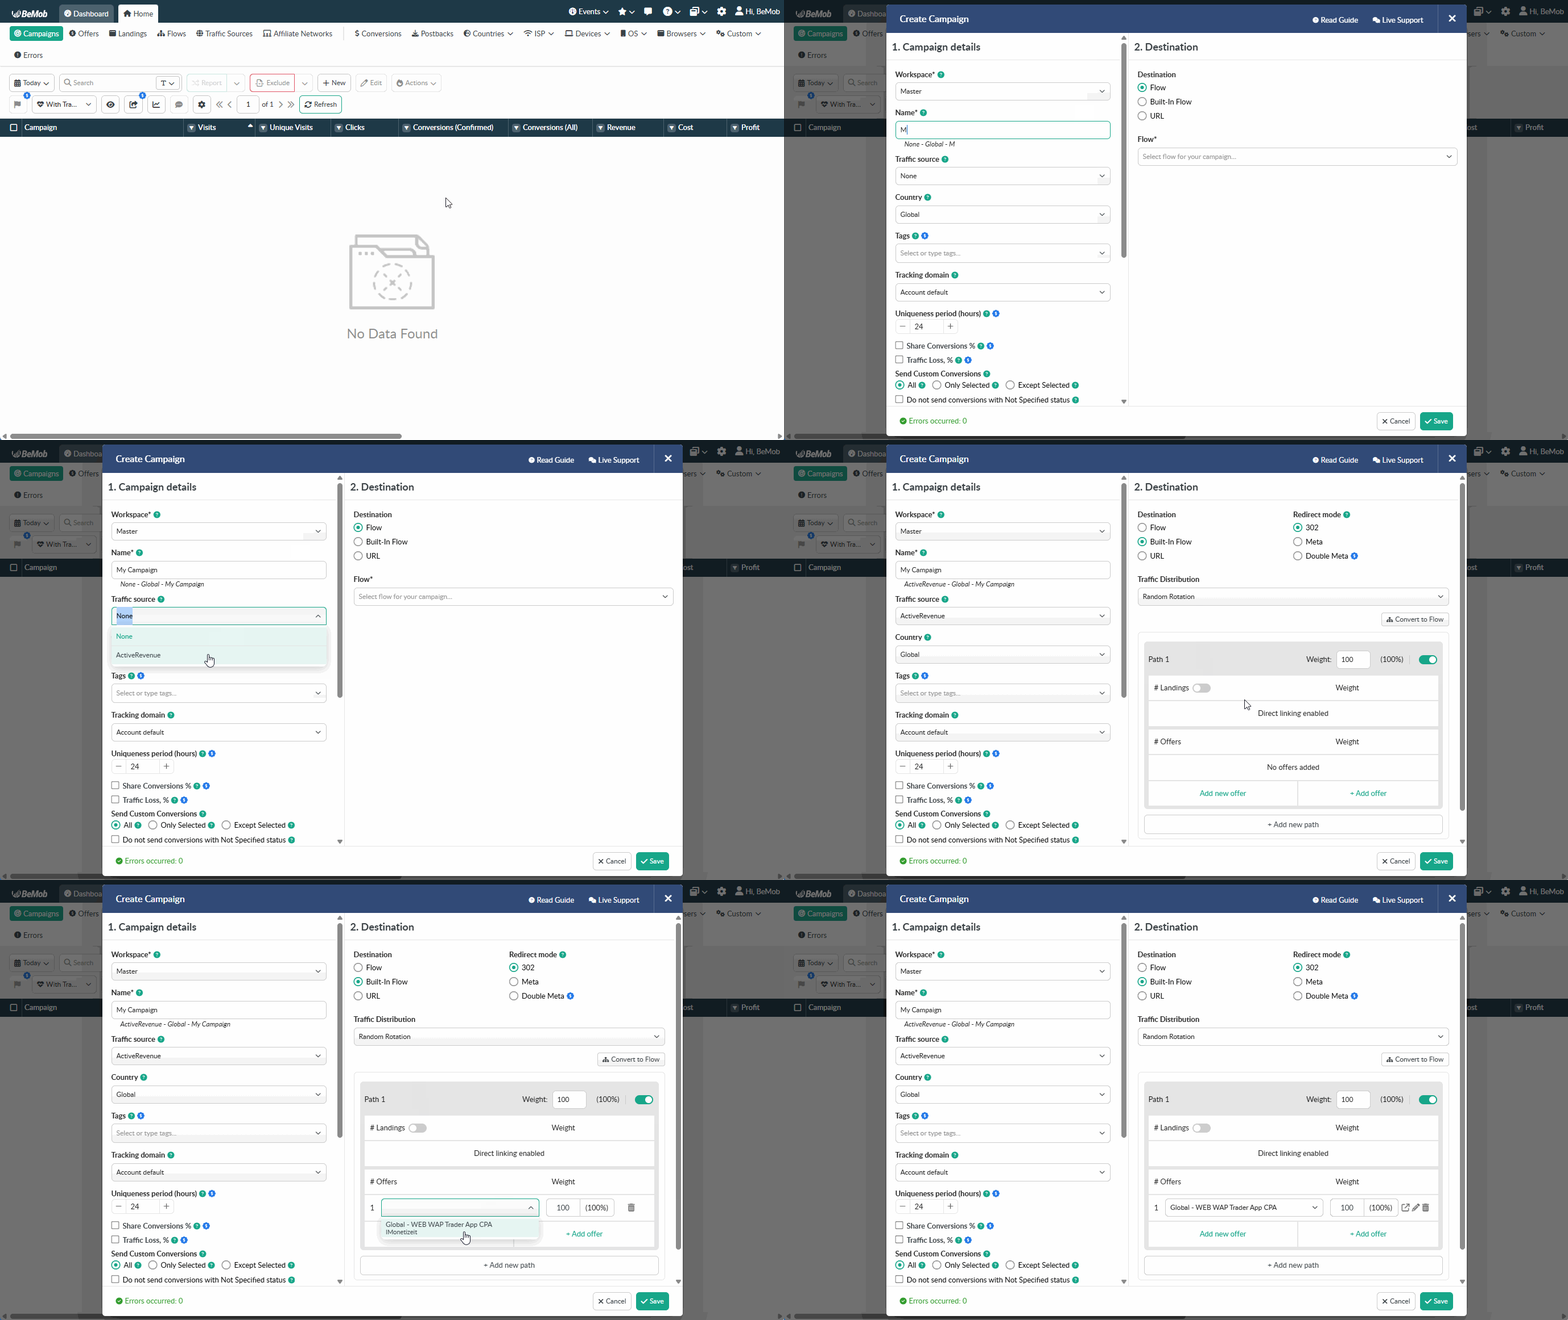
5. Create a campaign without a landing page.
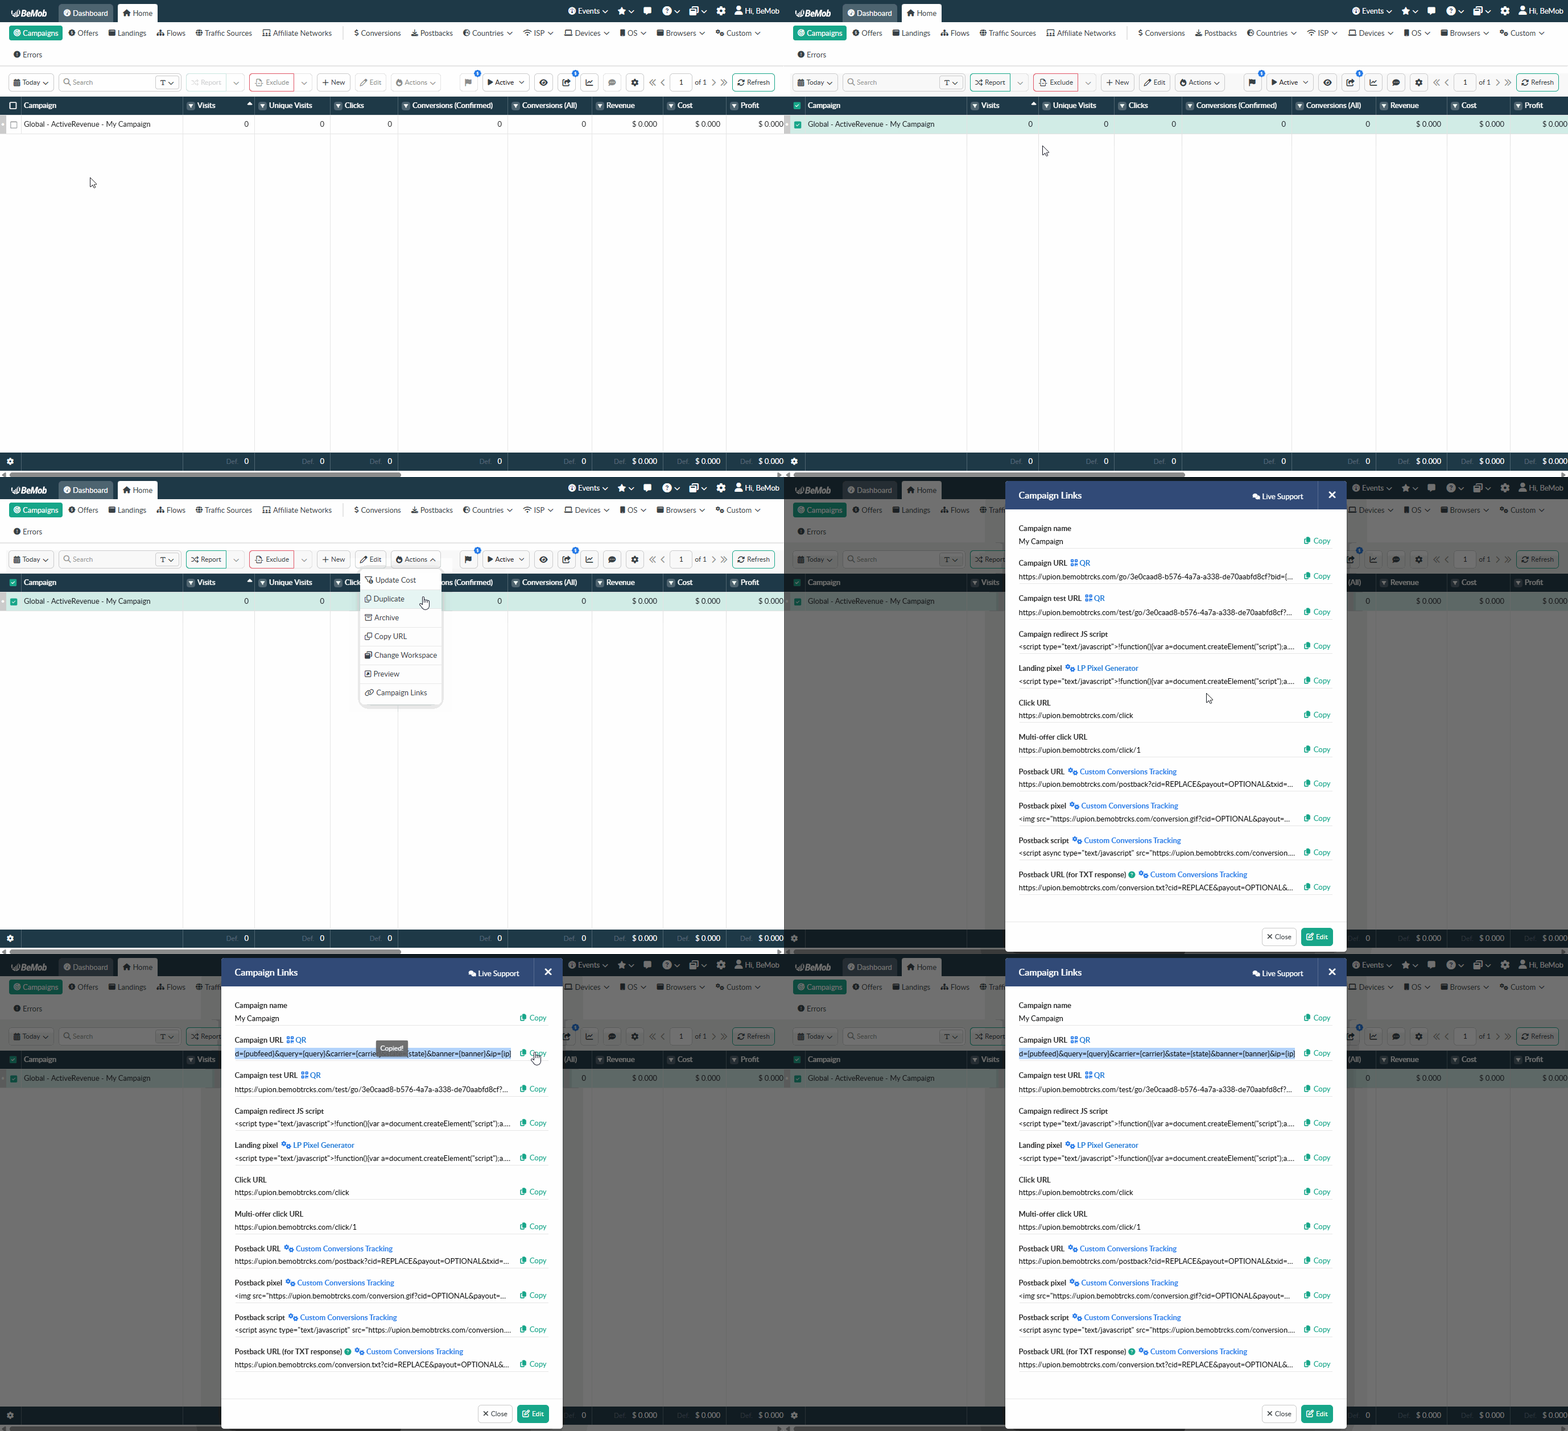
6. Place the BeMob Campaign URL in your traffic source.
7. Test a visit and a conversion before launching traffic.
❗️Do not use the Campaign Test URL for this test, as events generated through the Campaign Test URL are not registered in BeMob.
💡 For detailed instructions on how to perform a conversion test in BeMob, see our Conversion Test guide.
¶ Important
Use the BeMob Campaign URL only in the traffic source.
Do not place an affiliate offer URL directly in the traffic source, otherwise BeMob will not register the visit and will not be able to attribute conversions.
¶ Affiliate Offer With a Landing Page
Choose this scenario when you use a pre-lander, advertorial, quiz, product page or another landing page before the visitor reaches an affiliate offer.
¶ Typical flow

BeMob records the initial visit, opens your landing page and then tracks the visitor's click on a call-to-action button. The click is redirected to the affiliate offer and the click ID remains available for conversion attribution.
¶ Best for
- Pre-landers, advertorials and quiz funnels
- Campaigns with several CTA buttons
- Split tests between landing pages or offers
- Funnels where you need to analyze both visits and clicks
¶ You need
- A landing page URL or landing-page files hosted on your side
- An affiliate offer URL
- A traffic source
- An affiliate-network postback
- A BeMob Click URL for every button that sends visitors to the offer
¶ What you will configure
1. Add your traffic source and its available macros.
2. Add the affiliate network and its postback settings.
3. Add the offer URL.
4. Add the postback to the affiliate network.
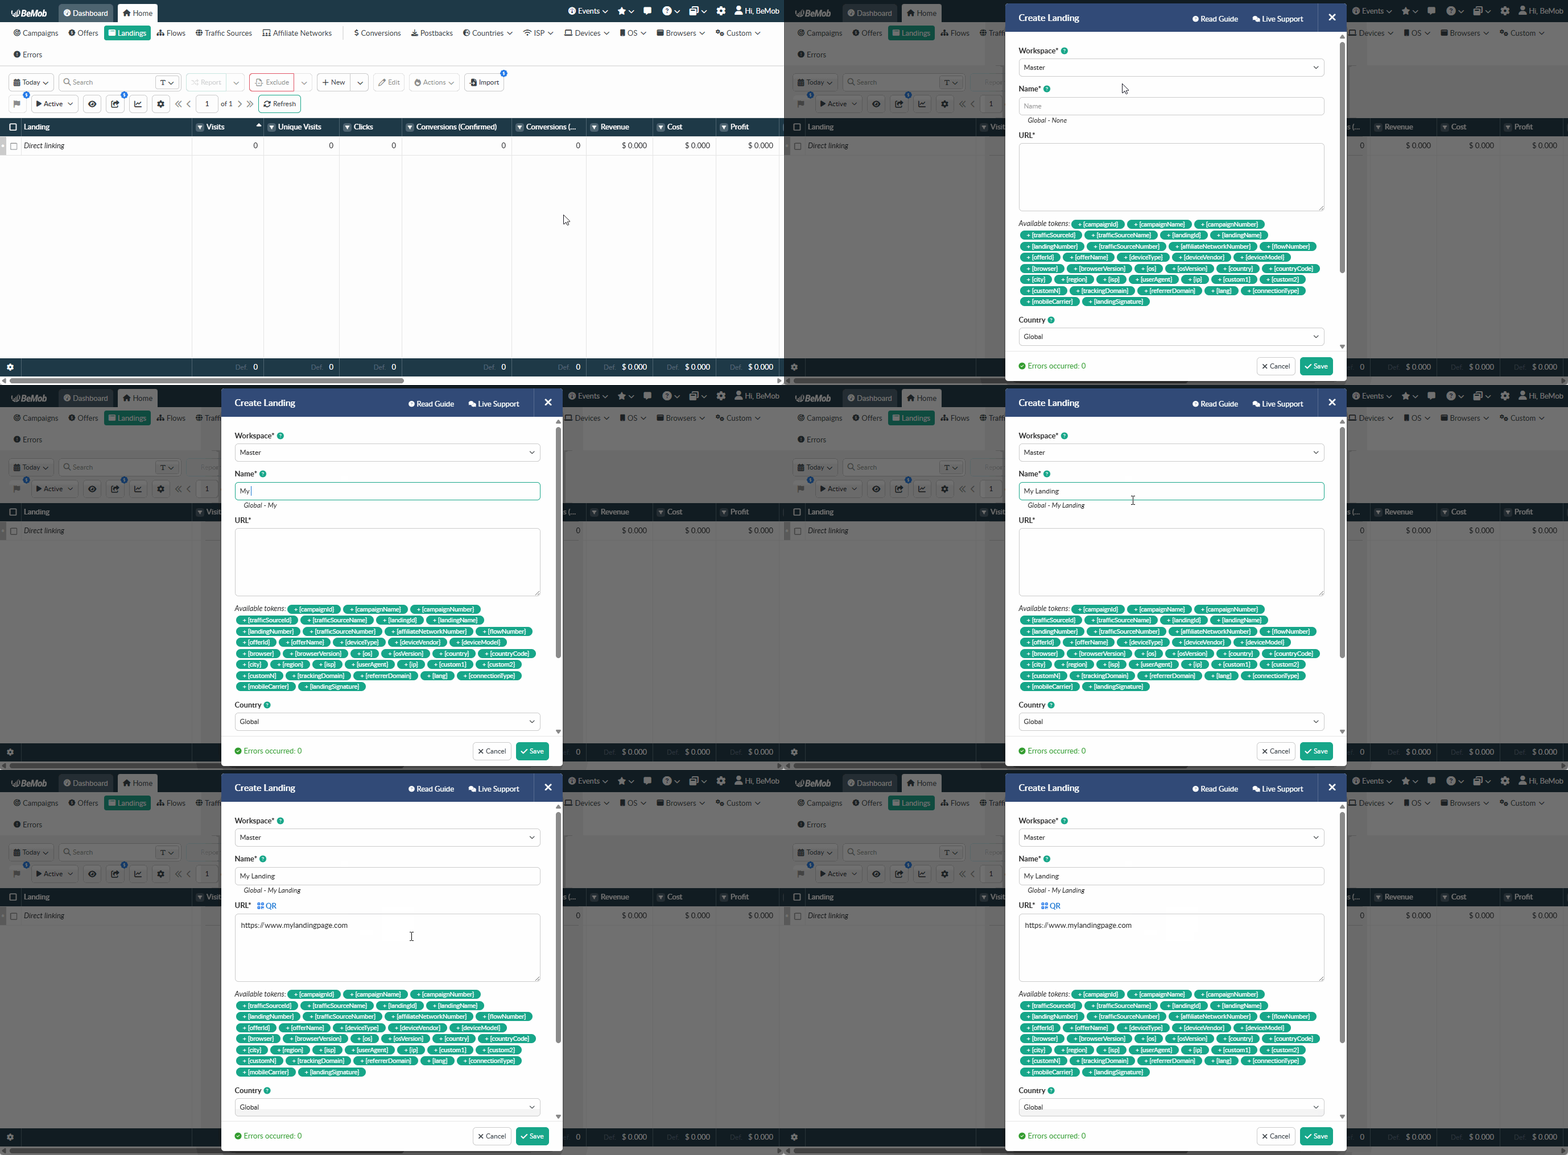
5. Add your landing page URL.
6. Create a campaign with the landing page and offer in its flow.
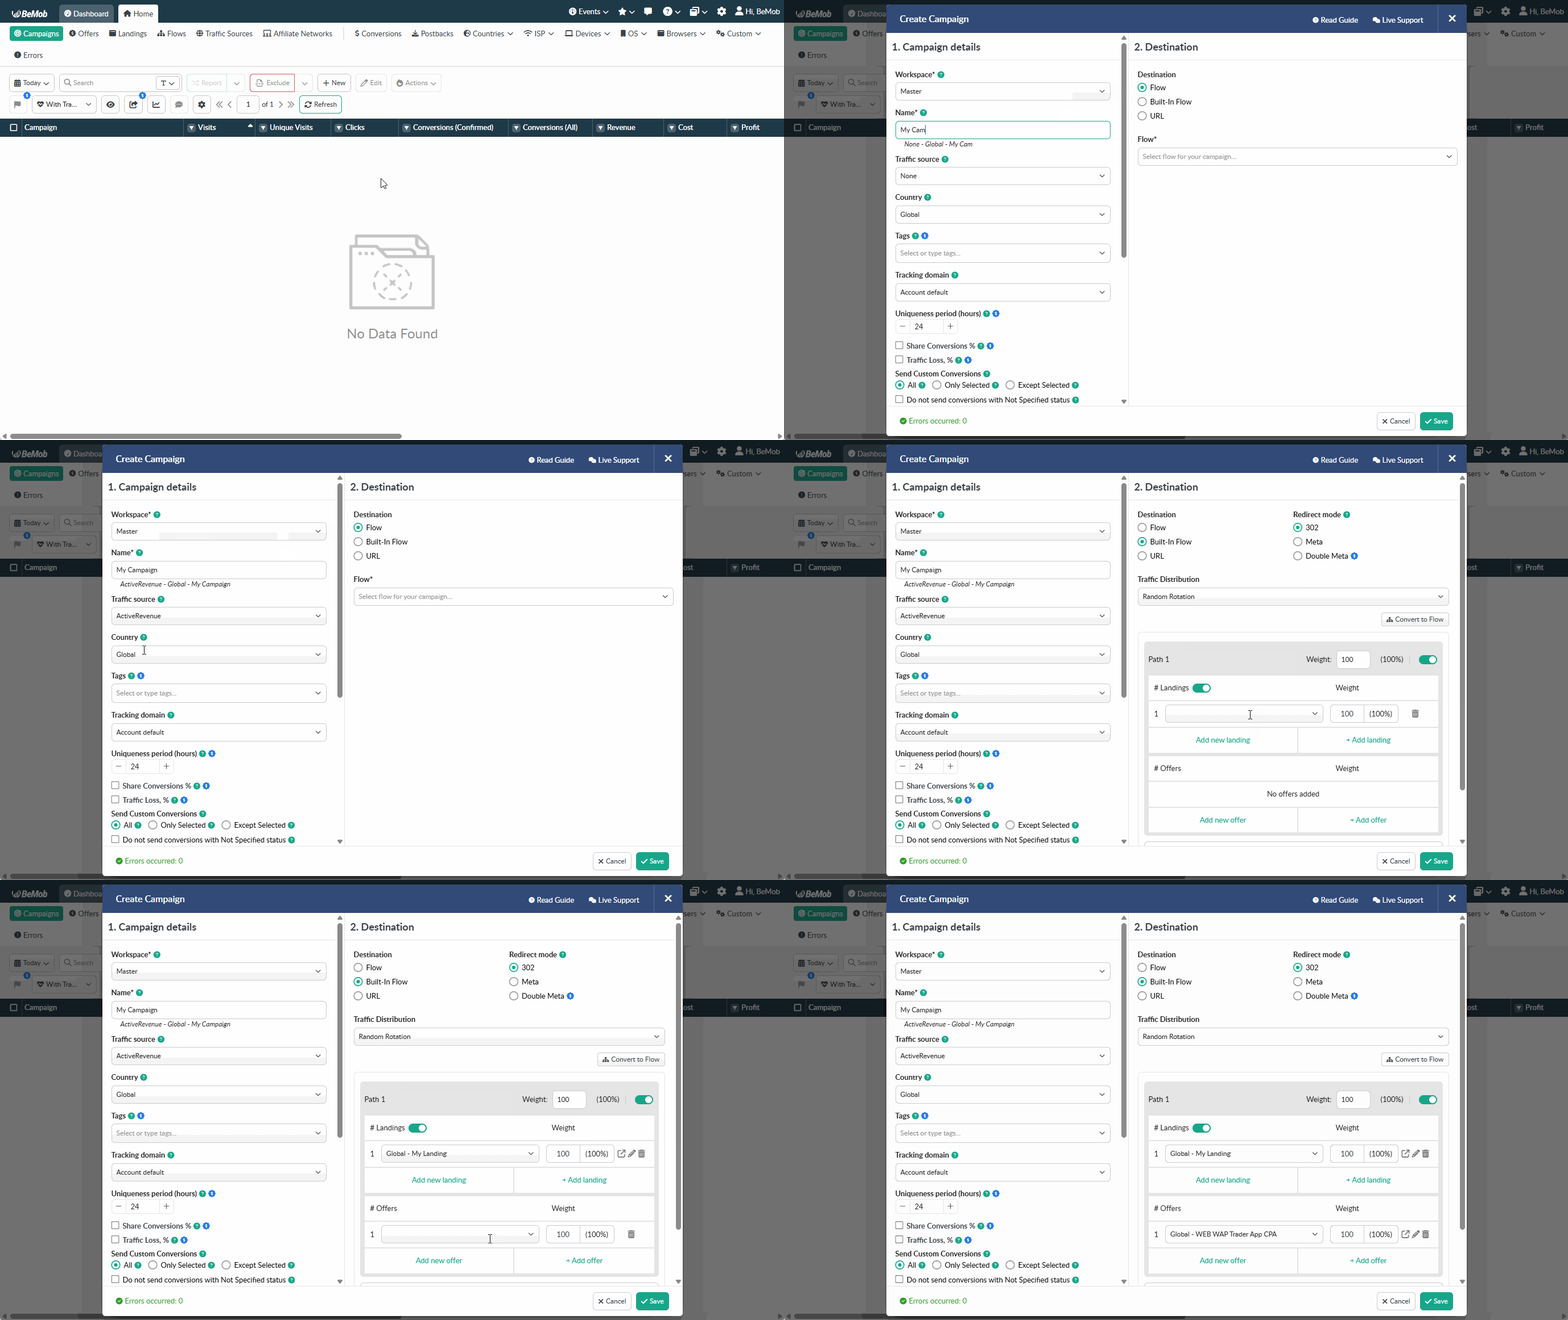
7. Add a BeMob Click URL to each CTA button on the landing page.
💡 For detailed instructions on how to set the Click URL, see our Click URL settings guide.
8. Test the full path: visit, landing-page click and conversion.
❗️Do not use the Campaign Test URL for this test, as events generated through the Campaign Test URL are not registered in BeMob.
💡 For detailed instructions on how to perform a conversion test in BeMob, see our Conversion Test guide.
¶ Important
Every CTA that leads to the affiliate offer must use a BeMob Click URL. A regular direct offer link bypasses click tracking and can cause incomplete attribution.
If your landing page has several buttons or multiple offer paths, create and test each tracking link separately.
¶ Own Website or Online Store
Choose this scenario when you own the website where the conversion happens, for example an online store, SaaS product, registration flow, booking website or lead-generation form.
¶ Typical flow

You need to pass the BeMob click ID to your website and return it to BeMob when the visitor completes a purchase, registration or another target action.
¶ Best for
- Ecommerce and online stores
- Own lead forms
- SaaS registrations and subscriptions
- Booking systems
- Websites with several conversion events
¶ Recommended conversion method
Use an S2S postback when your backend can store the click ID and send the conversion after the action is confirmed. This is the most reliable option for purchases and server-side events.
A Conversion Pixel can be used when a server-side implementation is not available. Place it on the final Thank You or Order Success page - not on the landing page or product page.
¶ You need
- A website or store that you can edit
- A way to pass the BeMob
{clickId}to your website, usually as cid - A way to store the
ciduntil the conversion happens - A Conversion Pixel (S2S postback is a more reliable method)
- A unique transaction ID for purchases, where available
¶ What you will configure
1. Add your traffic source and its available macros.
2. Set your website as an offer in BeMob.
3. Specify {clickId} in your website link on the side of BeMob.
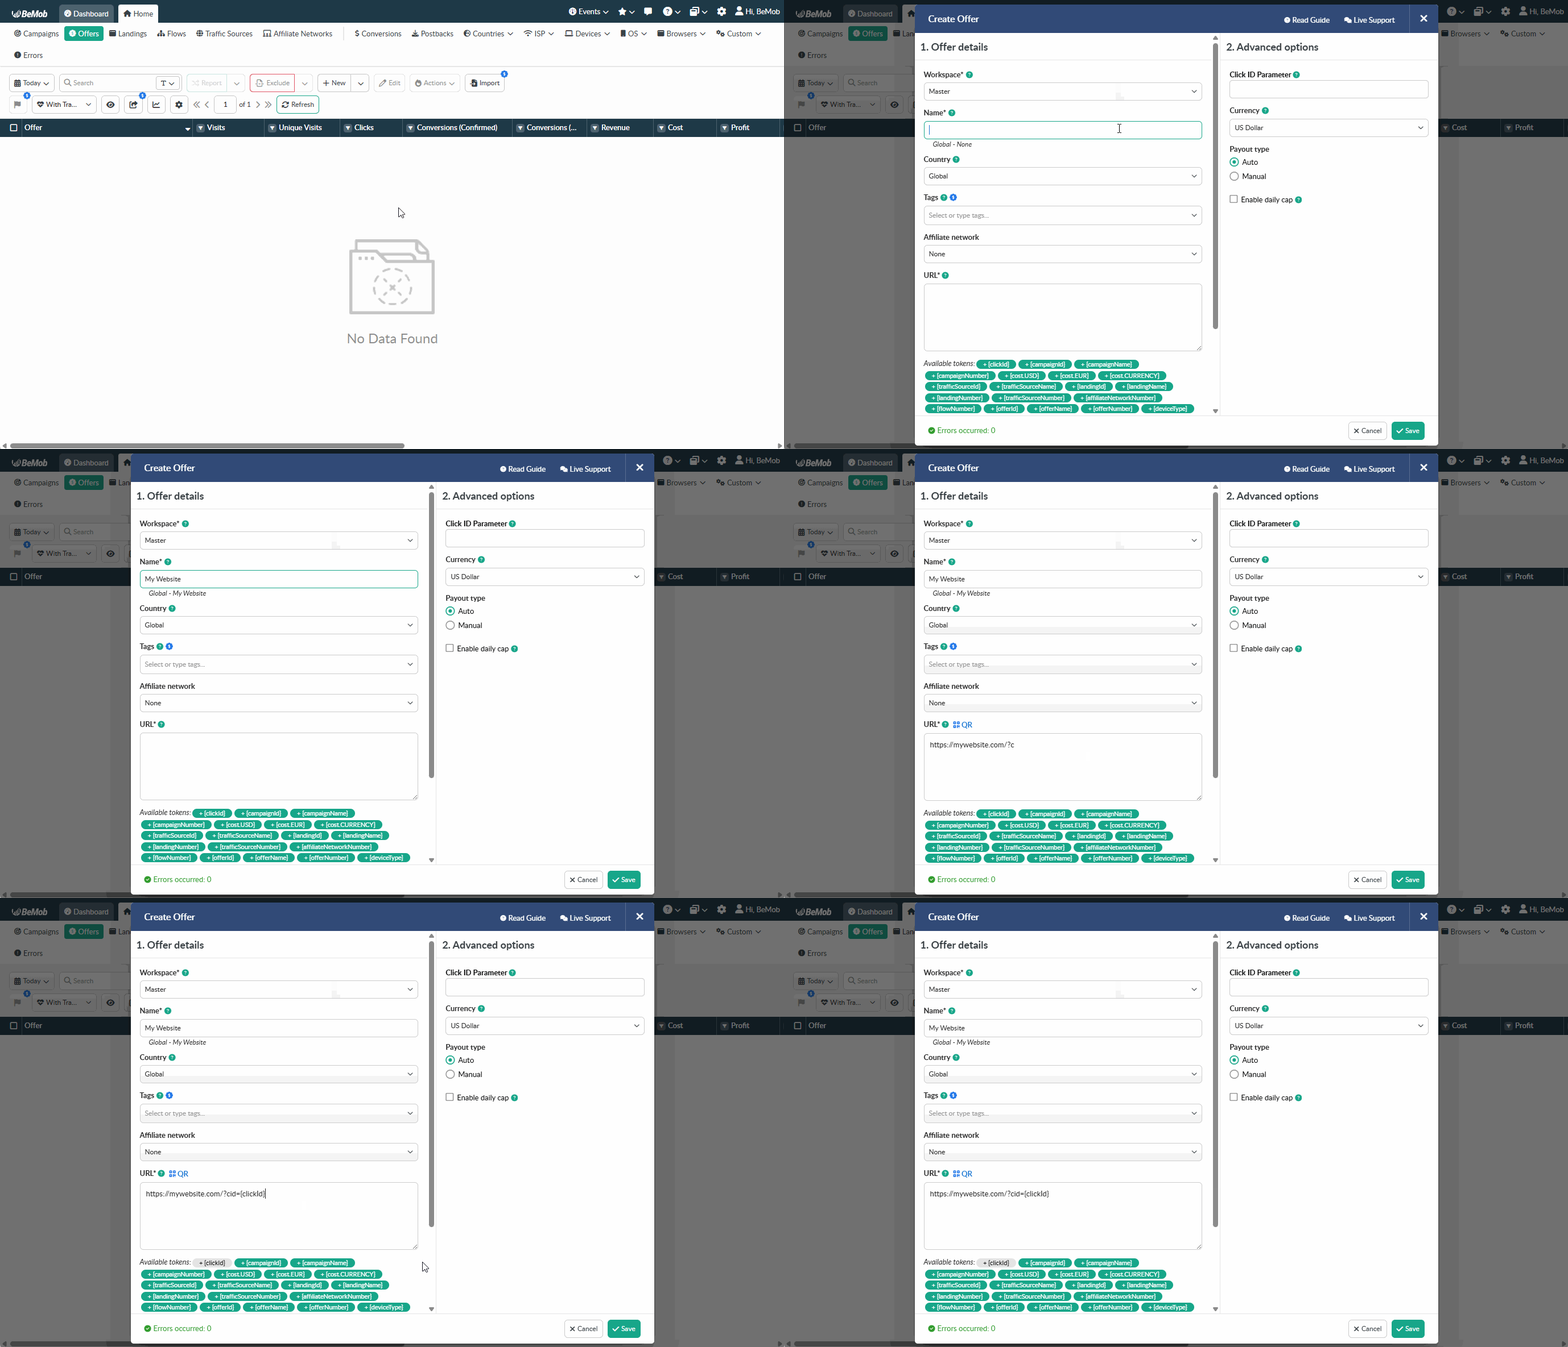
4. Create a campaign with your website in its flow.
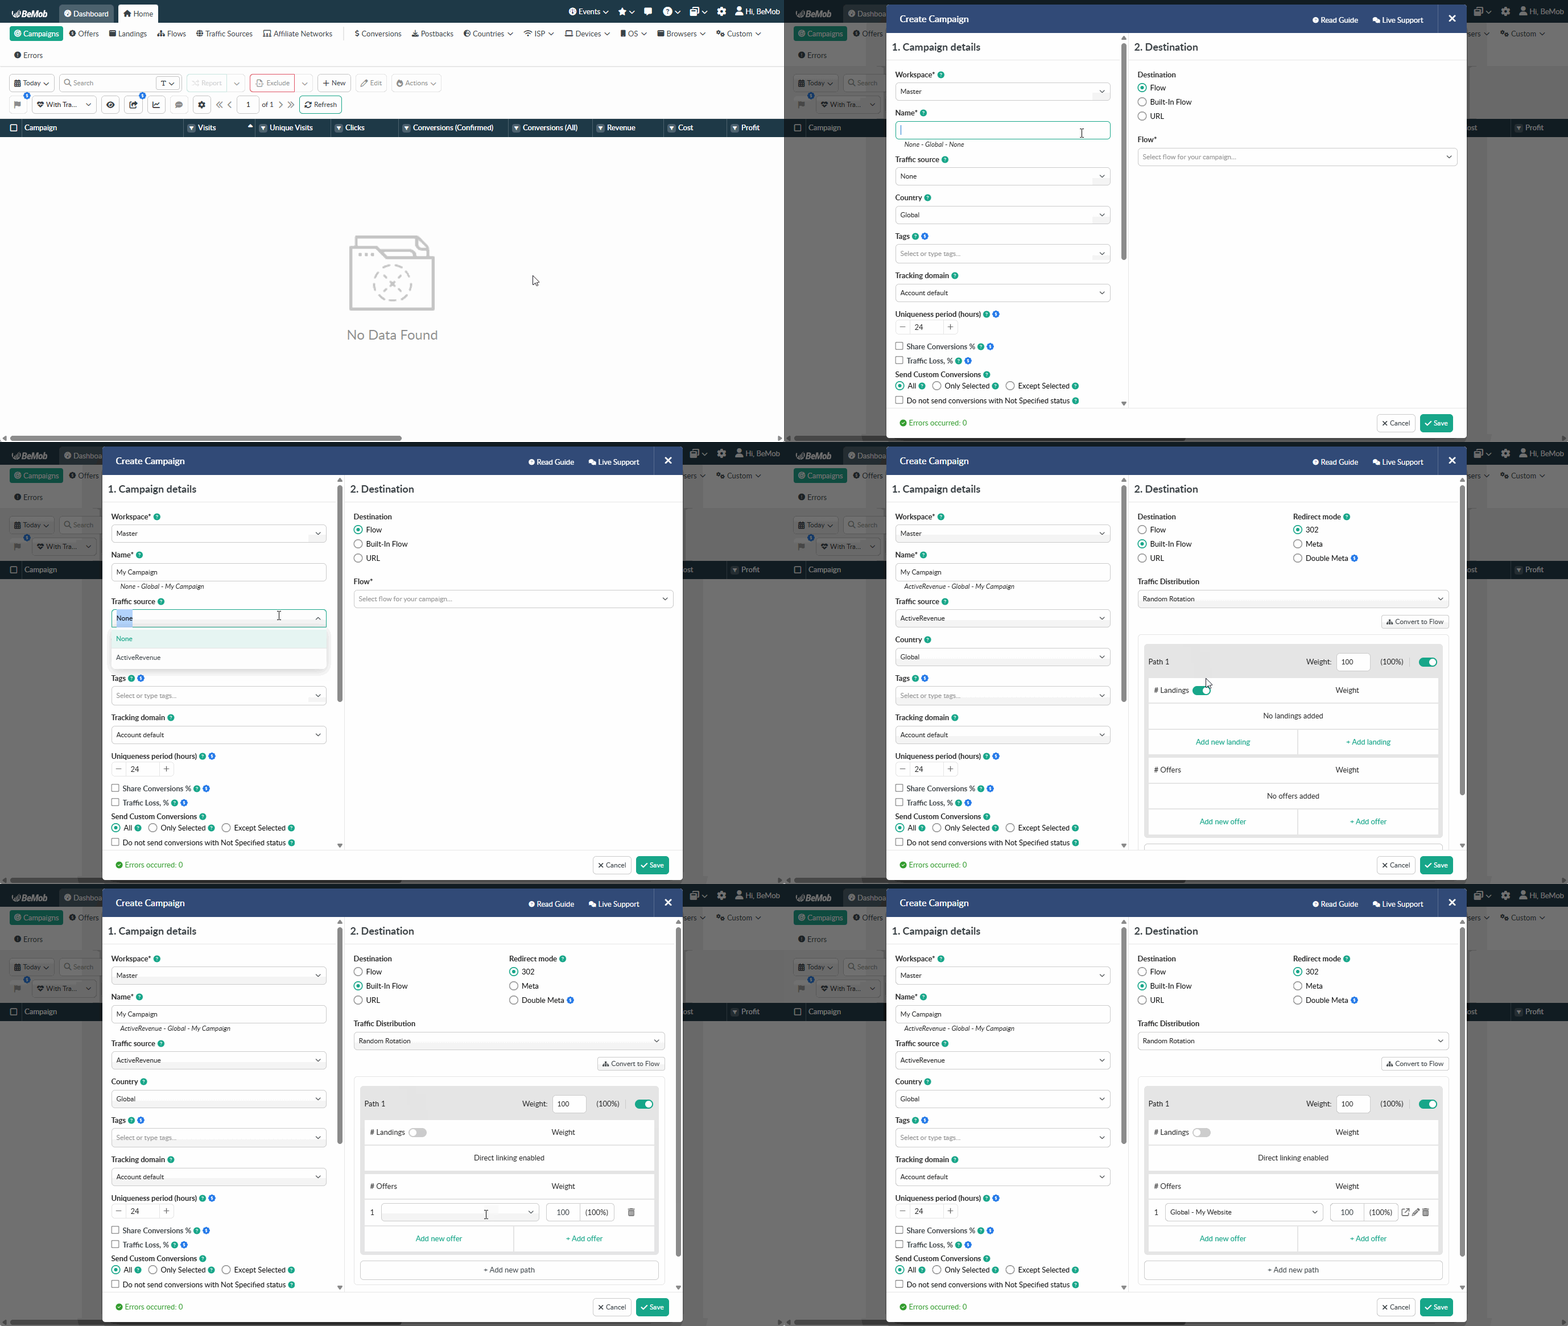
5. Save the cid in your website session, cookie, database or order record.
6. Send the cid back to BeMob after the conversion.
7. Include payout, revenue, transaction ID or custom event data if needed.
8. Test a complete visit-to-conversion path before sending live traffic.
❗️Do not use the Campaign Test URL for this test, as events generated through the Campaign Test URL are not registered in BeMob.
💡 For detailed instructions on how to perform a conversion test in BeMob, see our Conversion Test guide.
¶ Important
Do not hard-code a click ID or test the postback by opening it directly in a browser. A conversion can be attributed only when BeMob has first registered a valid visit with the same click ID.
For purchase tracking, send a unique transaction ID to prevent duplicate conversions or set the custom conversions tracking.
¶ Direct Tracking For Strict Ad Platforms
Choose this scenario when an advertising platform does not allow redirect links, requires the final URL to stay on your domain, or restricts third-party tracking URLs (Facebook, Google Ads, Bing)
¶ Typical flow

With Direct Tracking, the visitor opens your landing page directly instead of passing through a BeMob redirect. BeMob records the visit through an LP Pixel placed on the landing page.
When the visitor clicks a CTA, BeMob can also track the outgoing click and pass the click ID to the next destination.
¶ Best for
- Platforms with strict redirect policies
- Google, Facebook and other platforms where final-URL compliance matters
- Campaigns that must keep the visitor on your own domain
- Landing pages where you control the page code
¶ You need
- A landing page on a domain you control
- Access to the landing page code
- An LP Pixel and CTA URL generated in BeMob
- A conversion method: usually an S2S postback or Conversion Pixel
¶ What you will configure
1. Add your traffic source and its available macros.
2. Add the affiliate network and its postback settings.
3. Add the offer URL.
4. Add the postback to the affiliate network.
5. Add your landing page URL.
6. Create a campaign with the landing page and offer in its flow.
7. Add the LP Pixel to the code of your landing page.
8. Replace every outbound CTA with BeMob CTA URL.
💡 For detailed instructions on how to set the LP Pixel and CTA URL, check our Direct Tracking guide.
9. Test the visit, CTA click and conversion flow using your landing page URL.
💡 For detailed instructions on how to perform a conversion test in BeMob, see our Conversion Test guide.
¶ Important
The LP Pixel records the visit to the landing page, but it does not replace CTA tracking. If visitors click through to an offer or another destination, use the required CTA URL to track the click and connect it to the original visit.
Direct Tracking may provide less redirect-level control than a standard redirect campaign. The traffic distribution based on conditions (countries, browsers, IP, ISP etc.) will not be available for this tracking method.
¶ Tracking Multiple Conversion Types
Choose this scenario when a single visitor can generate multiple conversion types for the same offer, such as first-time deposits, leads, sales, or other conversion types.
¶ Typical flow

Multiple conversion types are tracked as Custom Conversions in BeMob. You can create separate custom conversions for different actions and track them from either an affiliate offer or your own website.
¶ Best for
- First-time deposit tracking
- Sales and purchase tracking
- Registration and signup tracking
- Affiliate offers with multiple conversion types
- Your own websites where different user actions need to be tracked separately
¶ You need
- A traffic source
- An affiliate offer or your own website
- For affiliate offers: a postback URL from BeMob configured in the affiliate network
- For your own website: a BeMob conversion pixel installed on your ‘thank you’ page
- Custom Conversions configured for the conversion events you want to track
¶ What you will configure
1. Add your traffic source and its available macros.
2. Add the affiliate network and its offer to BeMob.
If you use your own website, add its URL to BeMob instead.
3. Create Custom Conversions for the actions you want to track.
💡 For detailed instructions on how to set custom conversions tracking with BeMob, see our guide.
4. For an affiliate offer, add the BeMob postback URL to the affiliate network settings.
For your own website, add the Conversion Pixel to your ‘thank you’ page.
💡 For detailed instructions on how to use the Conversion Pixel for conversions tracking, check our Conversion Pixel guide.
5. Create a campaign and configure its flow.
6. Place the BeMob Campaign URL in your traffic source.
7. Test each conversion type before launching traffic.
❗️Do not use the Campaign Test URL for this test, as events generated through the Campaign Test URL are not registered in BeMob.
💡 For detailed instructions on how to perform a conversion test in BeMob, see our Conversion Test guide.
¶ Important
Set up each conversion type as a separate Custom Conversion in BeMob and make sure the corresponding conversion event is sent correctly.
For affiliate offers, conversions are sent to BeMob through the Postback URL. For your own websites, conversions can be sent through a Conversion Pixel.
Make sure the click ID is passed with each conversion so BeMob can attribute the conversion to the original visit.
¶ API-based Integration
Choose this scenario when your internal system, CRM, custom dashboard, automation tool or partner platform needs to exchange data with BeMob automatically.
The API is usually an addition to a standard tracking setup, not a replacement for it. You can still use Campaign URLs, LP Pixels and postbacks while using the API to manage objects or retrieve reporting data.
¶ Typical API use cases
- Create and update campaigns, offers, landing pages or traffic sources
- Retrieve reports and statistics automatically
- Update campaign costs
- Manage custom parameters and integrations
- Synchronize data with an internal system
- Automate bulk operations
- Receive or send event data through webhooks or server-side logic
¶ Best for
- Custom reporting dashboards
- Cost-update scripts
- CRM, BI and internal-platform integrations
- Bulk campaign management
- Advanced automated workflows
¶ You need
- A BeMob API key with the required access level
- A secure place to store the API key
- A developer or automation tool that can make HTTPS requests
- A clear mapping between your system fields and BeMob fields
- A test environment or a safe testing process before using production objects
¶ What you will configure
1. Create an API key with only the permissions your integration needs.
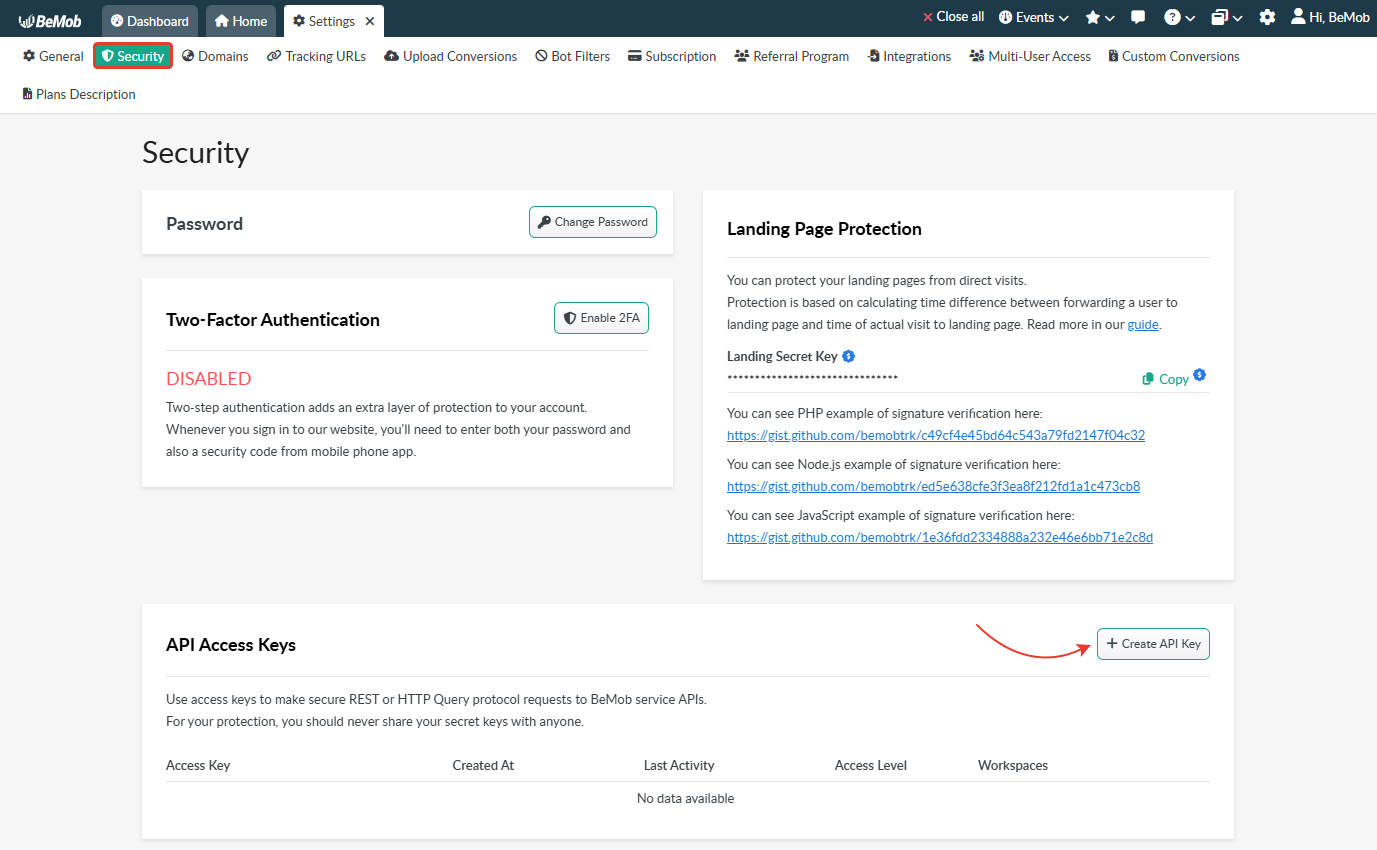
2. Read the API reference for authentication, endpoints, request formats and response codes.
3. Test requests with a limited set of non-critical objects.
4. Add error handling, retries and logging on your side.
5. Validate that the integration does not overwrite campaign settings or duplicate conversions.
6. Monitor API responses and update the integration when the API changelog changes.
¶ Important
Keep API keys private. Do not put them in public code repositories, browser-side scripts or shared documents.
If a third-party service only needs reports, use the minimum access level available. Review the permissions of each API key regularly, especially when access is given to contractors, external platforms or AI tools.
¶ Still not sure which scenario to choose?
Use these three questions:
- Can your traffic source use a redirect URL?
If yes, choose a standard affiliate or own-website scenario. If no, choose Direct Tracking. - Where does the conversion happen?
If it happens in an affiliate network, use an affiliate-offer scenario and configure the network postback. If it happens on your own website, pass the click ID to your website and send a server-side conversion postback or Conversion Pixel. - How many conversions are performed by the same client?
If each client can generate only one conversion, choose a standard conversion-tracking scenario. If the same client can generate multiple conversions, such as a first-time deposit, lead, sale, or several different actions, choose Tracking Multiple Conversions scenario and configure each conversion type as a Custom Conversion in BeMob.
After choosing a scenario, follow its setup guide from start to finish and test the complete conversion path before launching live traffic.
📩 Need help? Contact support via live chat or email at support@bemob.com