¶ Registration And Verification
The BeMob registration process is quick and straightforward, requiring just a few steps before you can start tracking your ad campaigns.
As BeMob is a cloud-based platform, so all you need to sign up is a device with an internet connection.
To create your BeMob account access the registration page https://panel.bemob.com/register
¶ Step 1: Create Your Account
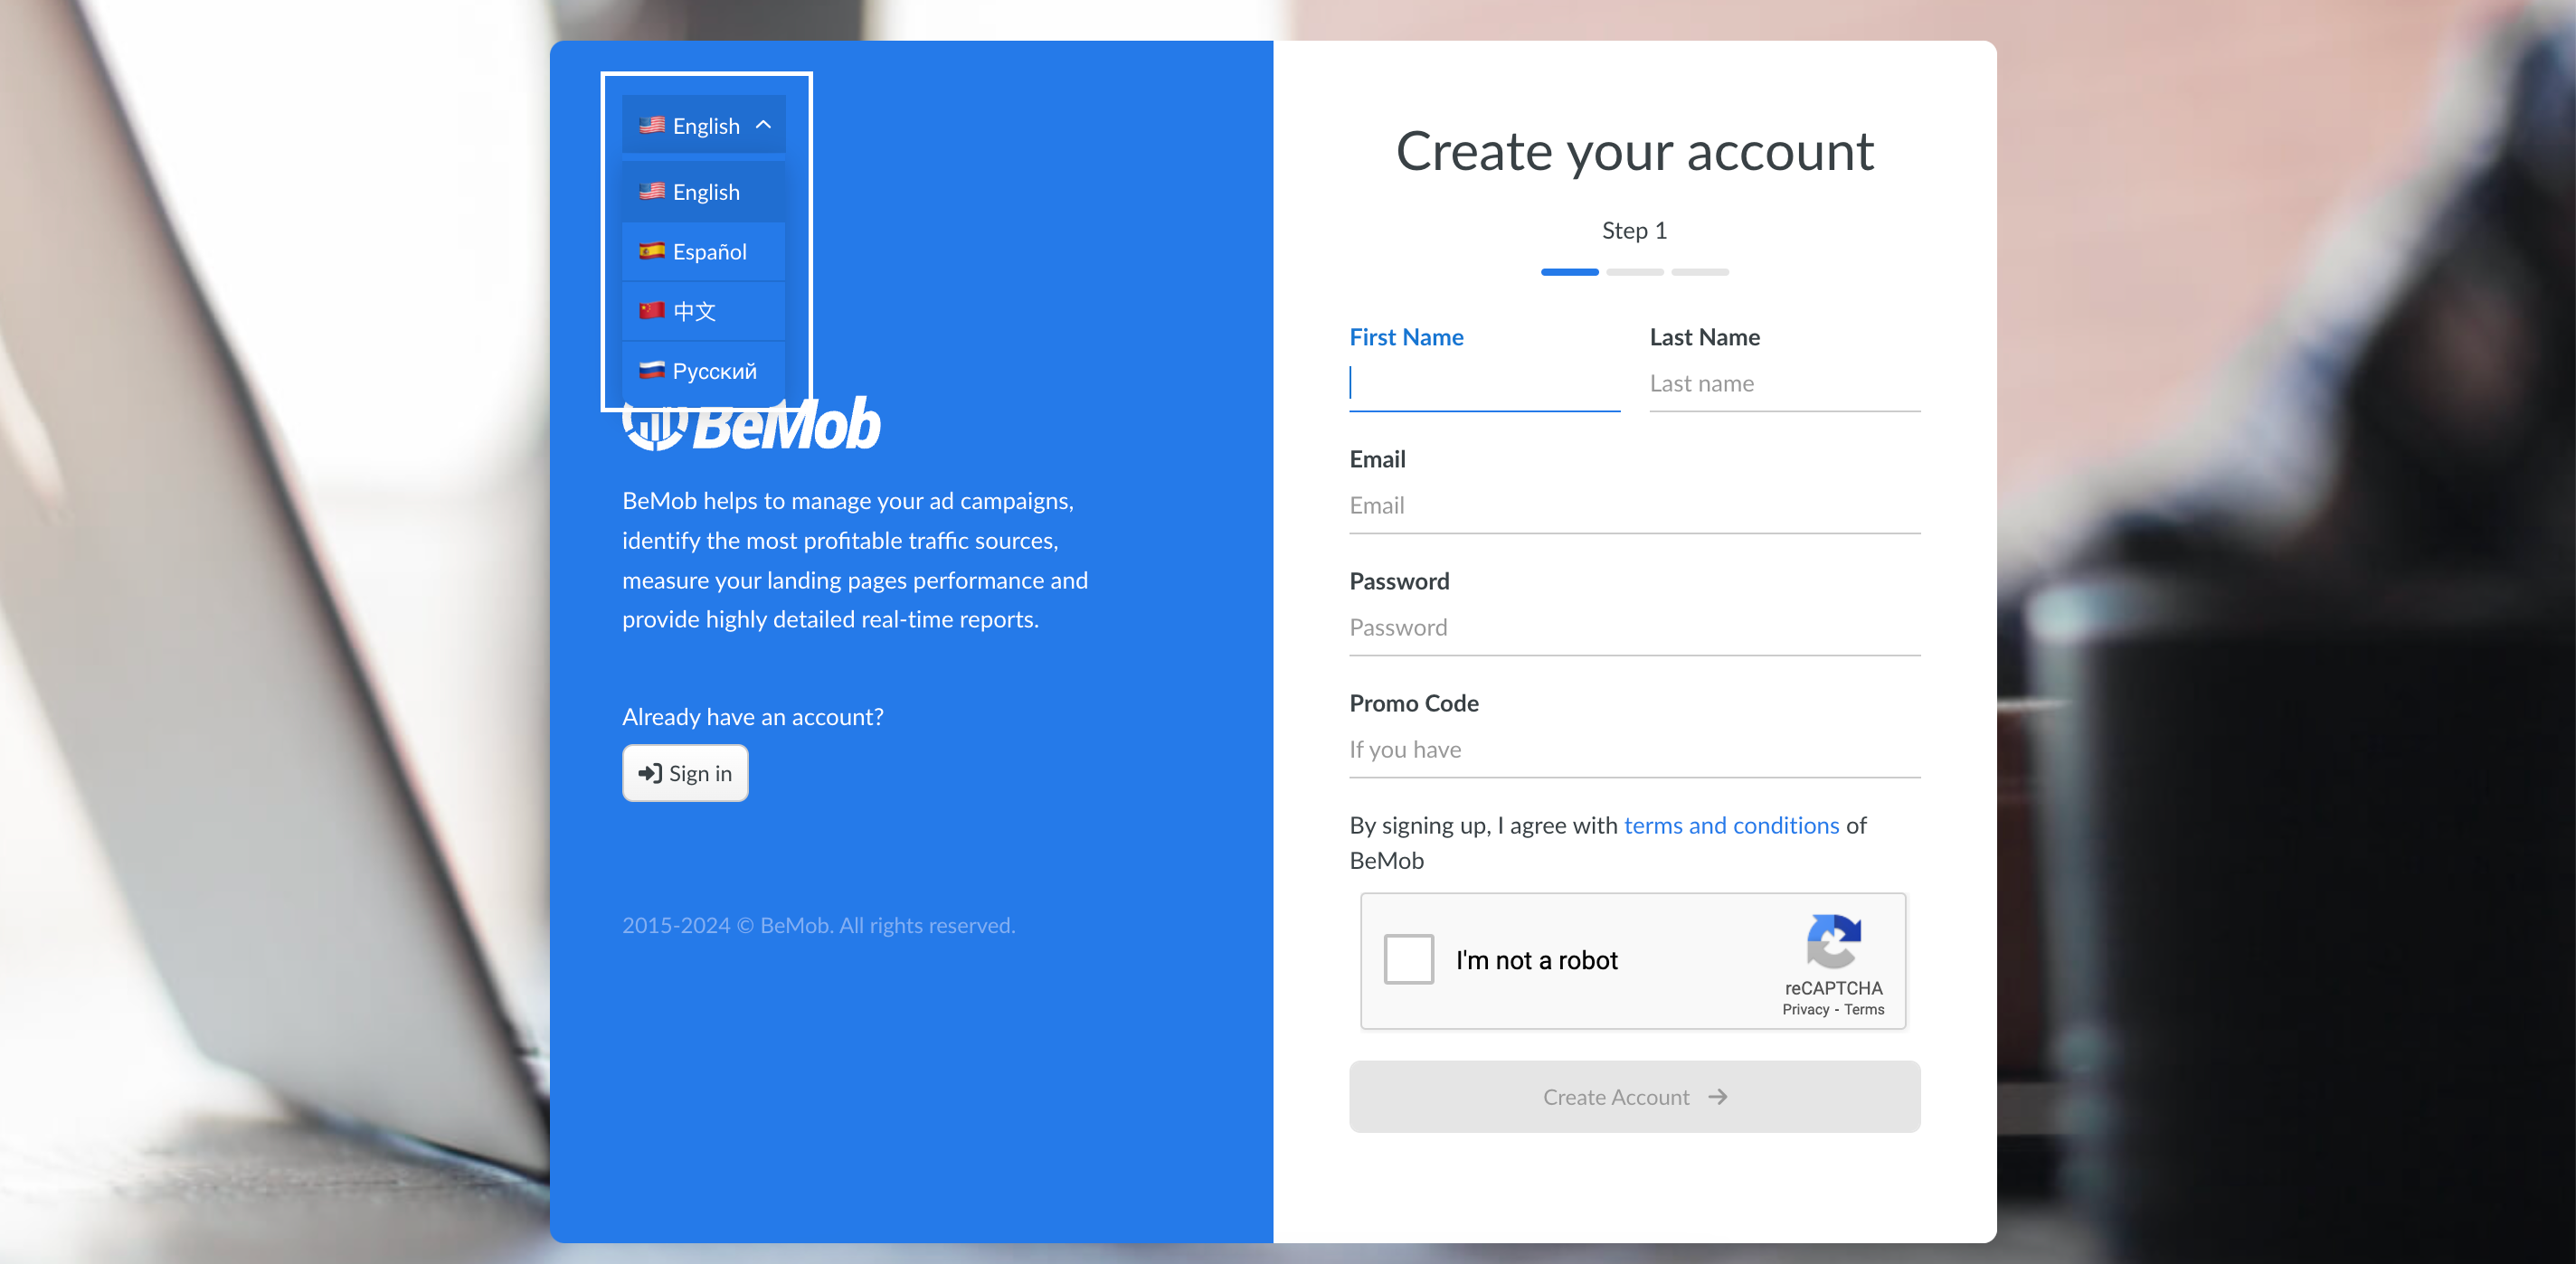
Once you access the registration page you can choose the language of the registration page if required. There are 4 options available: English, Spanish, Chinese and Russian.
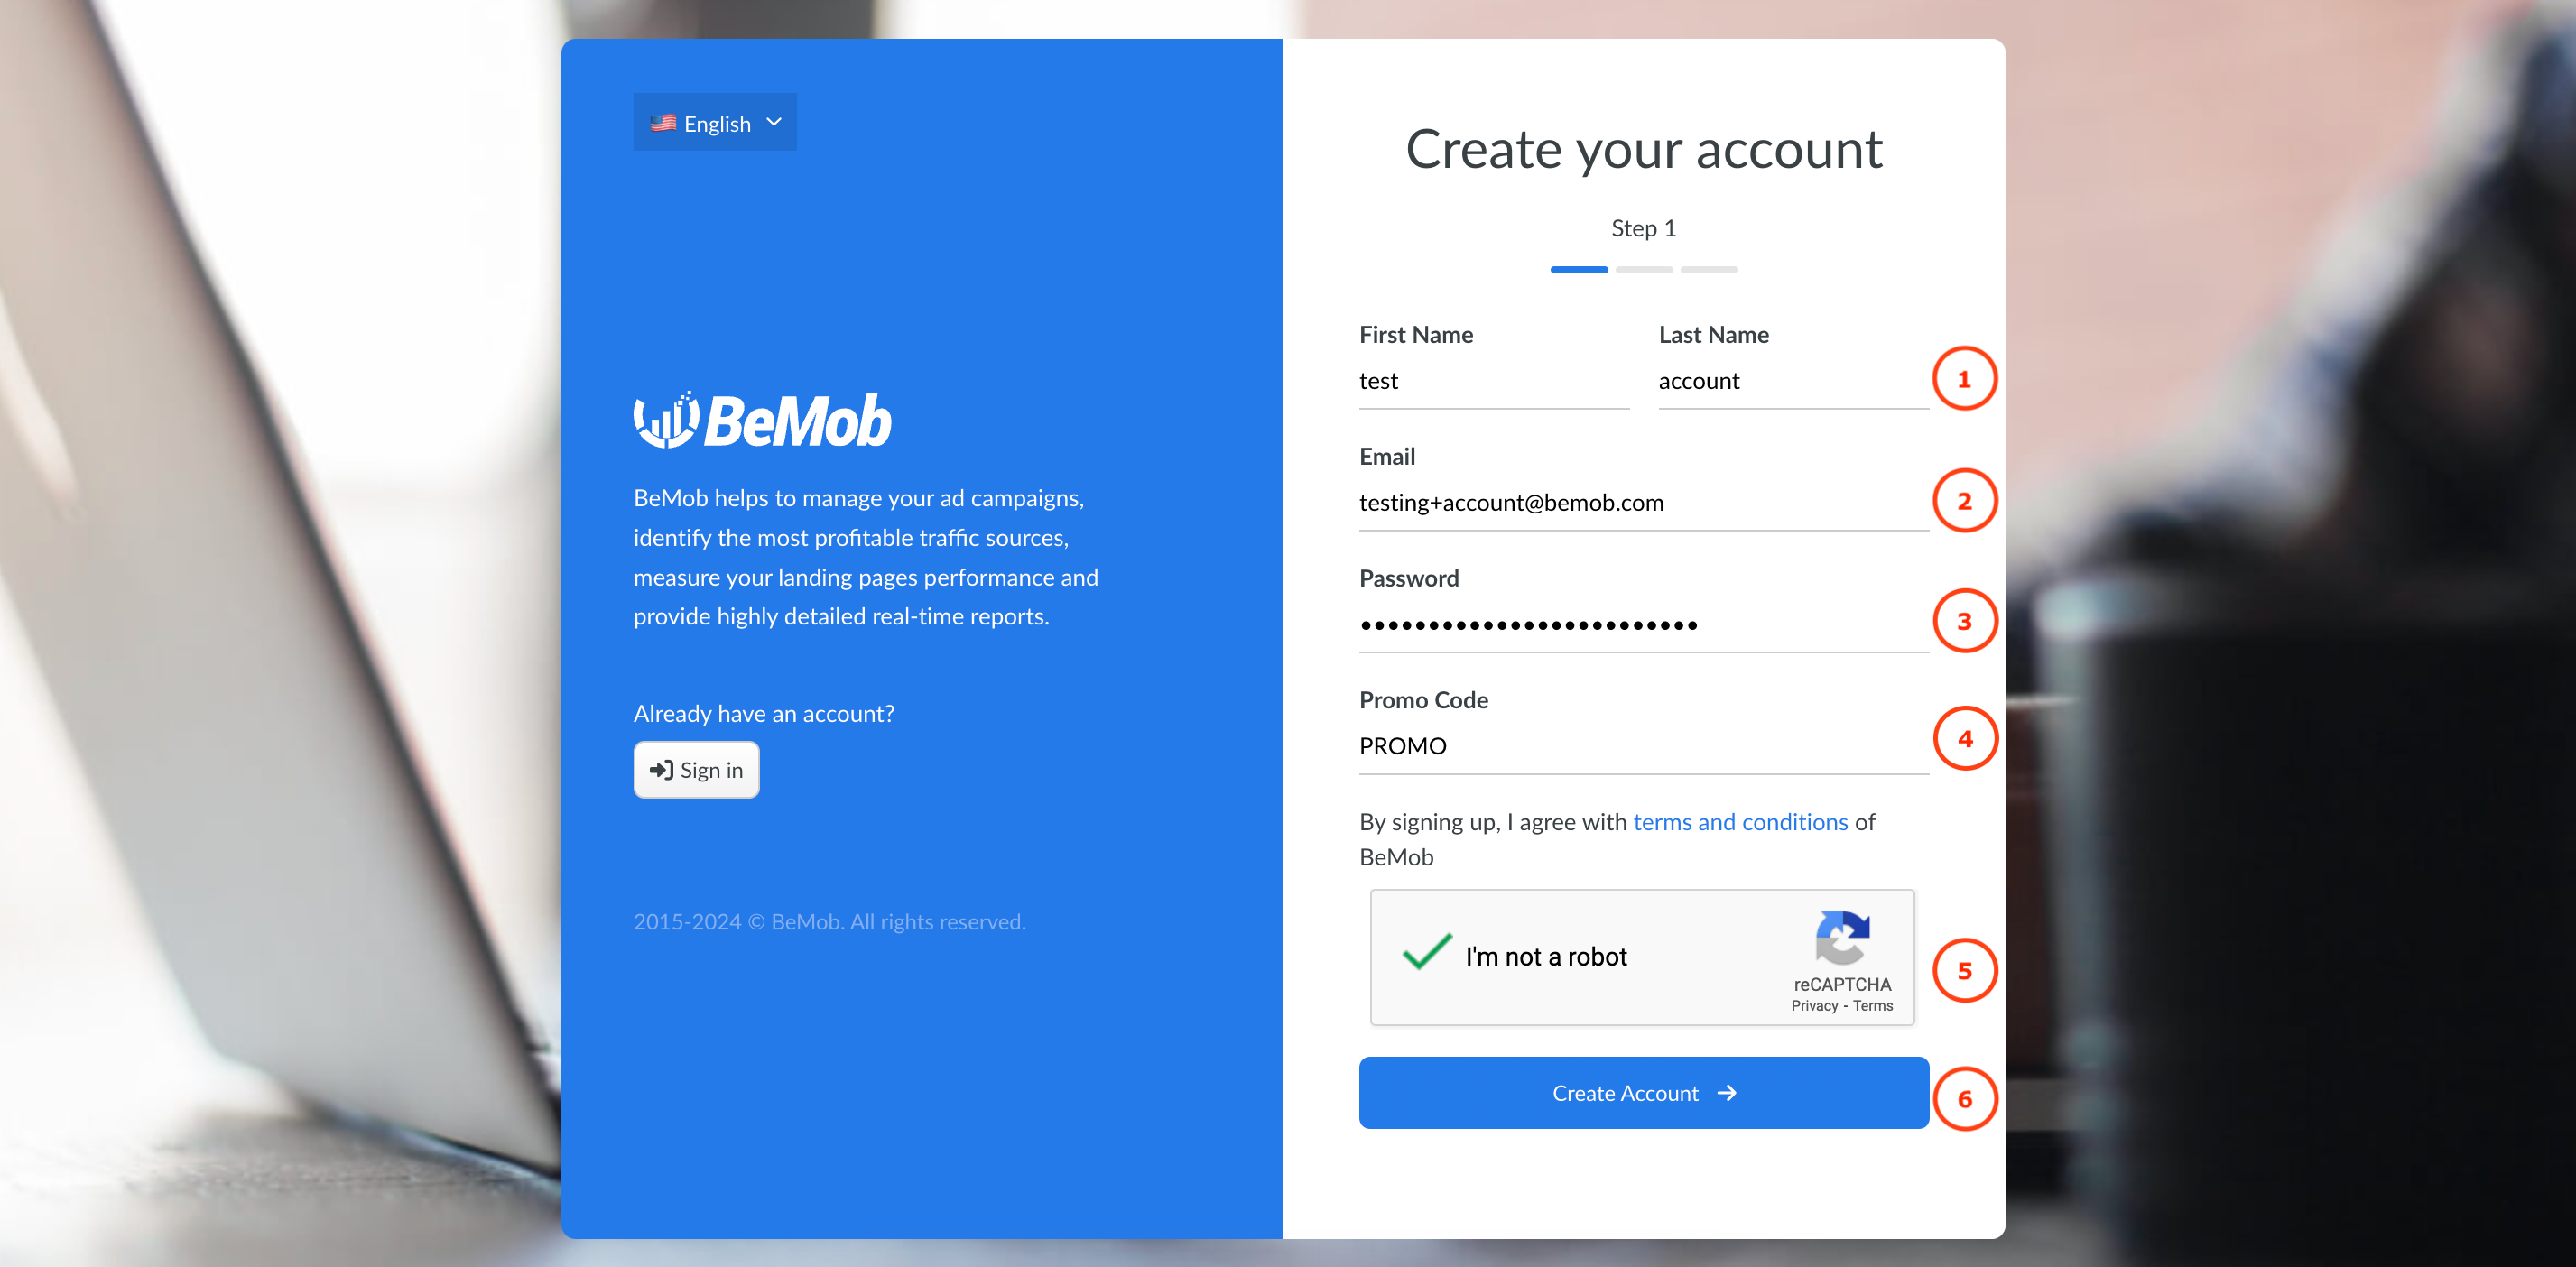
On the left side of the page the following details are required:
1. Your first and last names details. These fields are obligatory. Your first and last names will be visible in your BeMob account settings and invoices.
2. The email address you want to associate with the BeMob account. This field is obligatory.
Your email is required for the following actions:
- Password reset: To reset your account password if you forget it.
- Invoicing: To receive invoices if you upgrade to a paid plan.
- Usage notifications: To get notifications about event usage based on your plan.
- Onboarding tips: To receive helpful tips on how to get started with BeMob.
- Security alerts: To be warned if your account is accessed from a different location than where you originally signed up.
- Marketing communications: To receive news, updates, and discounts from BeMob and our partners once in a month. You can unsubscribe from this type of emails at any time. For updates on changes to the tracker, follow our changelog.
🛠 If you need to change the email specified in the process of registration after the account is created – contact our support team via live chat or at support@bemob.com
3. The password which will be used further for logging to BeMob account. This field is obligatory.
Your password should contain at least 8 charts. We also recommend to configure Two-factor Authentication for the security reasons.
4. Promo code. This field is not obligatory.
The promo code can be received from our partnering services: affiliate networks, traffic sources, forums, other affiliate services.
If you register using the affiliate link, the promo code field will be completed automatically. In case it remains empty, you can specify it manually.
Our promo code always consist of capital letters with no brackets or spaces, e.g. MOBIDEA or AFFLIFT25
The promo code value will be automatically applied to the subscription cost once you decide to switch the subscription to the paid plan.
You can specify only one promo code in this field.
💡 If you have no promo code, but wish to enjoy better terms with BeMob – contact our support team via live chat or at support@bemob.com
5. Click the I am not a robot checkbox. This is a mandatory action.
6. After all the required actions are performed the Create Account button will become active.
Click the button to go to Step 2.
¶ Step 2: Confirm Registration
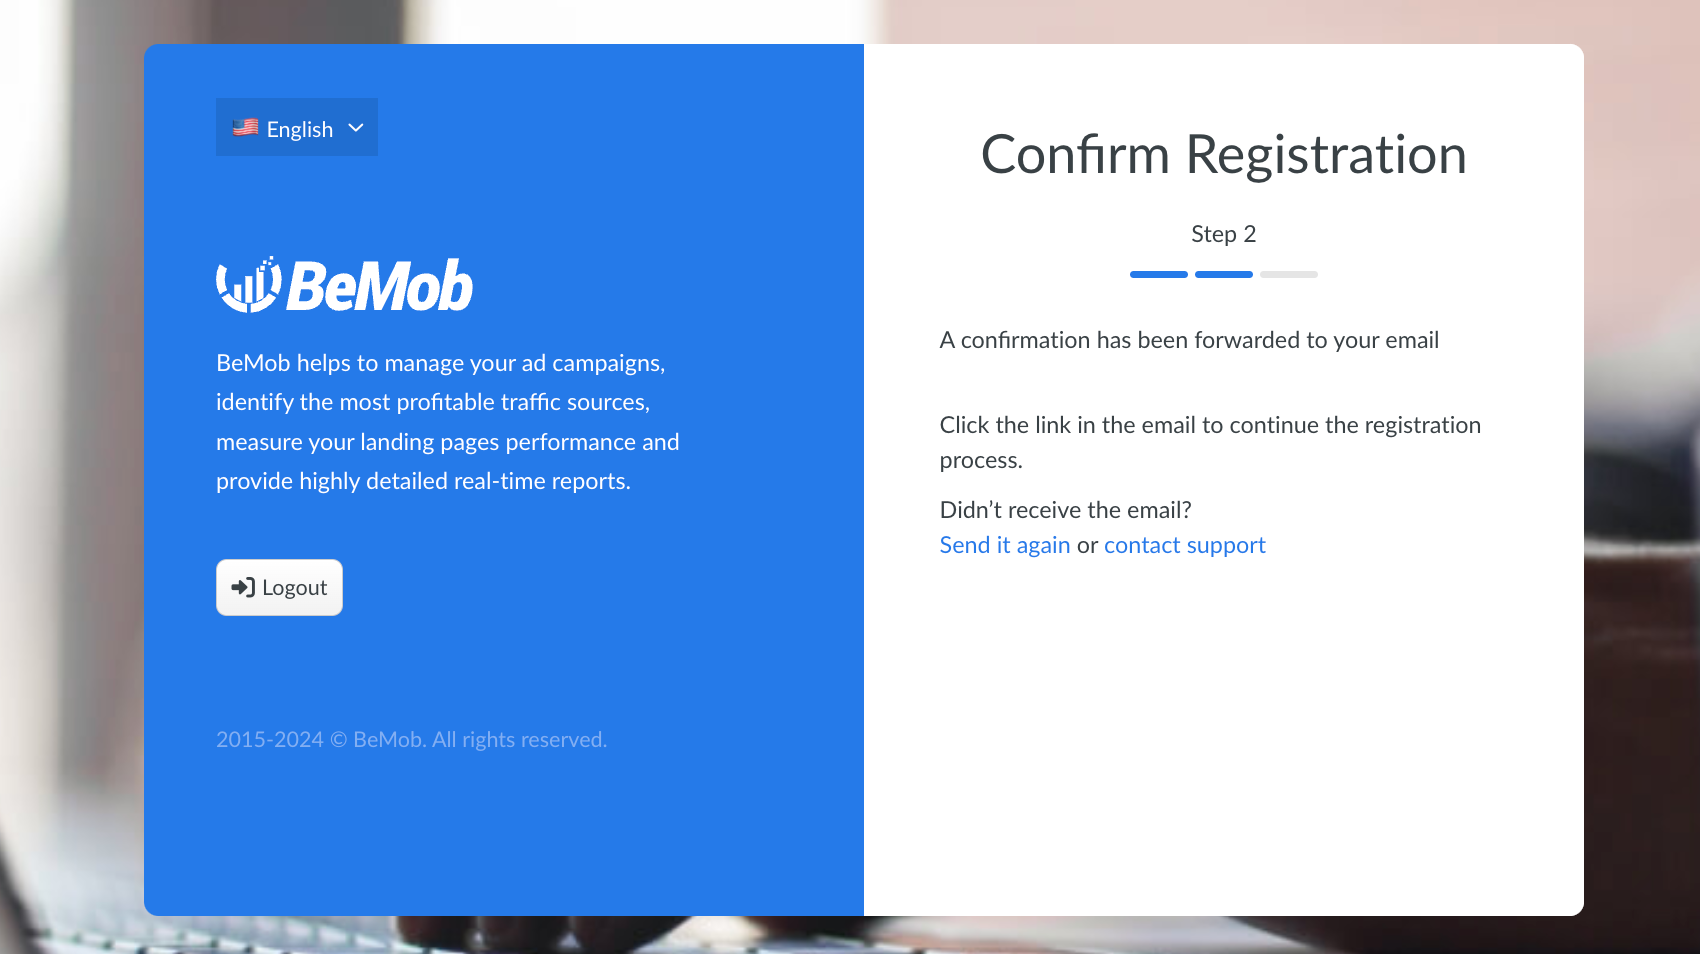
The confirmation of your registration will be sent to the email address specified in Step 1.
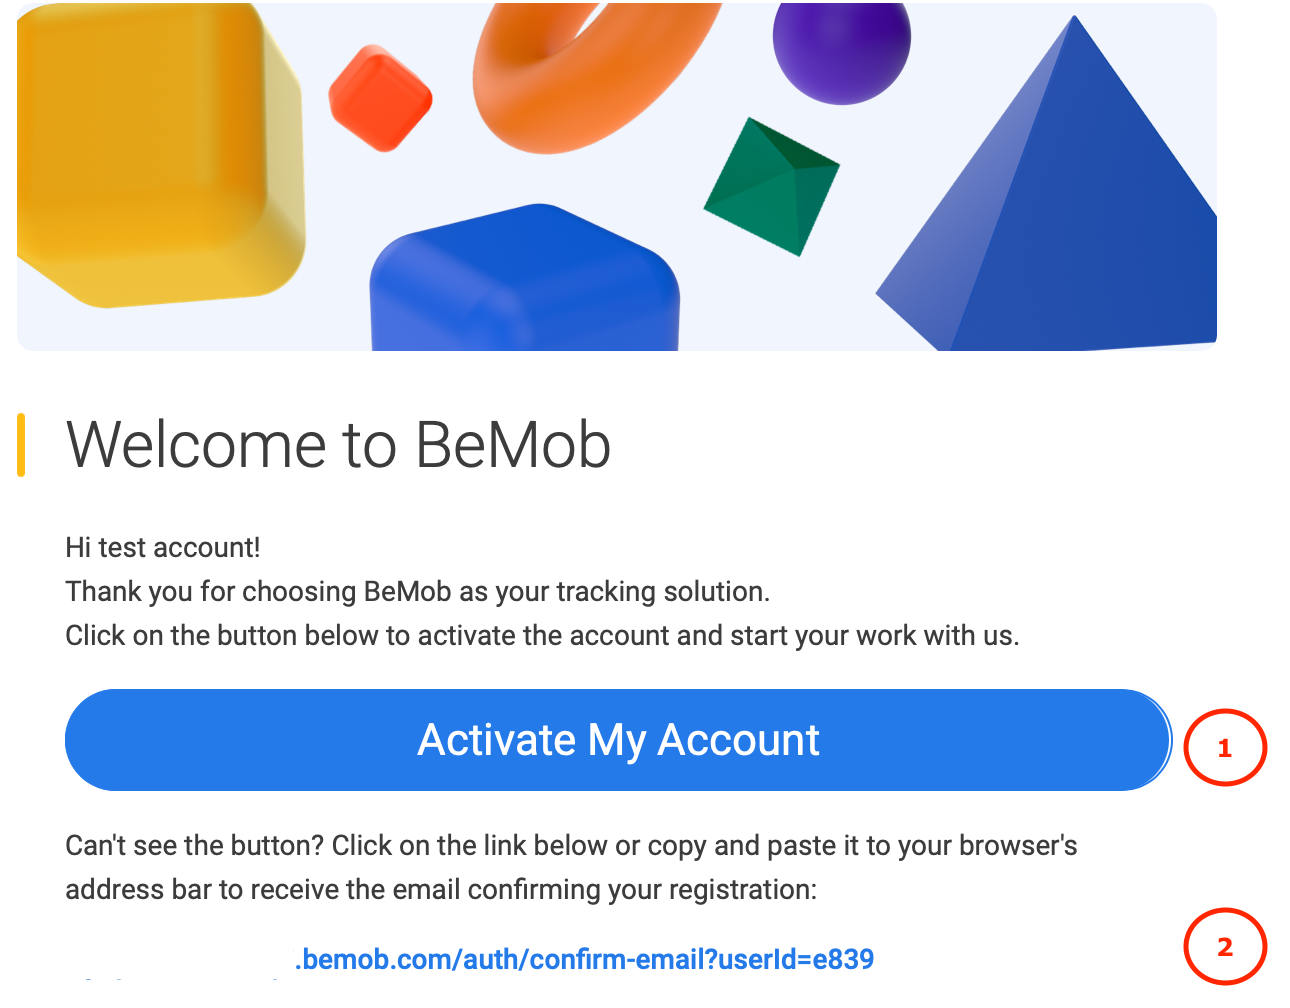
1. Check your email box and click the Activate my Account button.
2. If the button is not visible, click the link below.
🛠 Check the spam box if you don't see the confirmation letter in your inbox. If the letter is still missing – contact our support team via live chat or at support@bemob.com
¶ Step 3: Final Details
After confirming your account through the registration link from your email, you will be redirected to final step.
The following details are required to be completed:
1. Messenger type and ID. Not obligatory. This information is required to contact you in the urgent cases. We don't spam our clients with imposing favorable offers or switching to a paid plan.
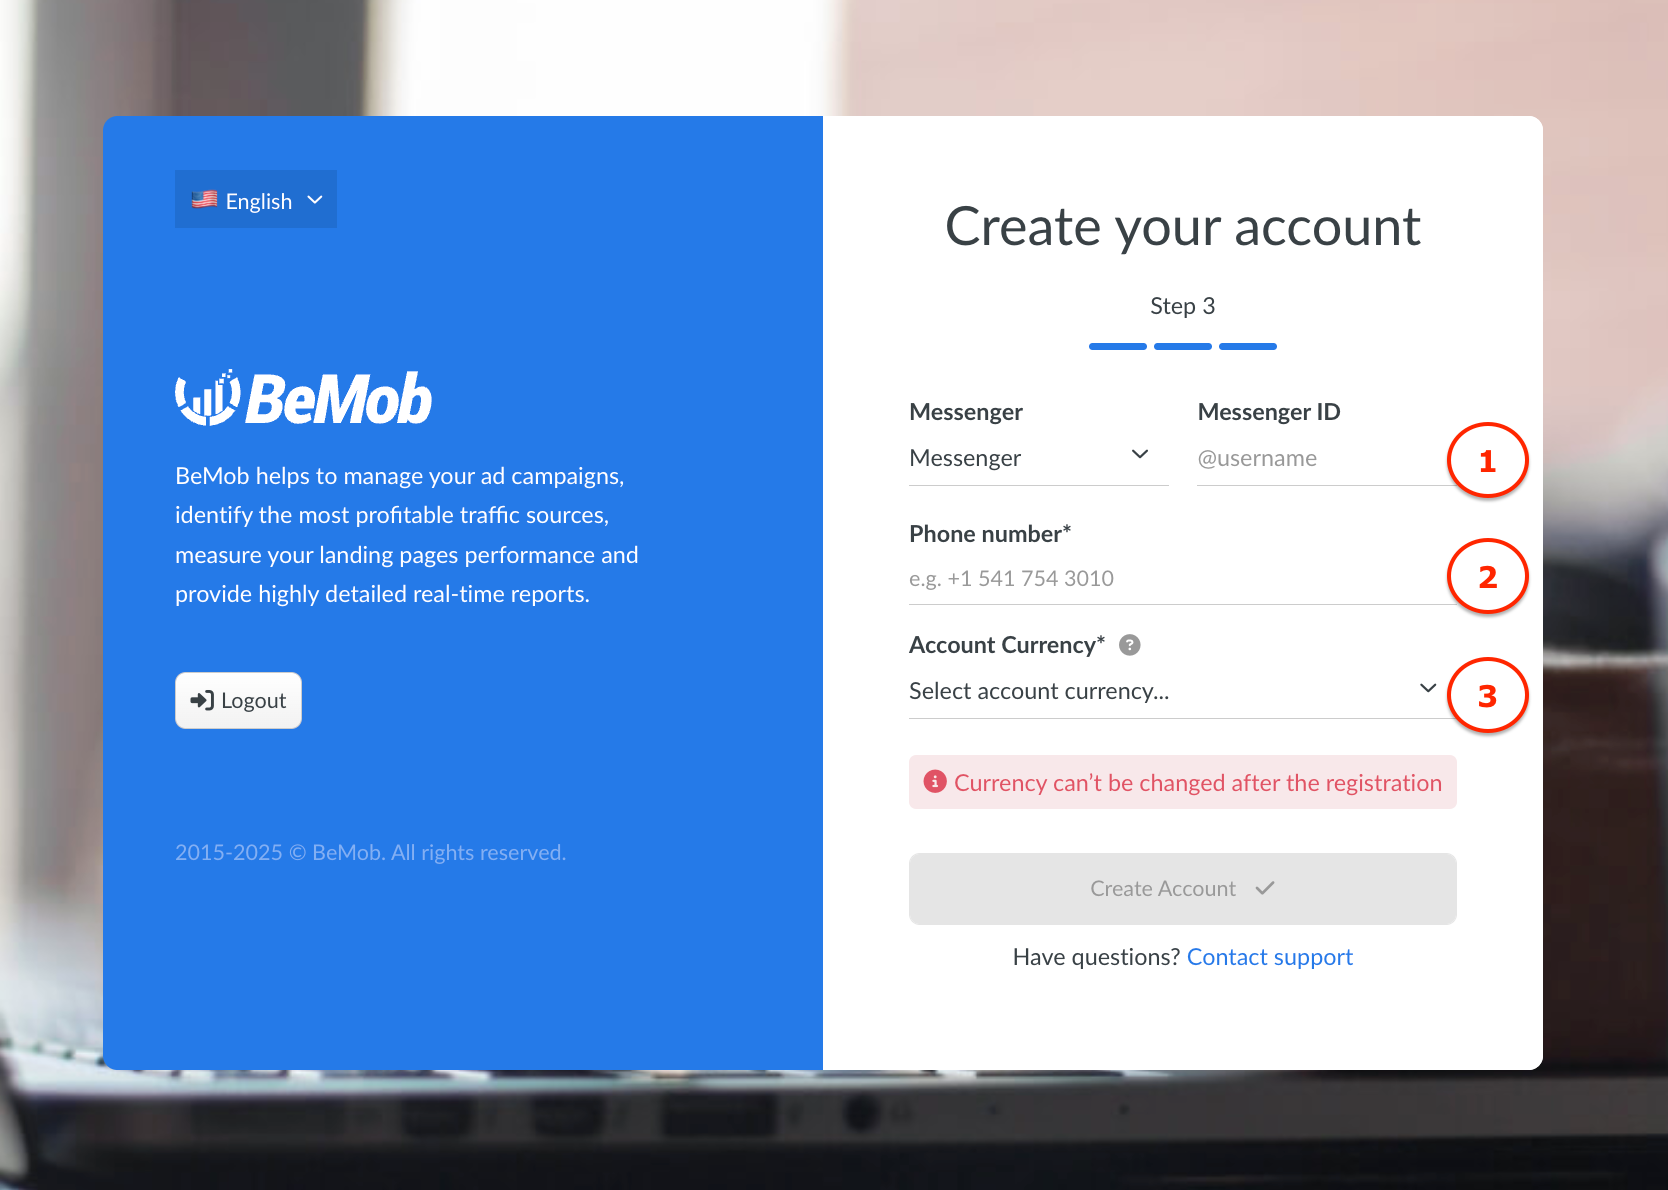
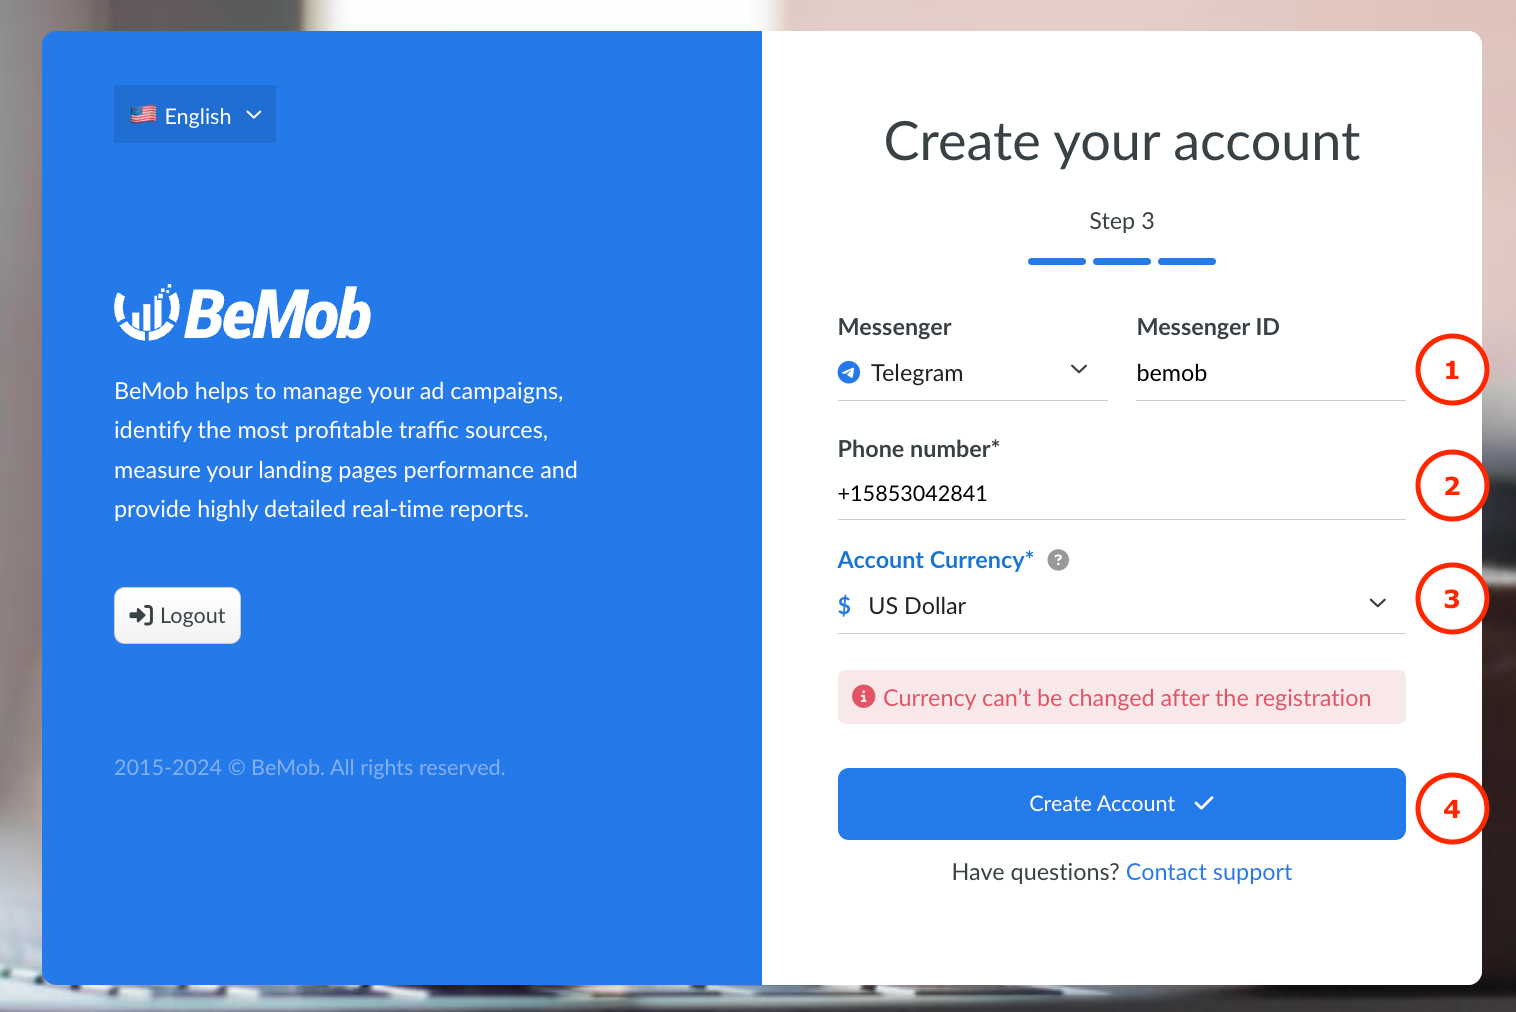
2. Phone number. This field is obligatory. It is used for our sales team purposes. However you will also not be spammed by their activity. The phone number should be added with your country code.
🛠 Example: You have the US phone number 5853042841.
The United States country code is +1.
In the phone number field it is required to specify +15853042841.
Make sure no spaces or extra symbols are added.
3. Account currency. This selection is obligatory. The account currency will be used to store and display all the financial data of your ad campaigns.
We recommend setting up universal currencies such as the US dollar or euro. These are mostly used with the different affiliate networks and traffic sources as default currencies. You can also select the currency of your geolocation for more convenient calculations.
📌 The account currency can't be changed after the registration.
You will need to create a new account if you wish to perform calculations in a different currency.
4. After all the required actions are performed the Create Account button will become active.
Click the button to enter your BeMob account.
¶ After Registration
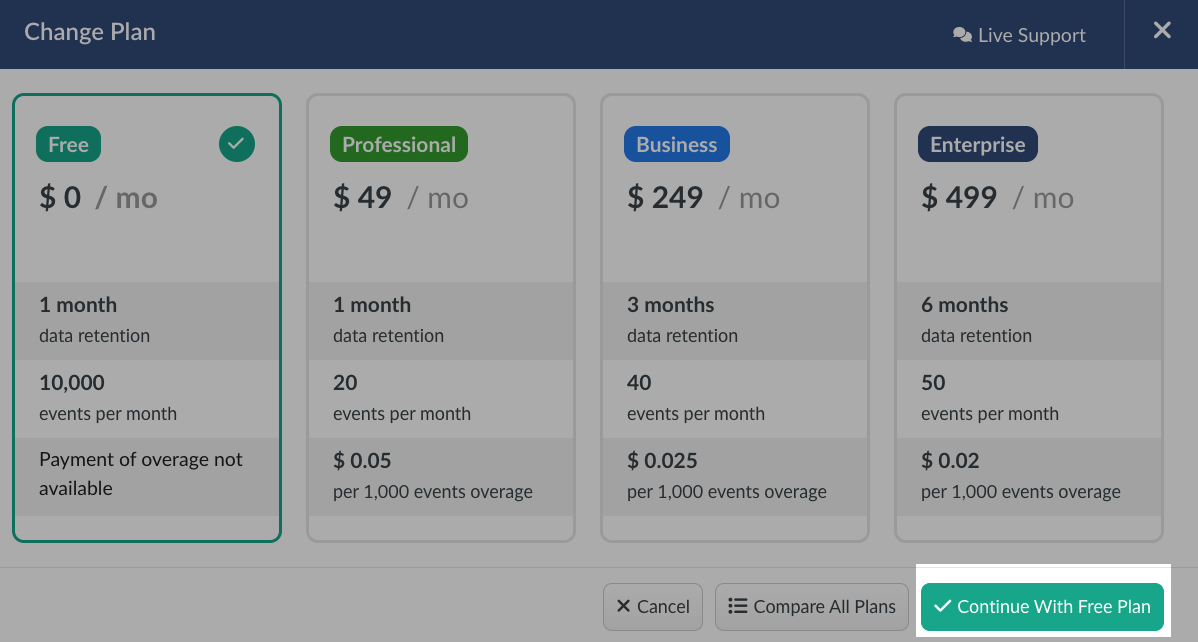
Once you access your BeMob account, a window with the plan selection will appear.
By default, your plan is Free, which includes all essential tracking features and functionality to explore BeMob’s capabilities.
To bypass selecting a plan, proceed directly to the Settings page to set your report timezone, Domain Settings to configure your custom domain or straight to Campaign creation.
¶ Reporting and Account Preferences
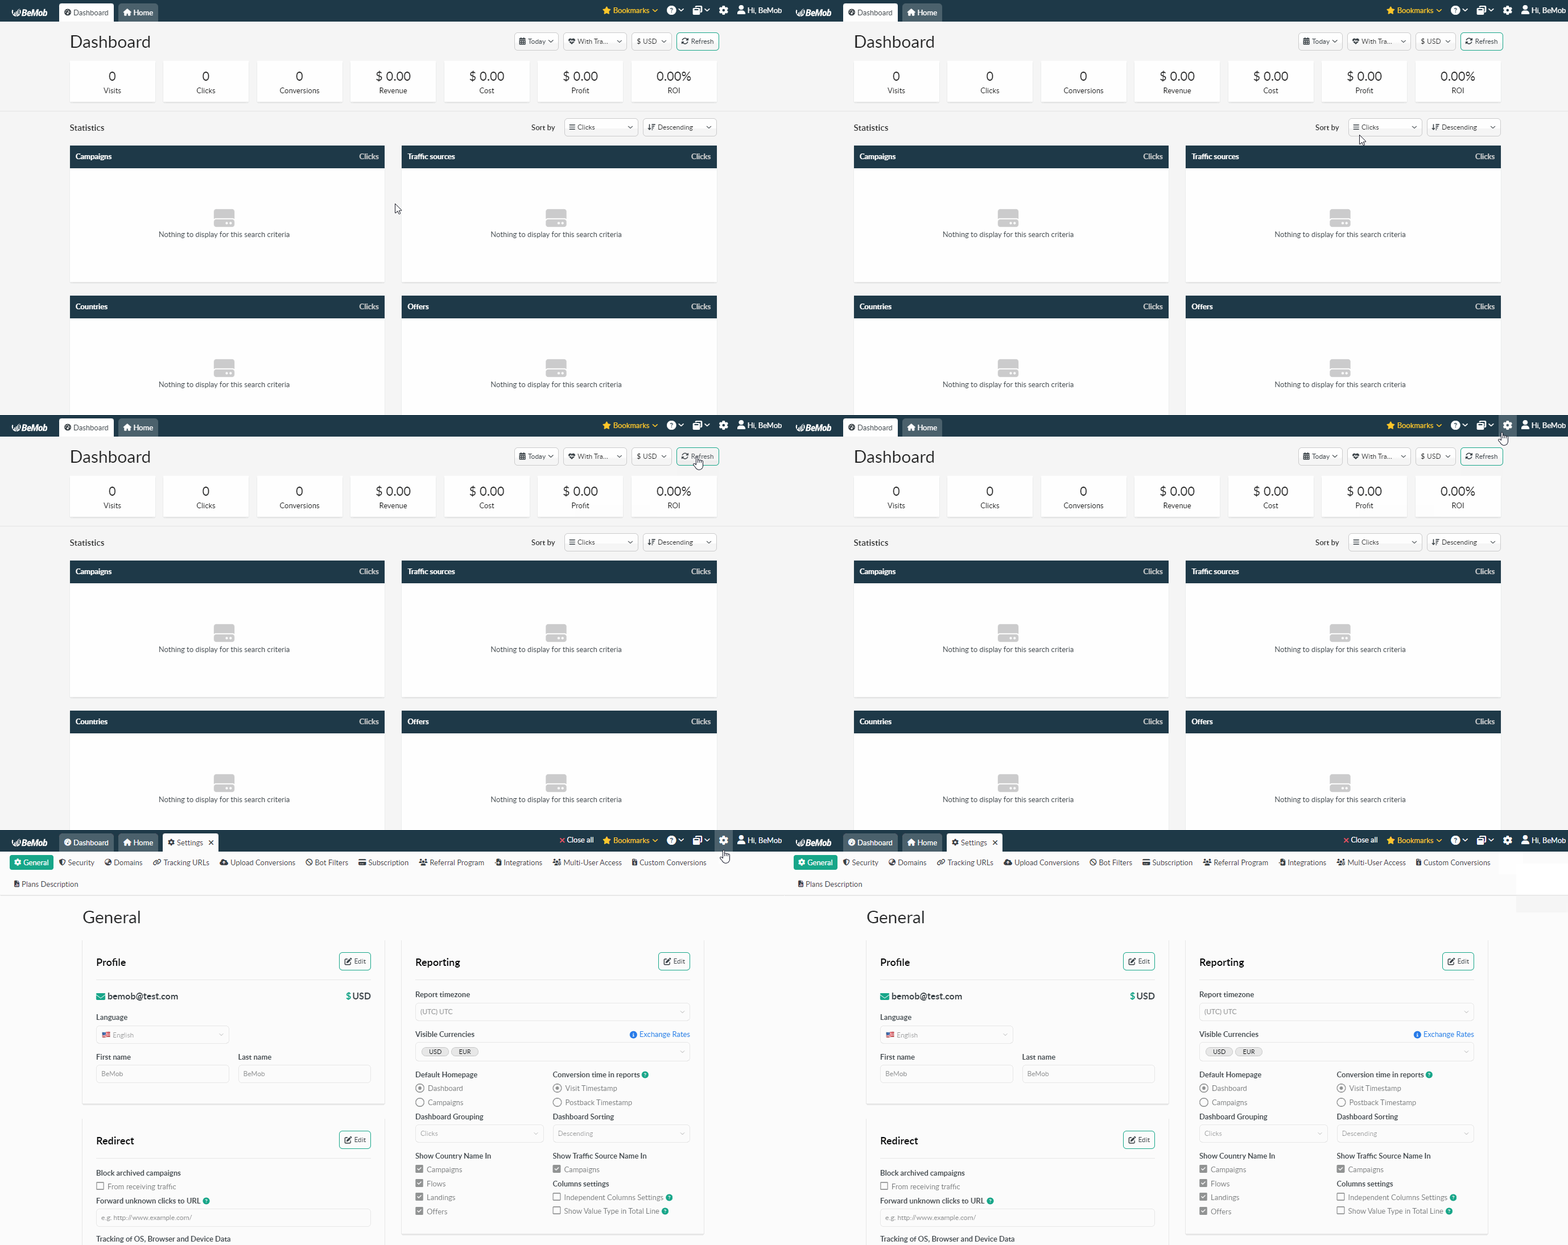
You can configure reporting and account preferences in the General settings.
To access General settings, click the gear icon in the panel.
¶ Language
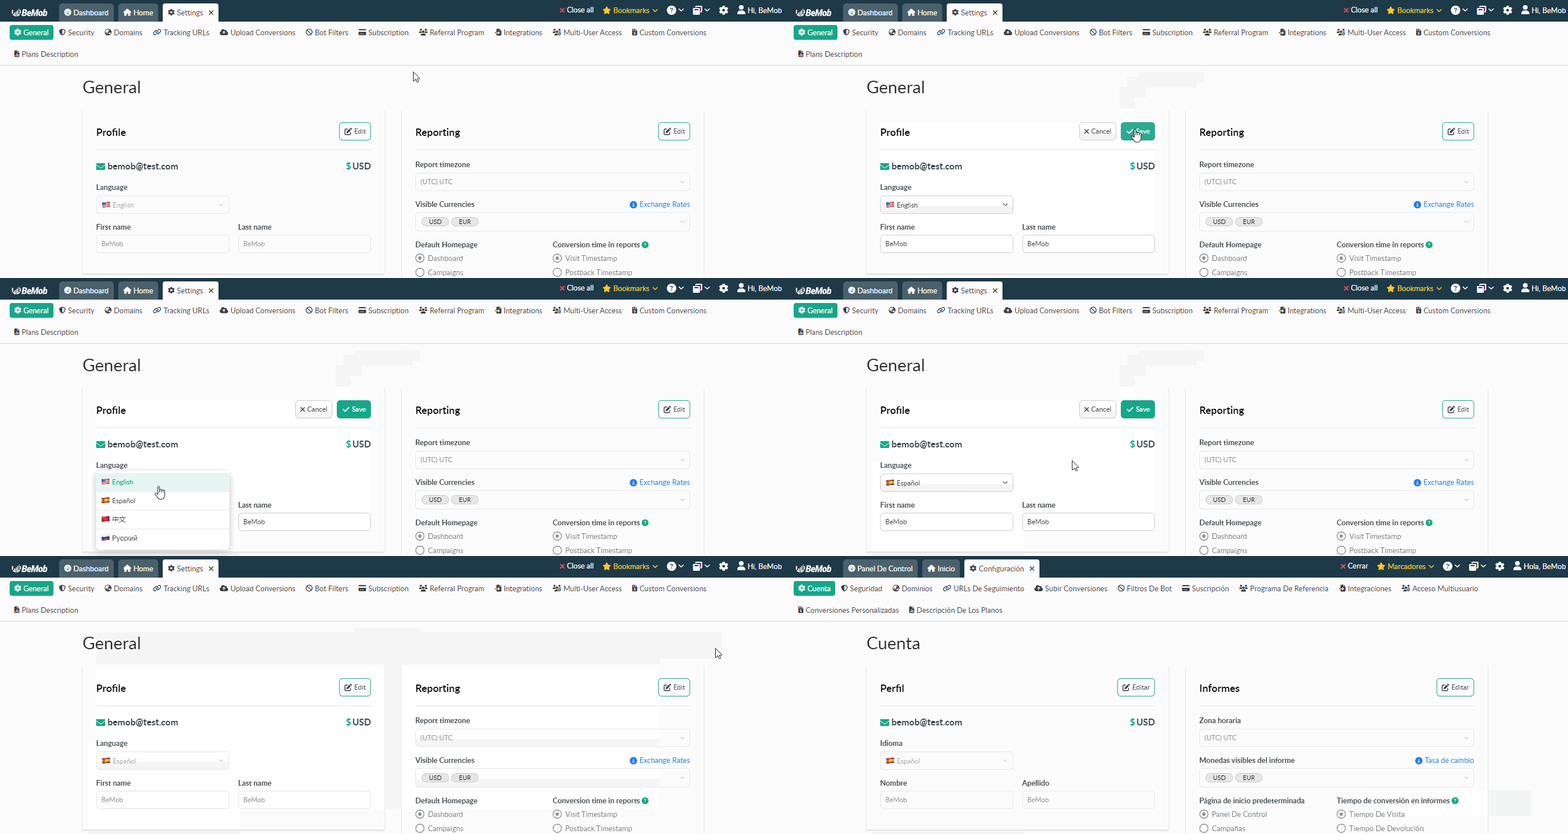
BeMob supports four panel languages: English, Español, 中文, and Русский.
To change the language click Edit, select the required language from the list and Save settings.
¶ Account Currency
The account currency is selected during registration and is used to store your account data.
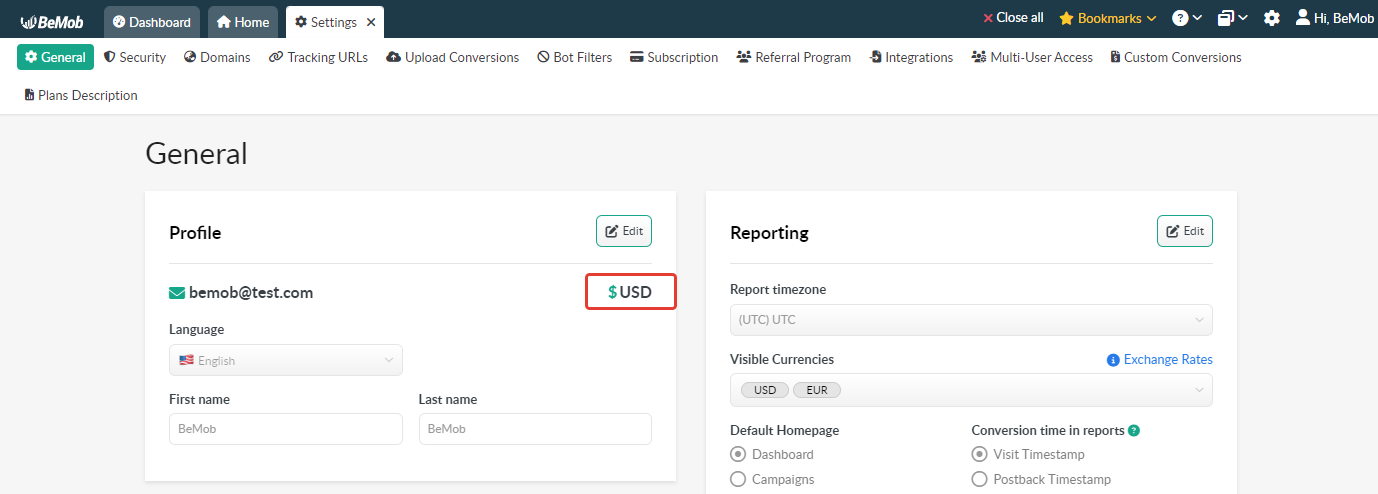
❗️ The account currency is selected once with the registration and cannot be changed later.
You can also select a different currency in campaign and offer settings to track traffic costs and conversion payouts correctly.
If your traffic source or affiliate network uses a currency different from your BeMob account currency, select the corresponding currency in:
- Campaign settings to track traffic costs.
- Offer settings to track conversion payouts.
BeMob automatically converts the reported cost or payout to your account currency in reports.
¶ Example 1: Affiliate Network
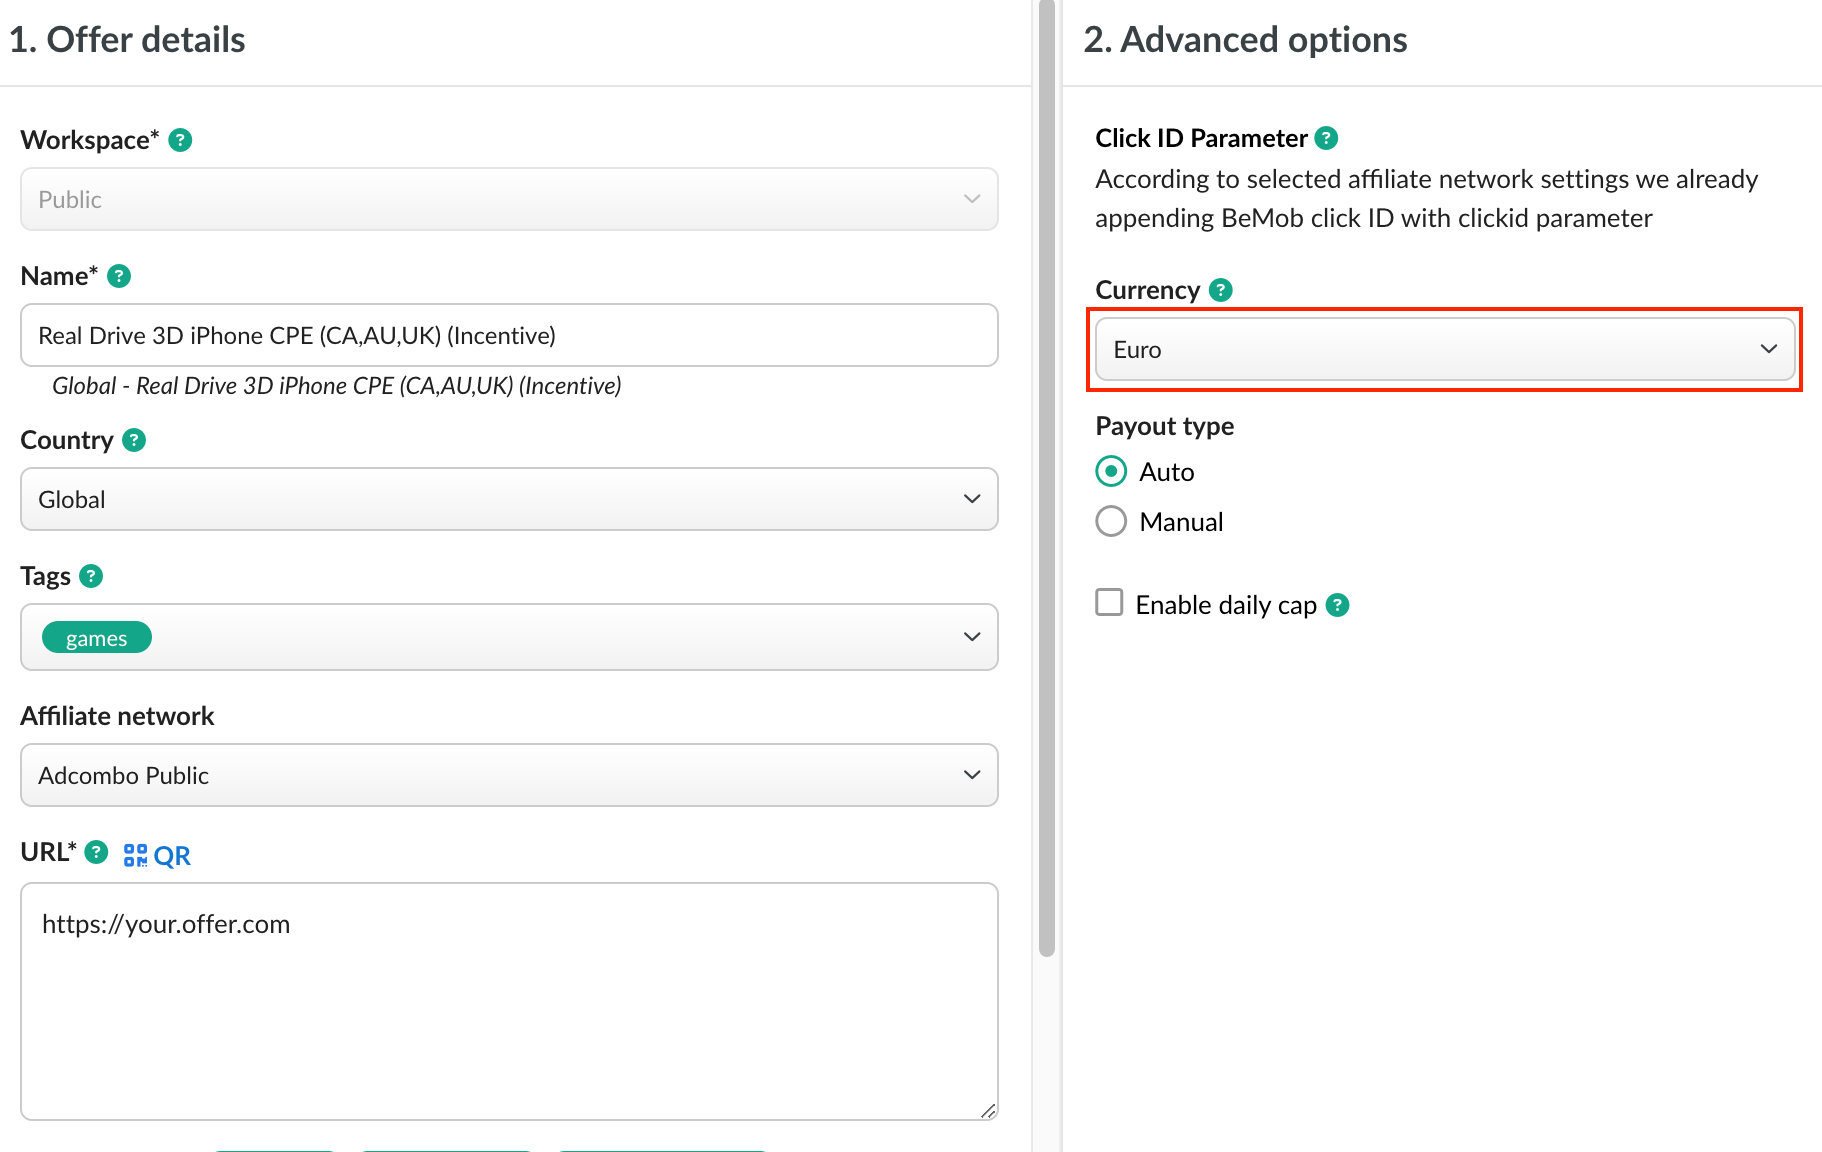
Your account currency is US dollar, while your affiliate network reports conversion payouts in Euro.
To avoid the discrepancy in revenue it is required to select Euro in the offer settings associated with this affiliate network.
The conversion payouts received in Euro will be converted to US dollars in BeMob reports.
¶ Example 2: Traffic Source
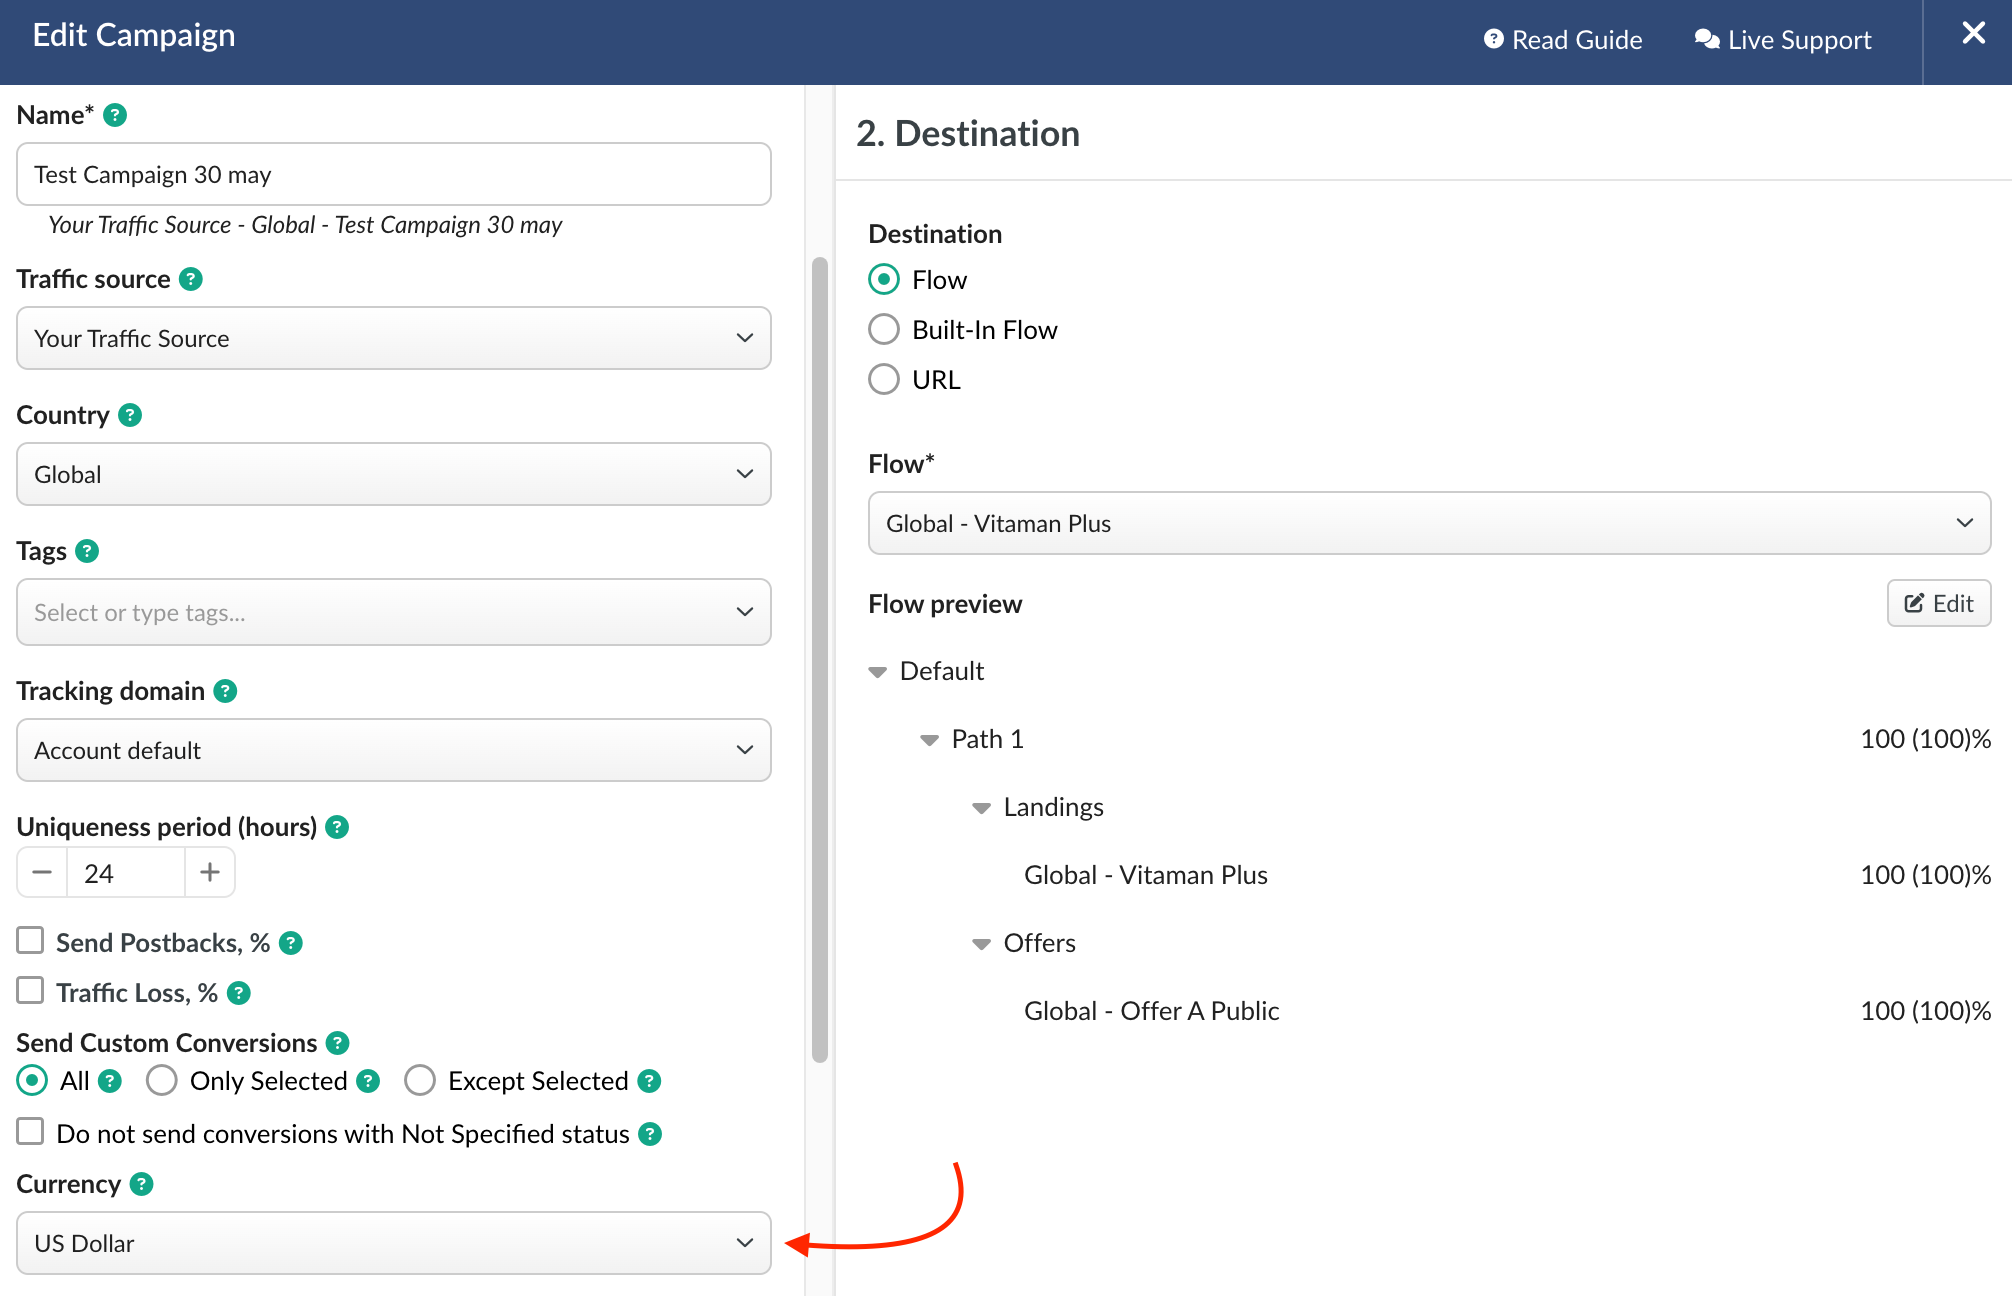
Your account currency is Euro, while your traffic source charges for traffic in US dollar.
To avoid the discrepancy in the cost data it is required to select US dollar in campaign settings associated with this traffic source.
The traffic costs reported in US dollars will be converted to Euro in BeMob reports. If you send conversions back to the traffic source side, the conversion payout will also be sent in the Euro as it is preferable currency for your traffic source.
¶ Report Timezone
The default timezone for every BeMob account is UTC.
To change it you should click Edit, select the required timezone from the list and Save changes.
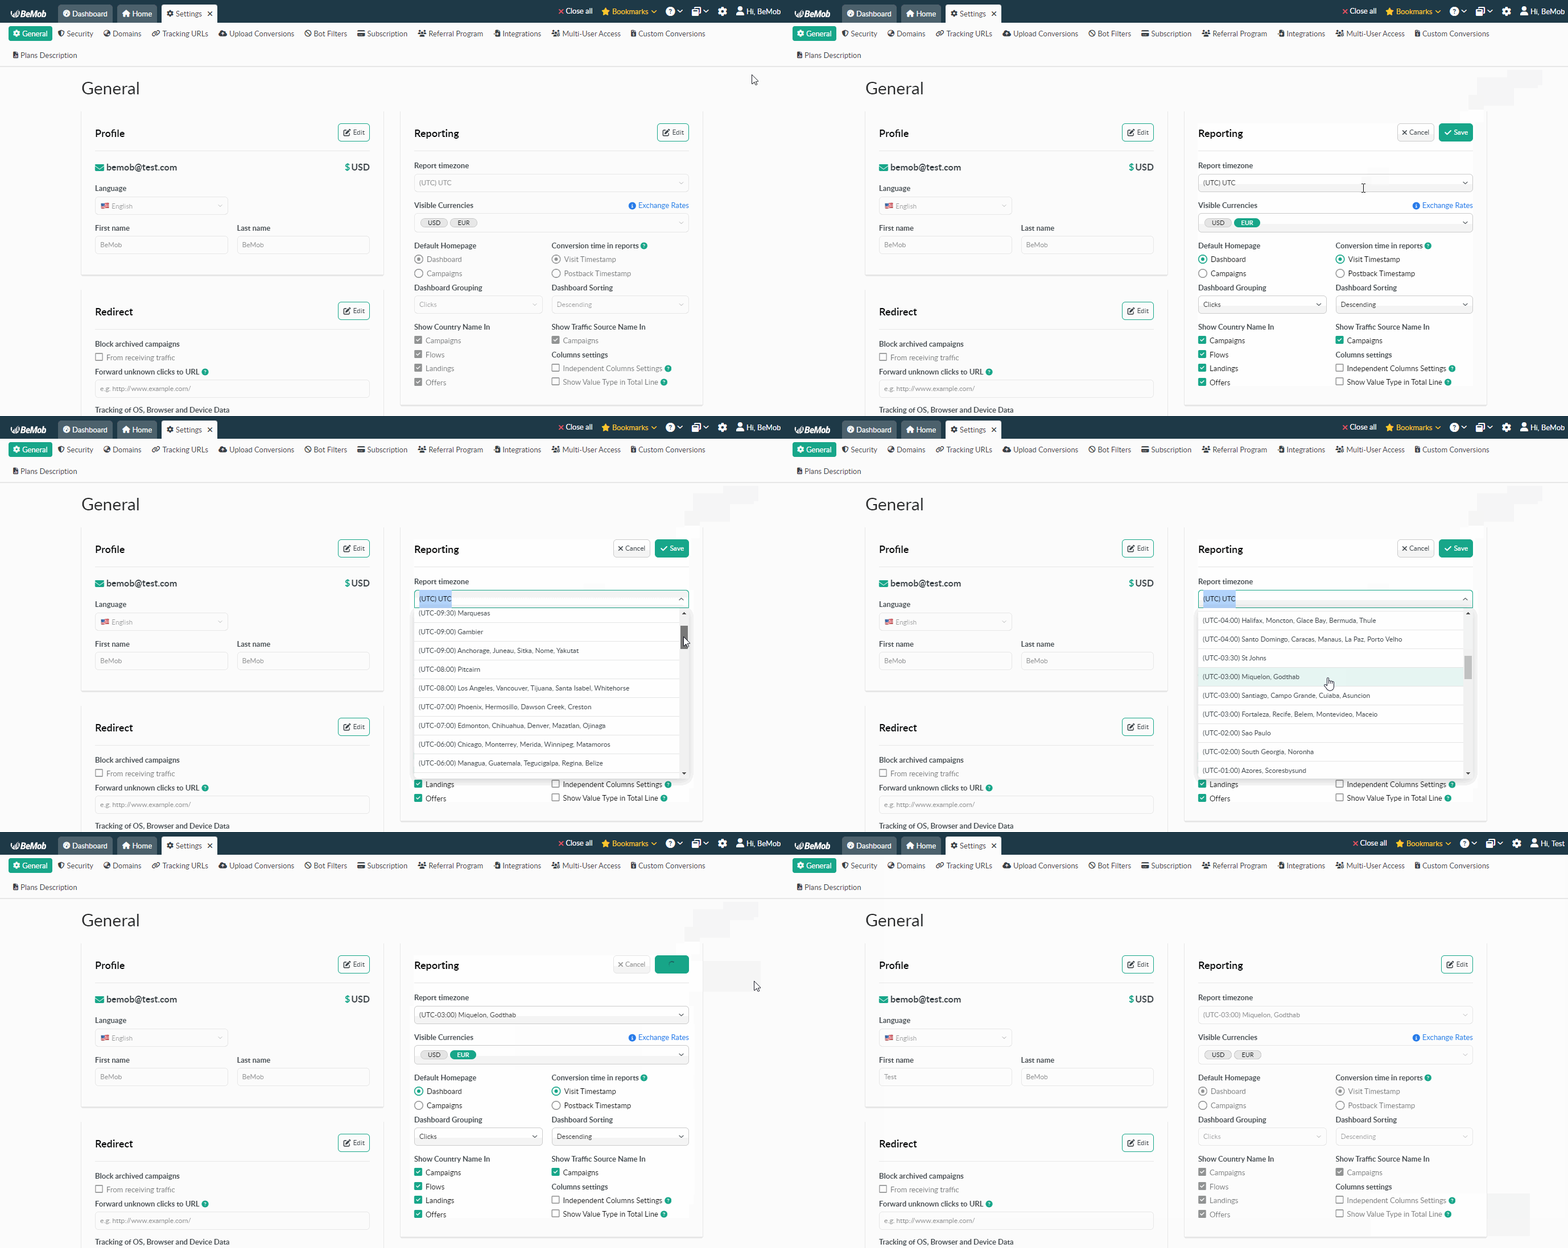
💡 All reports of your account will be displayed in the selected timezone.
¶ Conversion Time in Reports
The selection of Conversion Time determines which timestamp BeMob uses to display conversions in reports.
BeMob offers two options for reporting conversion time:
1. Visit Timestamp: Displays the conversion based on the time the visitor interacted with the campaign URL or clicked the CTA button.
2. Postback Timestamp: Displays the conversion based on the exact time the conversion was registered in the system.
¶ Visit Timestamp
The Visit Timestamp is the default option. It indicates the exact time when your campaign was accessed.
When a conversion is registered, it will be displayed in BeMob based on the time the visitor interacted with your Campaign URL.
¶ Example 1 (Without Landing Page):
• A visitor accessed your campaign on May 13th at 10:00:30 PM.
• The conversion was recorded 5 days later, on May 18th at 8:00:30 AM.
• With the Visit Timestamp option, the reporting date and time will show as May 13th at 10:00:30 PM.
¶ Example 2 (With Landing Page):
• A visitor accessed your Campaign URL on May 13th at 10:00:30 PM, viewed the landing page.
• The CTA button was clicked by the visitor on May 13th at 10:05:00 PM.
• If this visitor completes a conversion, it will appear in your BeMob reports with the timestamp May 13th at 10:05:00 PM, reflecting the time of the CTA button click.
This ensures accurate reporting based on user interaction with your campaign flow.
¶ Postback Timestamp
The Postback Timestamp represents the time when a conversion is registered in the system for a user who visited the Campaign URL.
When a conversion is registered, it will be displayed based on the exact moment it is registered in your campaign.
¶ Example:
• A visitor accessed your campaign on May 13th at 10:00:30 PM.
• The conversion was recorded later, on May 18th at 08:00:30 AM.
• With the Postback Timestamp option, the reporting date and time will show as May 18th at 08:00:30 AM, reflecting when the conversion was registered.
This setting is useful for tracking real-time conversion events as they occur.
¶ Switching Between Timestamps
To update the timestamp setting:
1. Go to Settings.
2. Access General tab.
3. Click the Edit button.
4. Select the desired timestamp option.
5. Press Save.
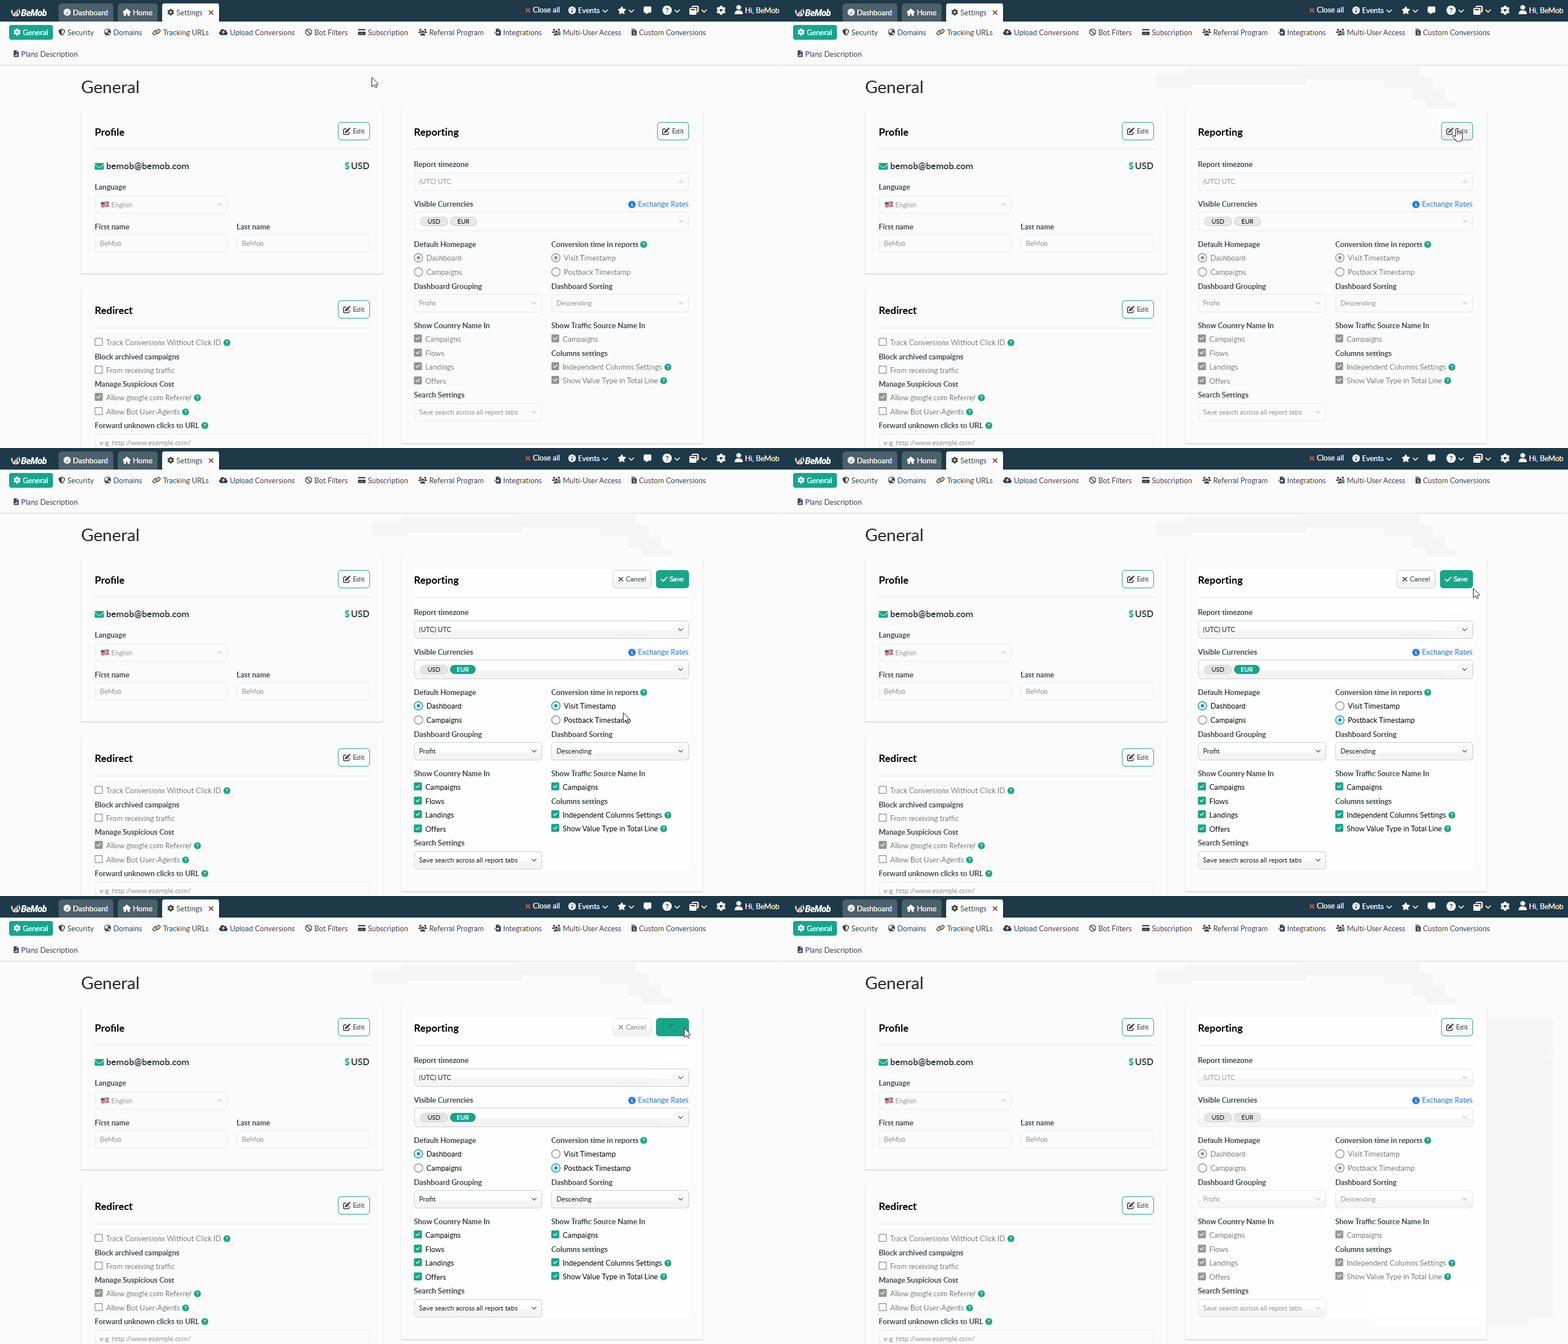
❗️ The updated timestamp setting applies only to newly appeared conversions.
¶ Password Settings
You can change your password in Security section:
- Click Change password.
- Enter your Old Password.
- Enter your New Password.
- Repeat Password.
- Save changes.
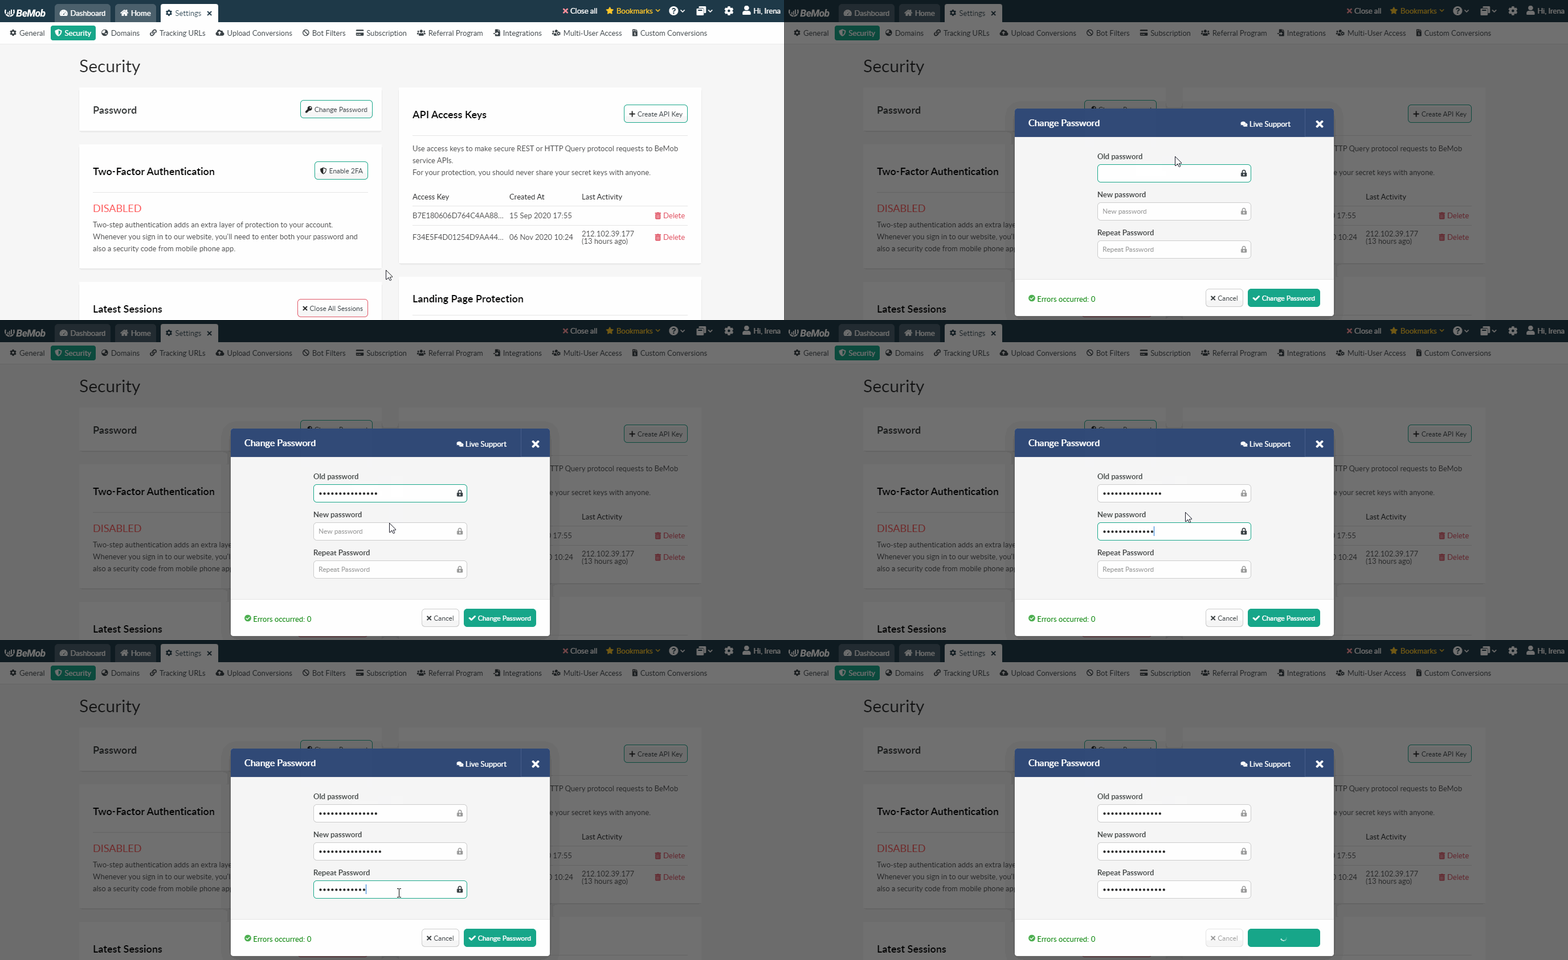
❗️ Use a strong password containing uppercase and lowercase letters and numbers.
¶ Two-Factor Authentication
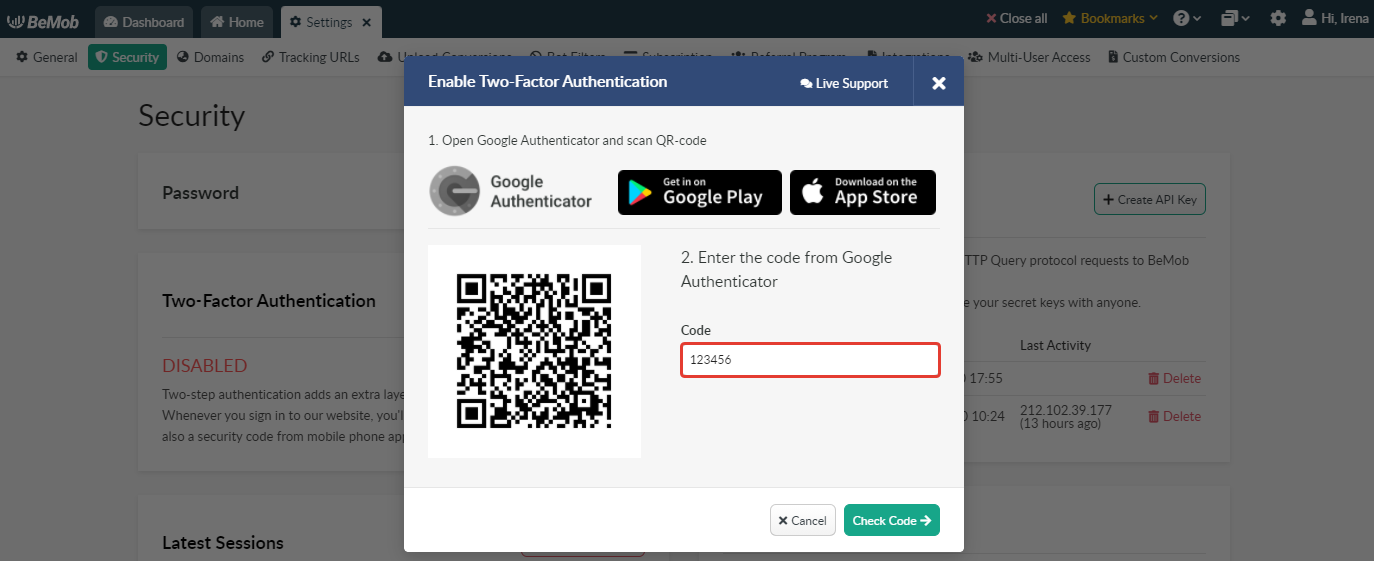
Two-factor authentication (2FA) adds an extra layer of security to your BeMob account. When 2FA is enabled, you must enter both your password and an authentication code when logging in.
❗️ Make sure the Google Authenticator app is installed on your mobile device.
To enable 2FA:
- click Enable 2FA;
- enter your account password;
- click Next Step;
- scan the QR-code with your mobile device.
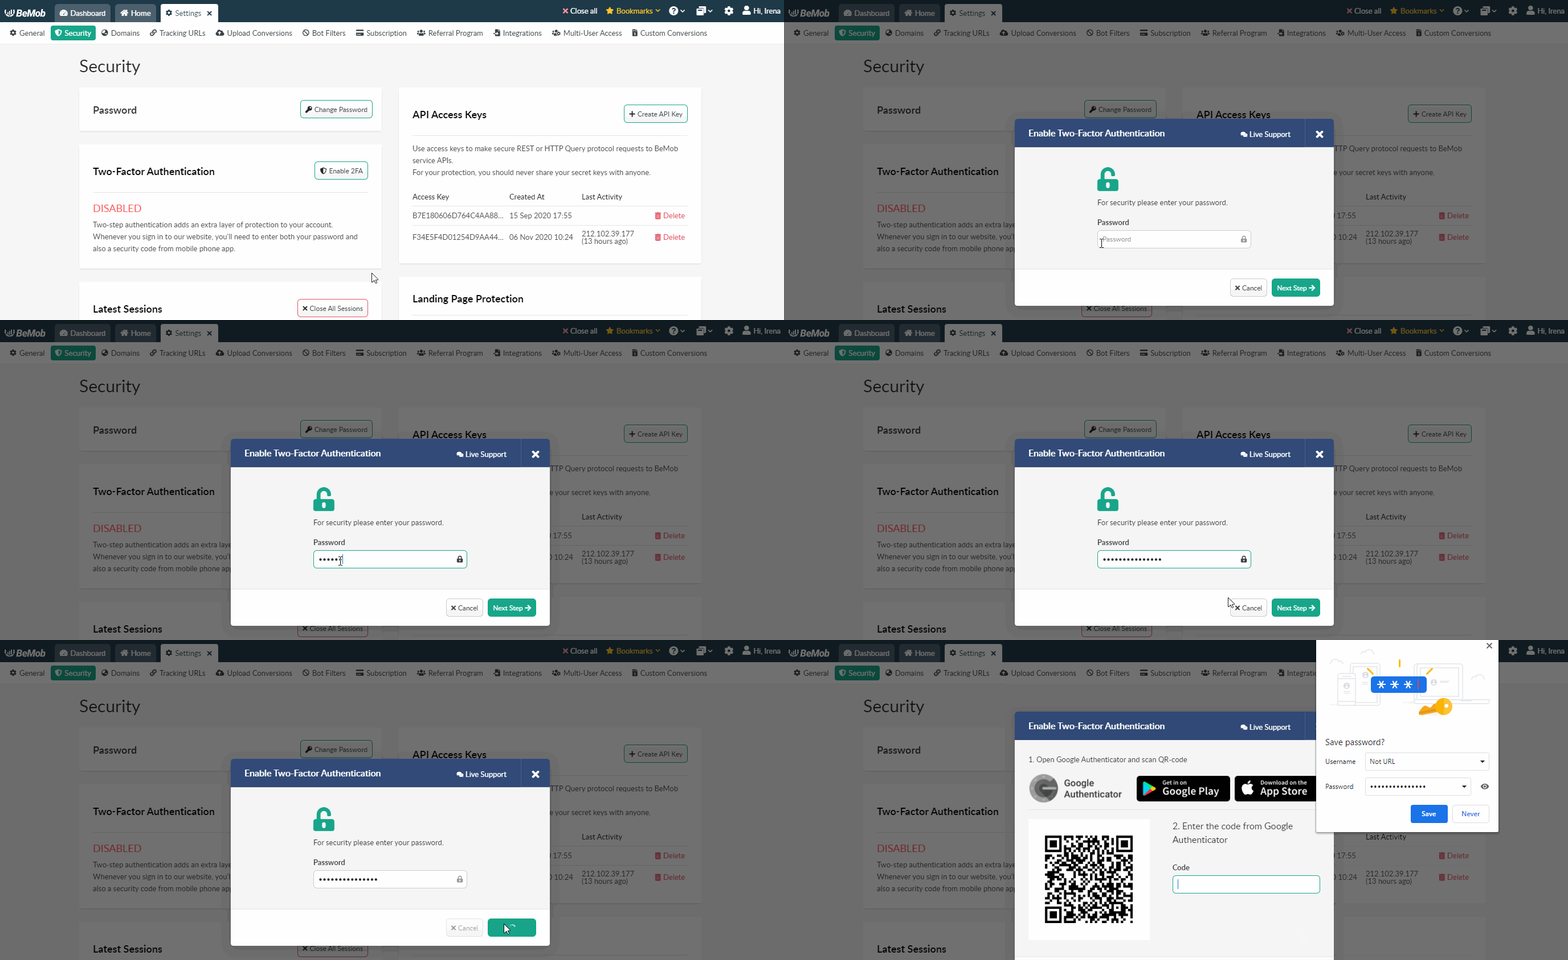
After scanning the QR code, Google Authenticator generates a six-digit authentication code.
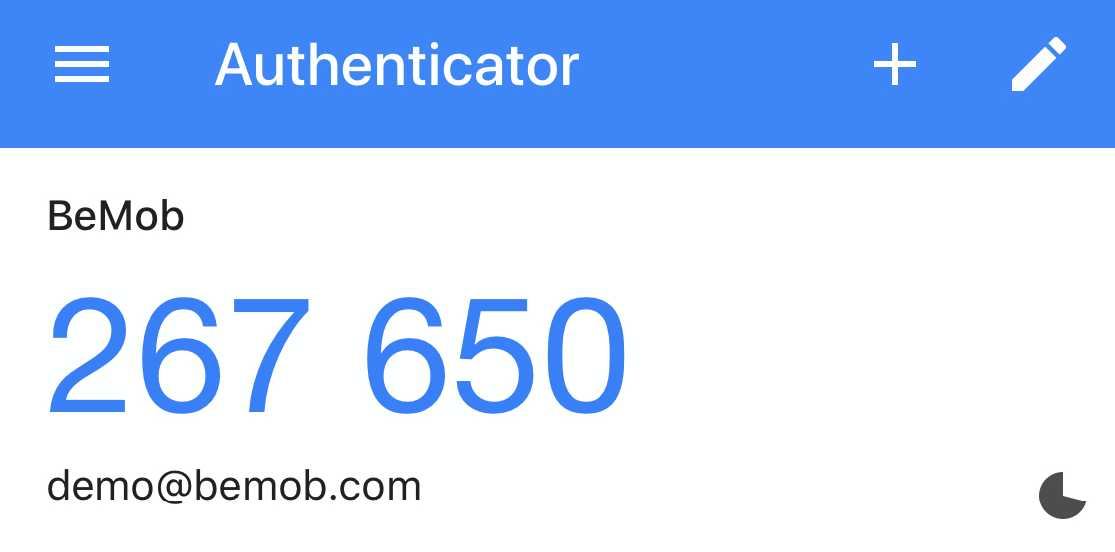
Enter the six-digit code in the corresponding field and click Check Code.
💡 For more information about two-factor authentication, see our Security guide.
¶ Columns Settings
After registration, BeMob provides a default set of report columns, including Visits, Clicks, Conversions (Confirmed), Cost, Profit, and others.
You can customize the visible columns based on your reporting needs and tracking scenario.
To open the columns settings, click 👁 icon on the panel.

You can perform the following actions:
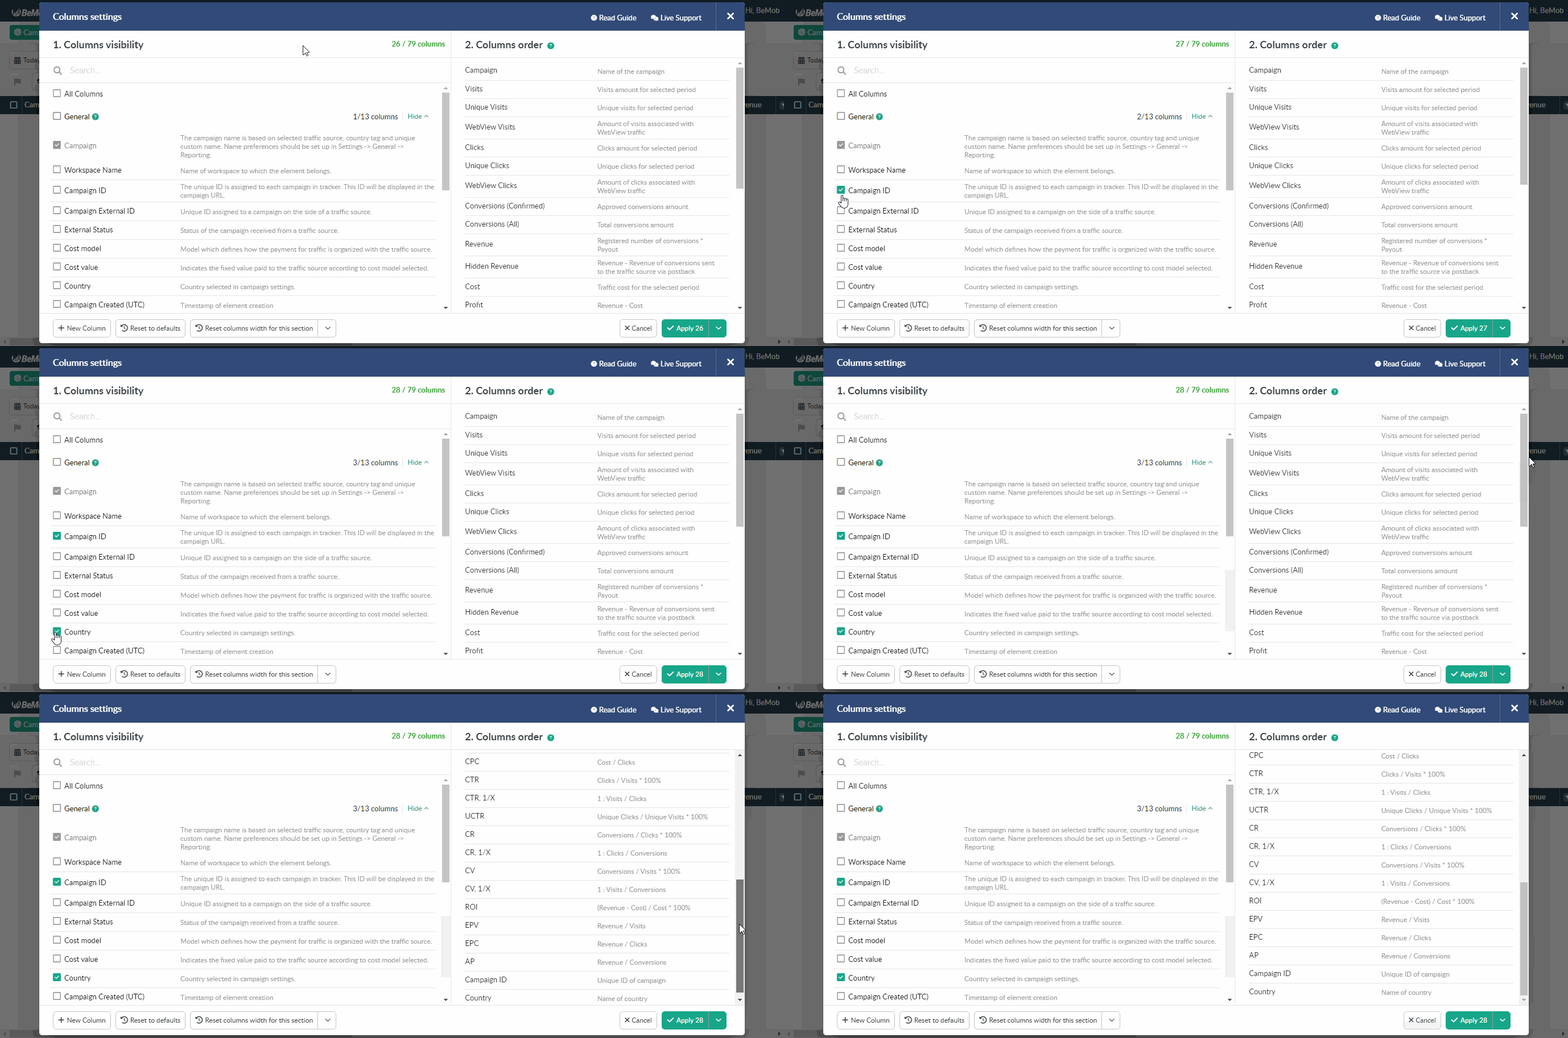
- Add columns
Tick the required column name on the left side of the settings window to add it to the report.
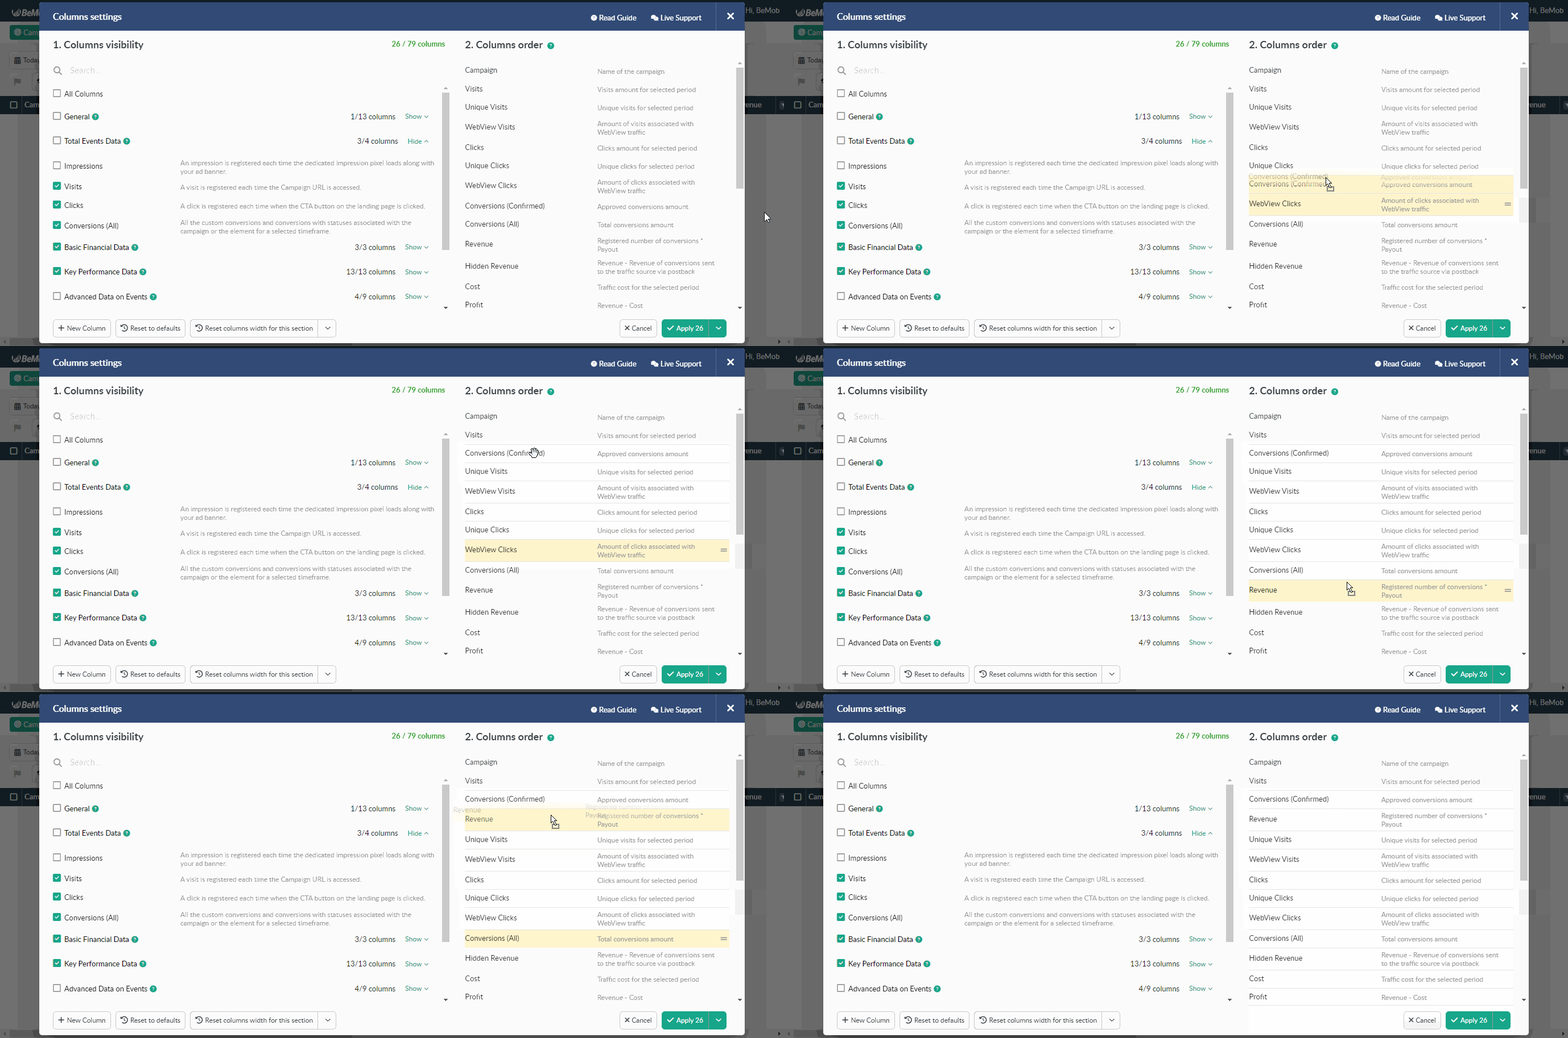
- Change column order
Drag columns up or down to change their order in the report.
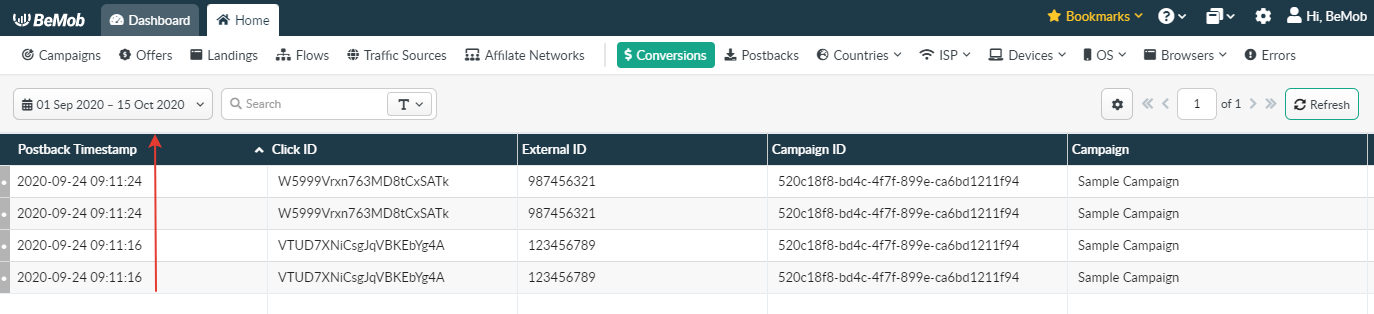
- Sort columns
Click the sorting icon in a column heading to change the sorting order.
- Remove columns
Unmark a column in the Columns settings window to remove it from the report.
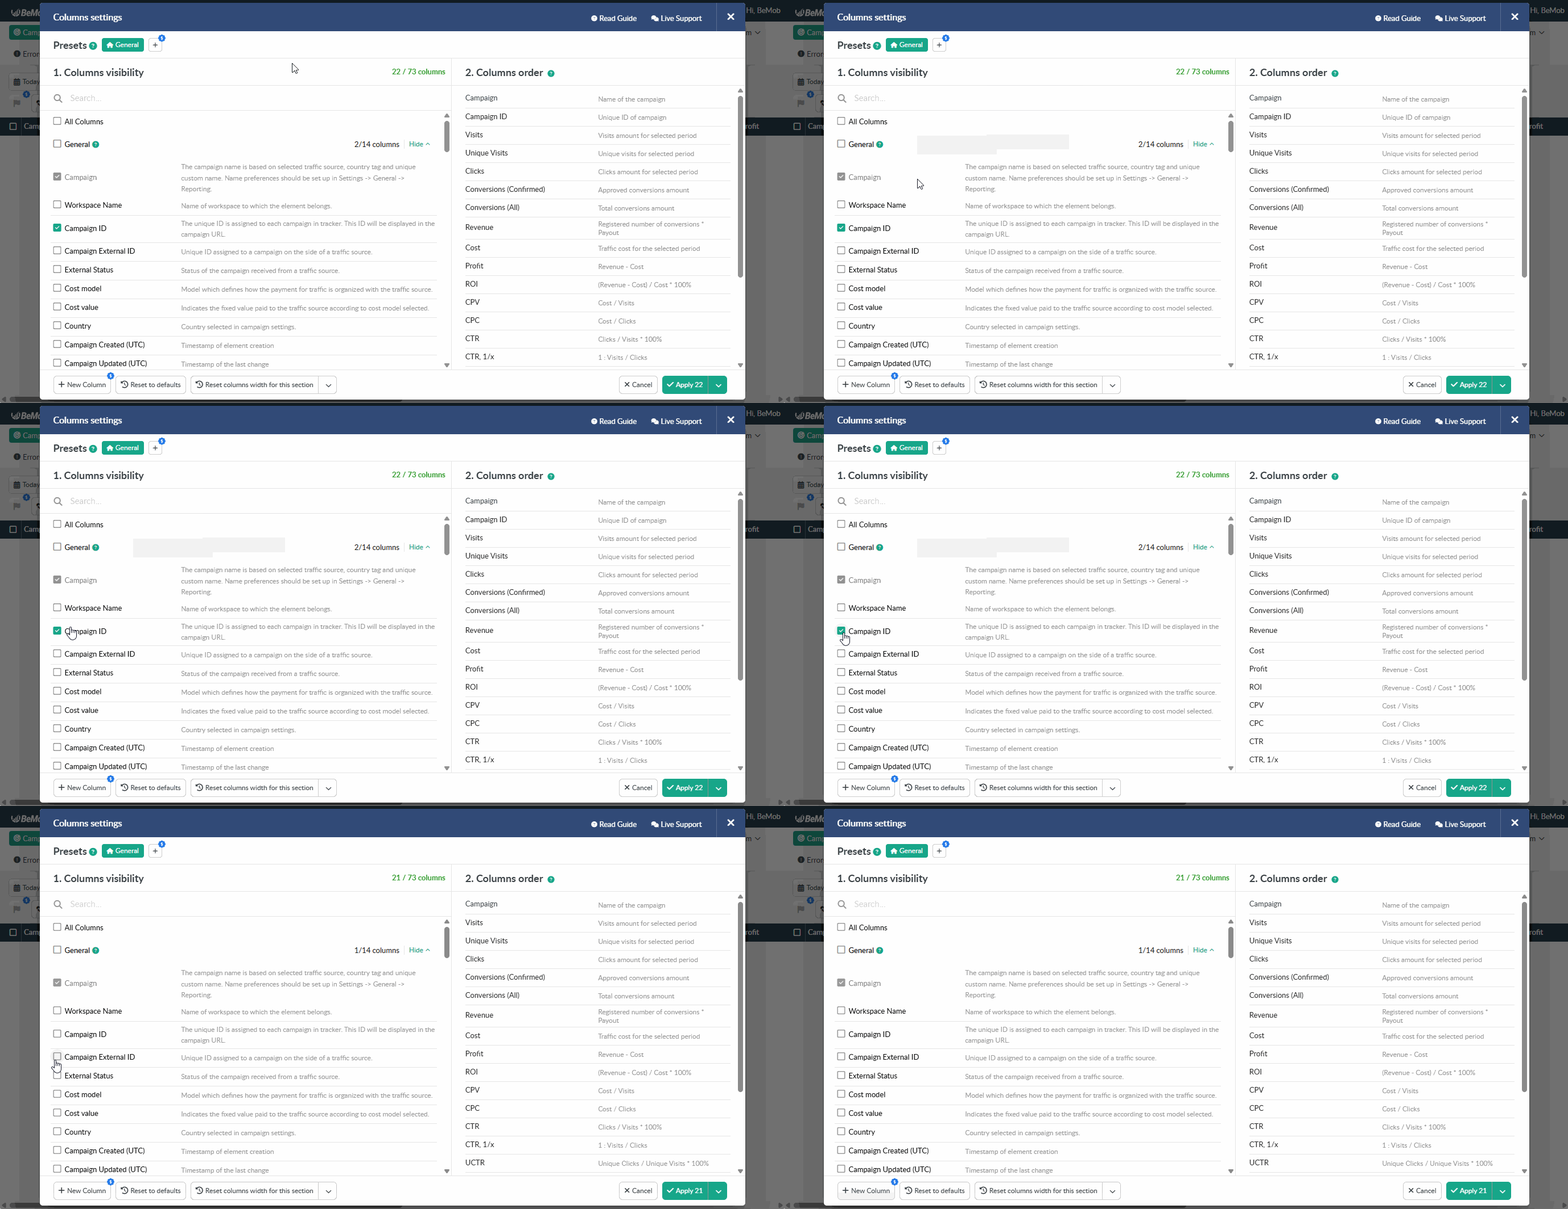
💡 For more information about managing columns, see our Columns Settings guide.
¶ Custom Tracking Domain
A tracking domain is used in all your tracking links: Campaign URL, Postback URL, Click URL, Landing Page Pixel etc.
❗️ BeMob provides a default domain for testing purposes. For live campaigns, we strongly recommend using a custom tracking domain.
The number of custom tracking domains you can add depends on your subscription plan. You can also purchase additional domain as an add-on.
💡 For details about available add-ons, see the Features section in your BeMob account.
You need to purchase a domain from a domain registrar before adding it to BeMob. You can use any domain registrar, such as GoDaddy, Namecheap, Cloudflare, Hostinger, Namesilo etc.
To connect your custom domain to BeMob, you need to configure a CNAME DNS record.
To add a custom tracking domain:
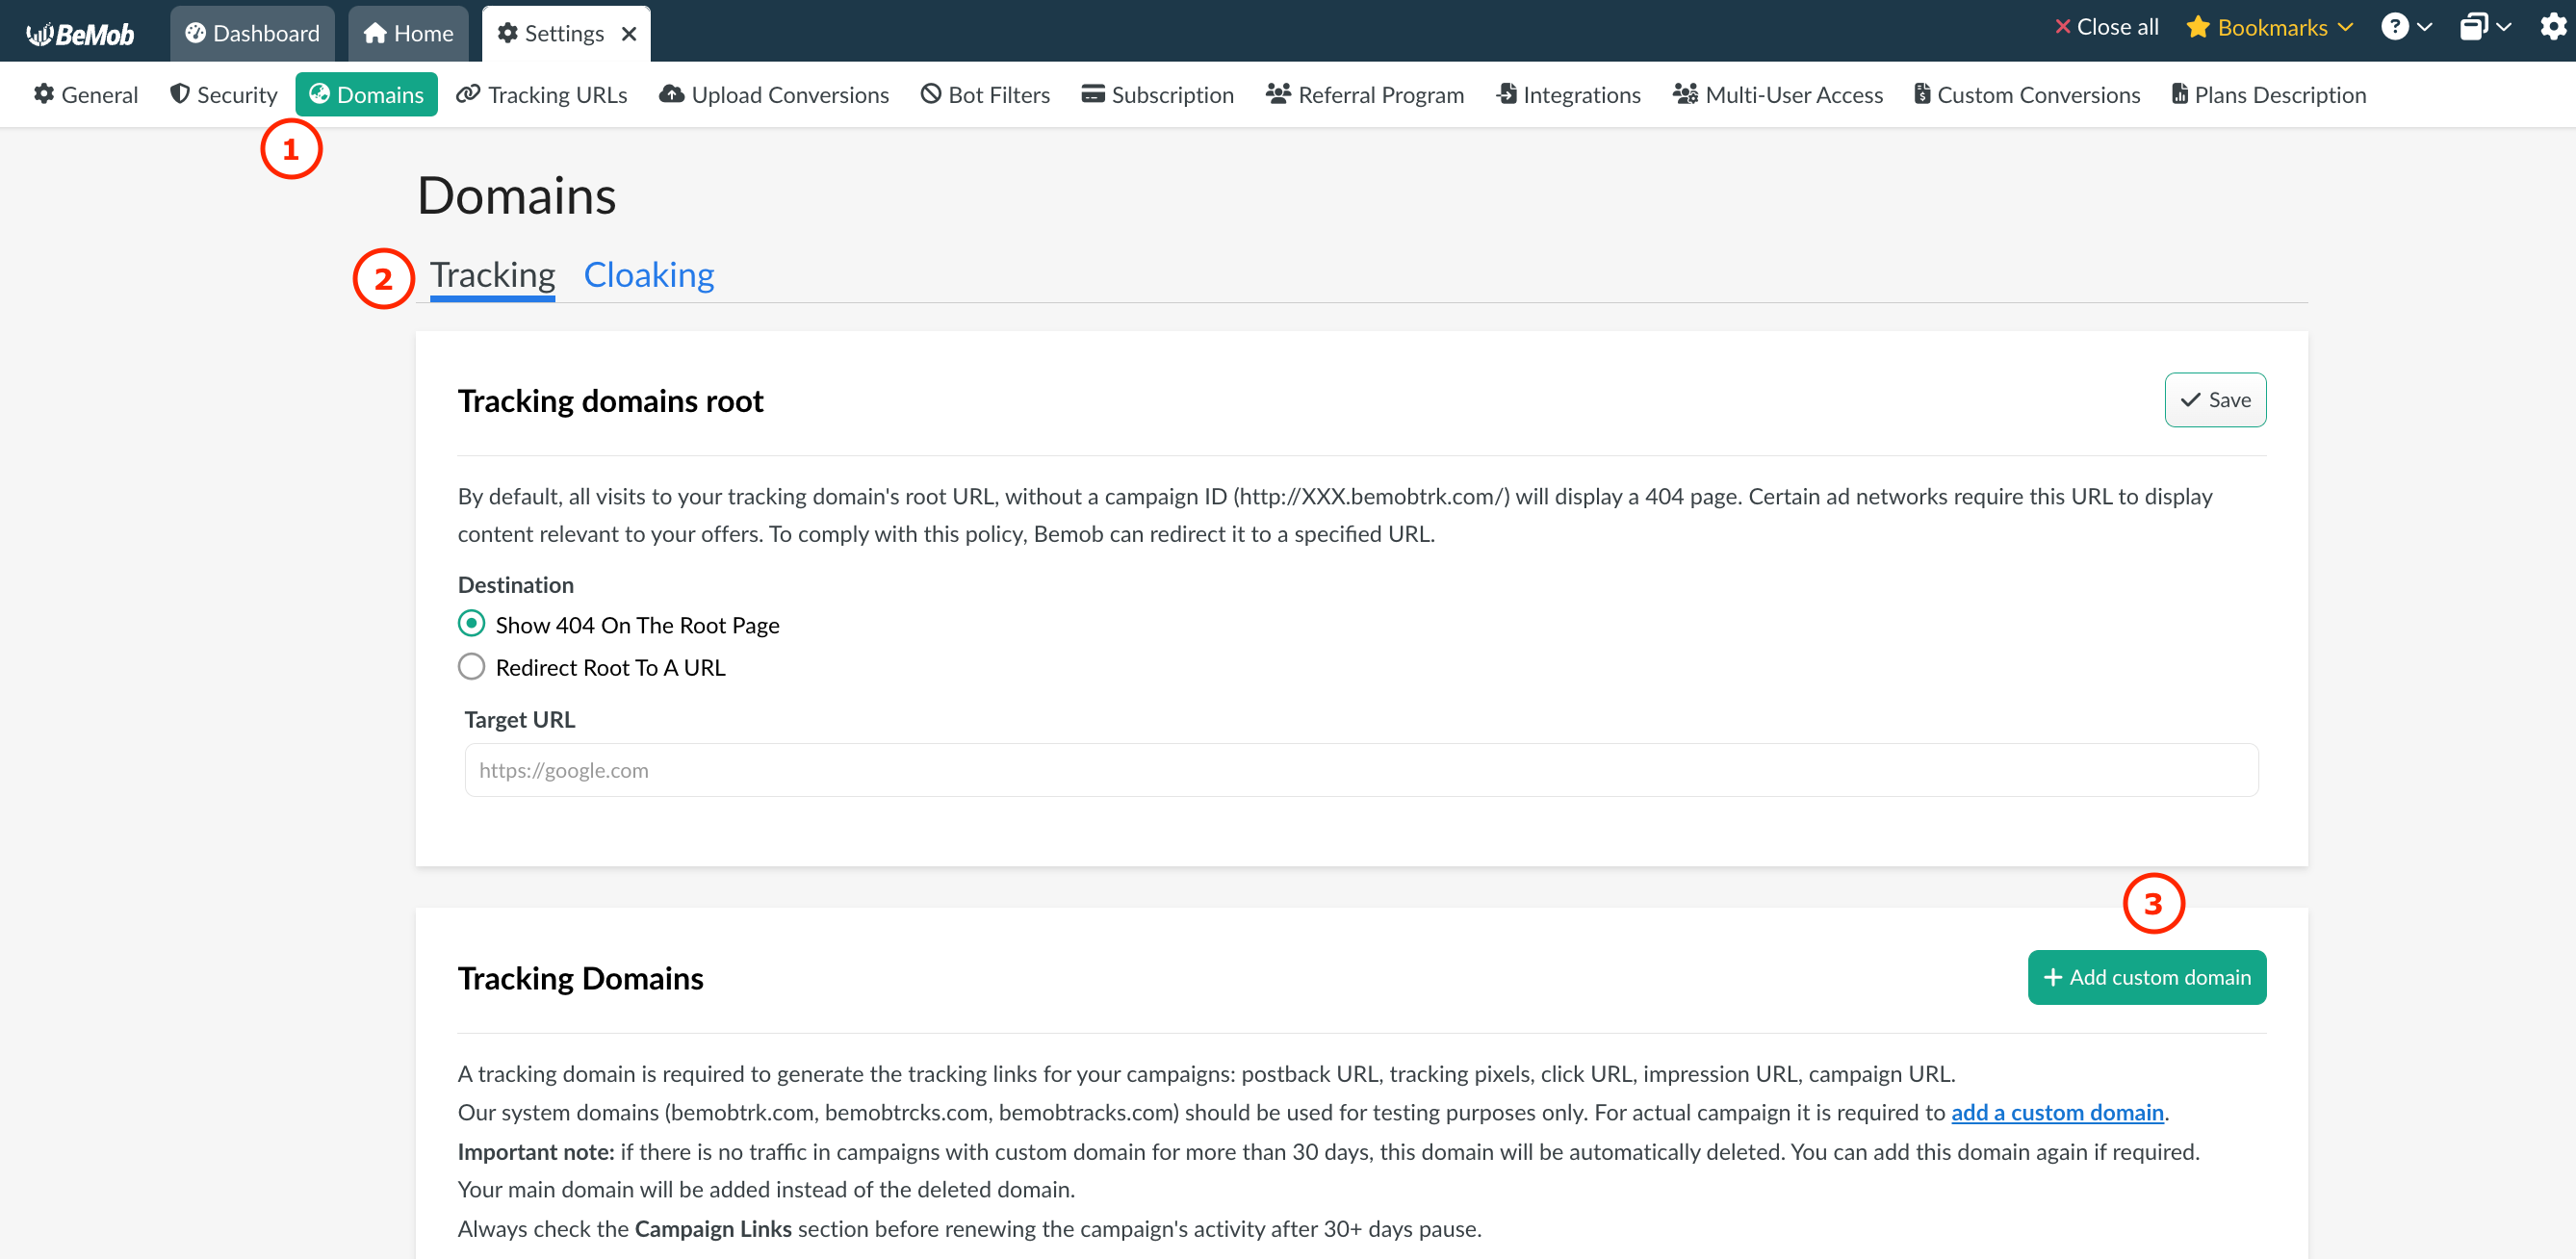
- Go to Settings → Domains in BeMob.
- Access Tracking section.
- Click Add Custom Domain.
4. Copy the dedicated BeMob domain provided for the CNAME record, for example, 12xyz.bmtrck.com.
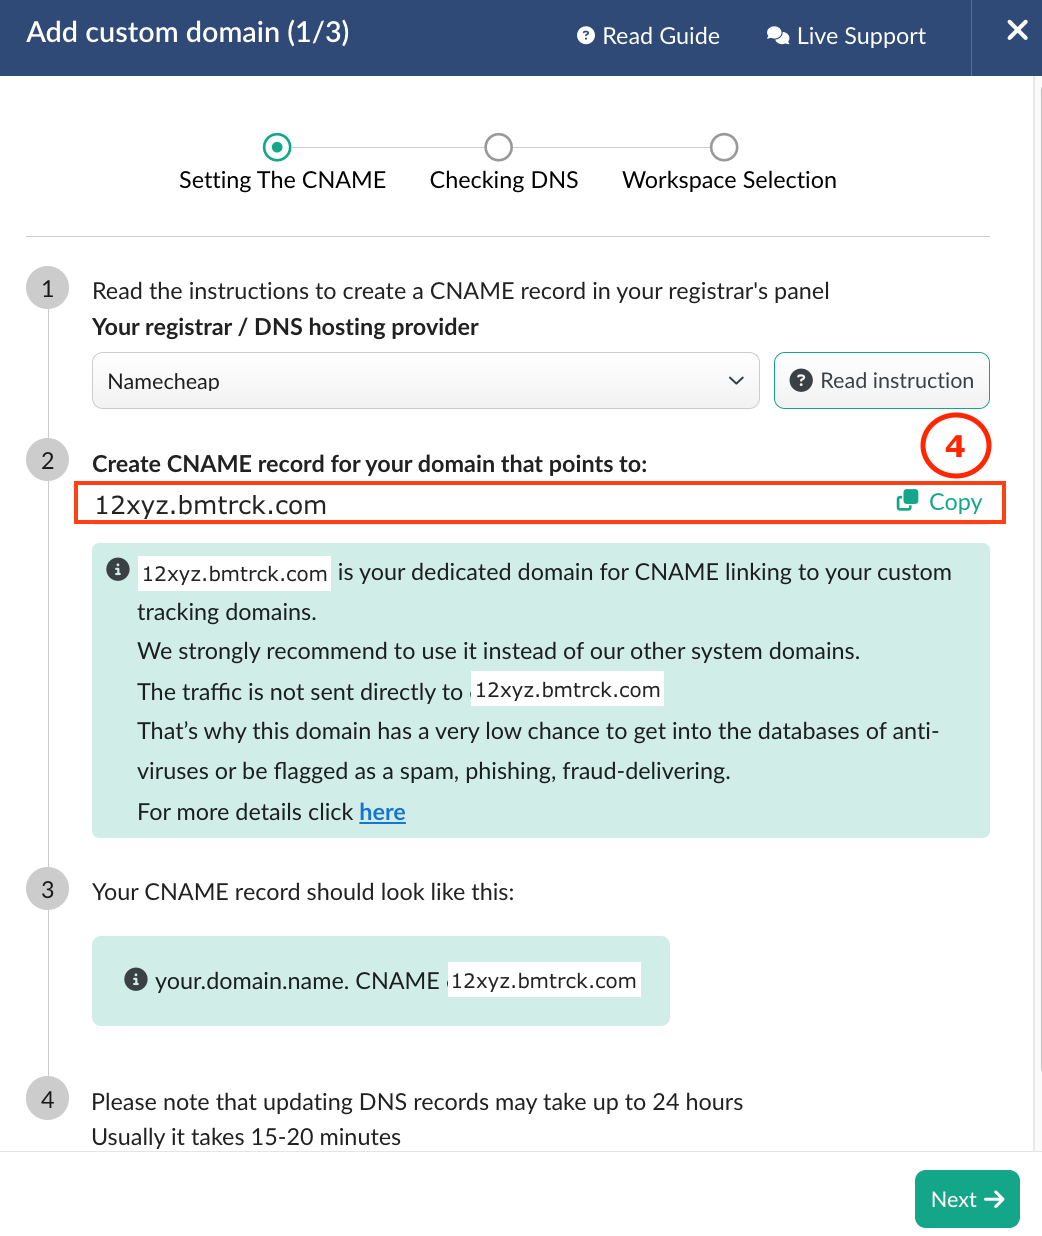
5. In your domain registrar, create a CNAME record for your tracking domain and point it to the BeMob domain. All other fields should be completed according to the recommendations of your registrar.
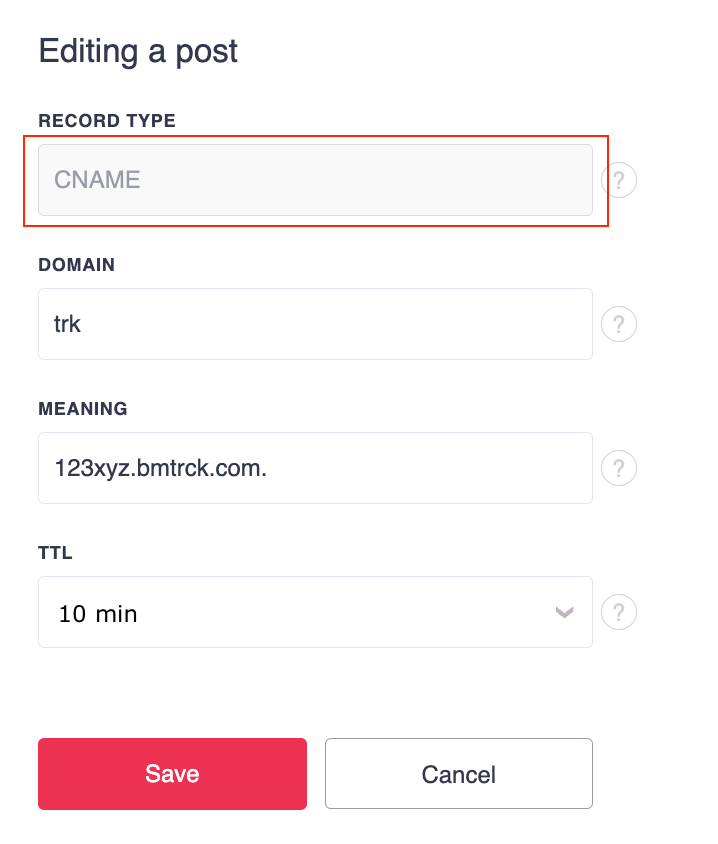
6. Copy the CNAME domain record and return to BeMob.
7. Click Next in the Add custom domain window.
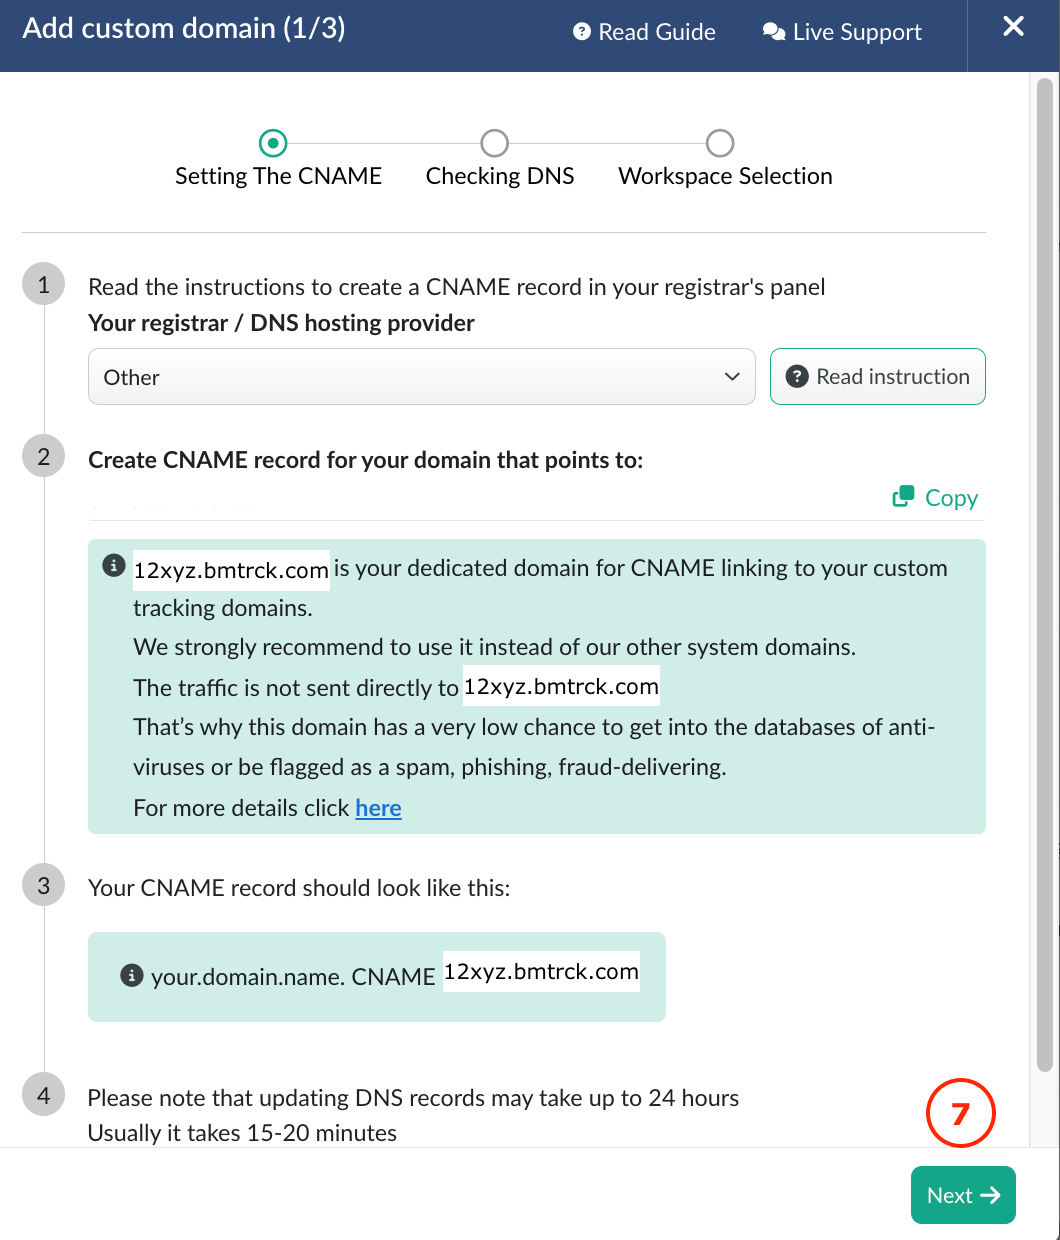
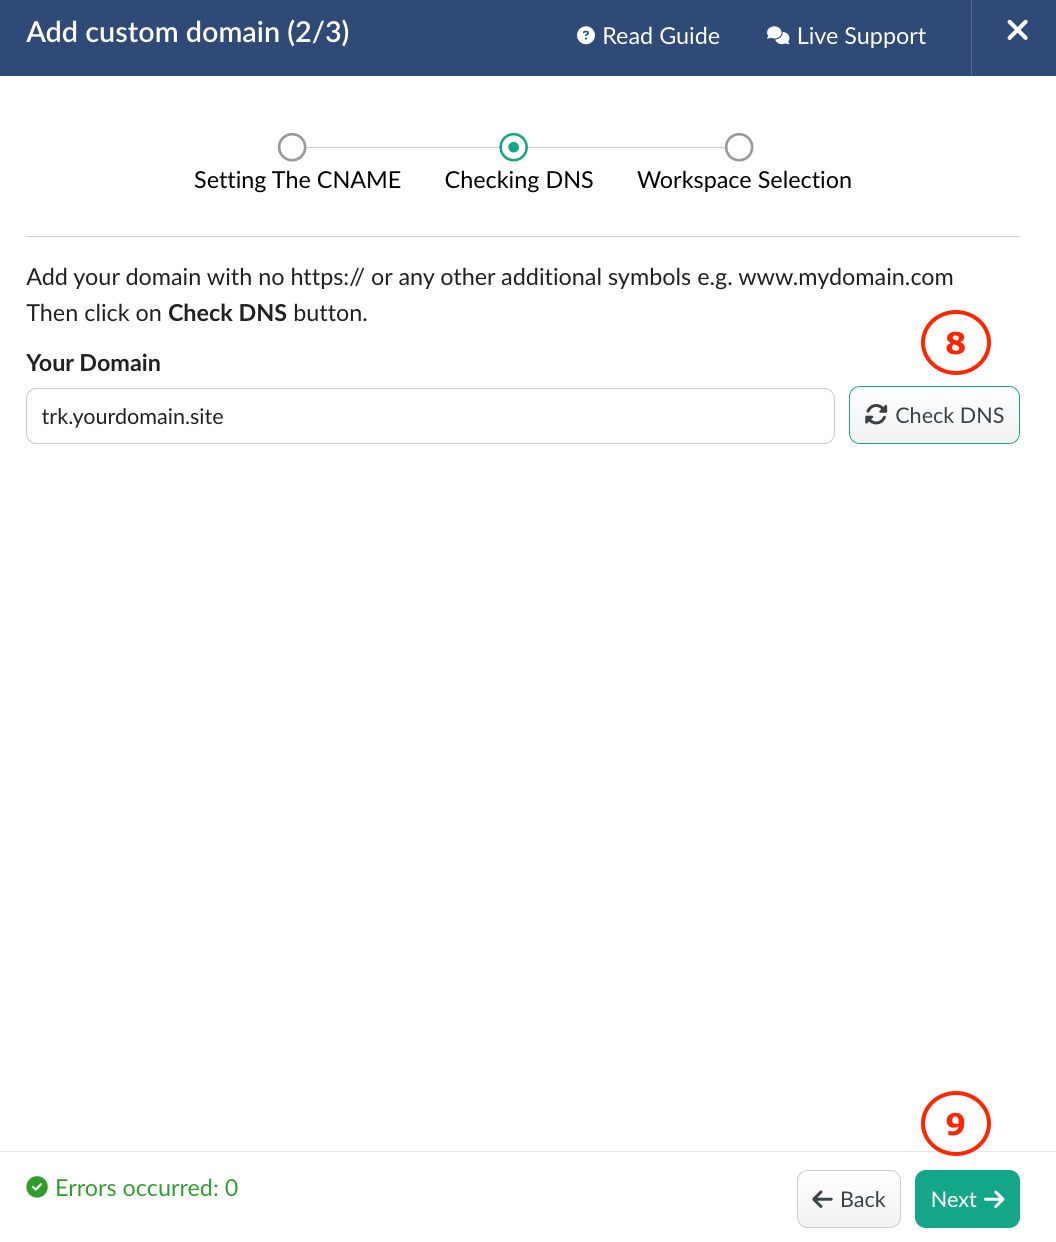
8. Enter your custom domain, and click Check DNS.
❗️ If your domain is shown with a trailing dot, remove the dot before entering it in BeMob. Do not add spaces.
9. Click Next.
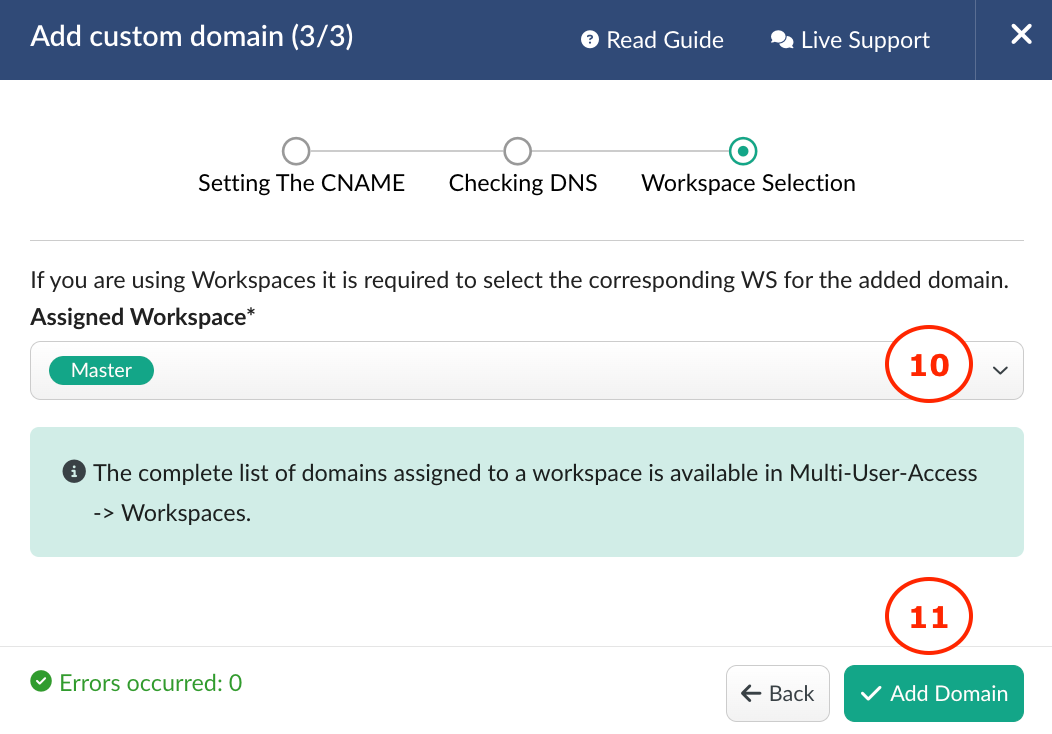
10. Select a Workspace. If you do not use Workspaces, leave Master selected.
Check our Introduction to Workspaces guide to learn more about workspaces.
11. Click Add Domain.
The added domain will appear in your list of domains.
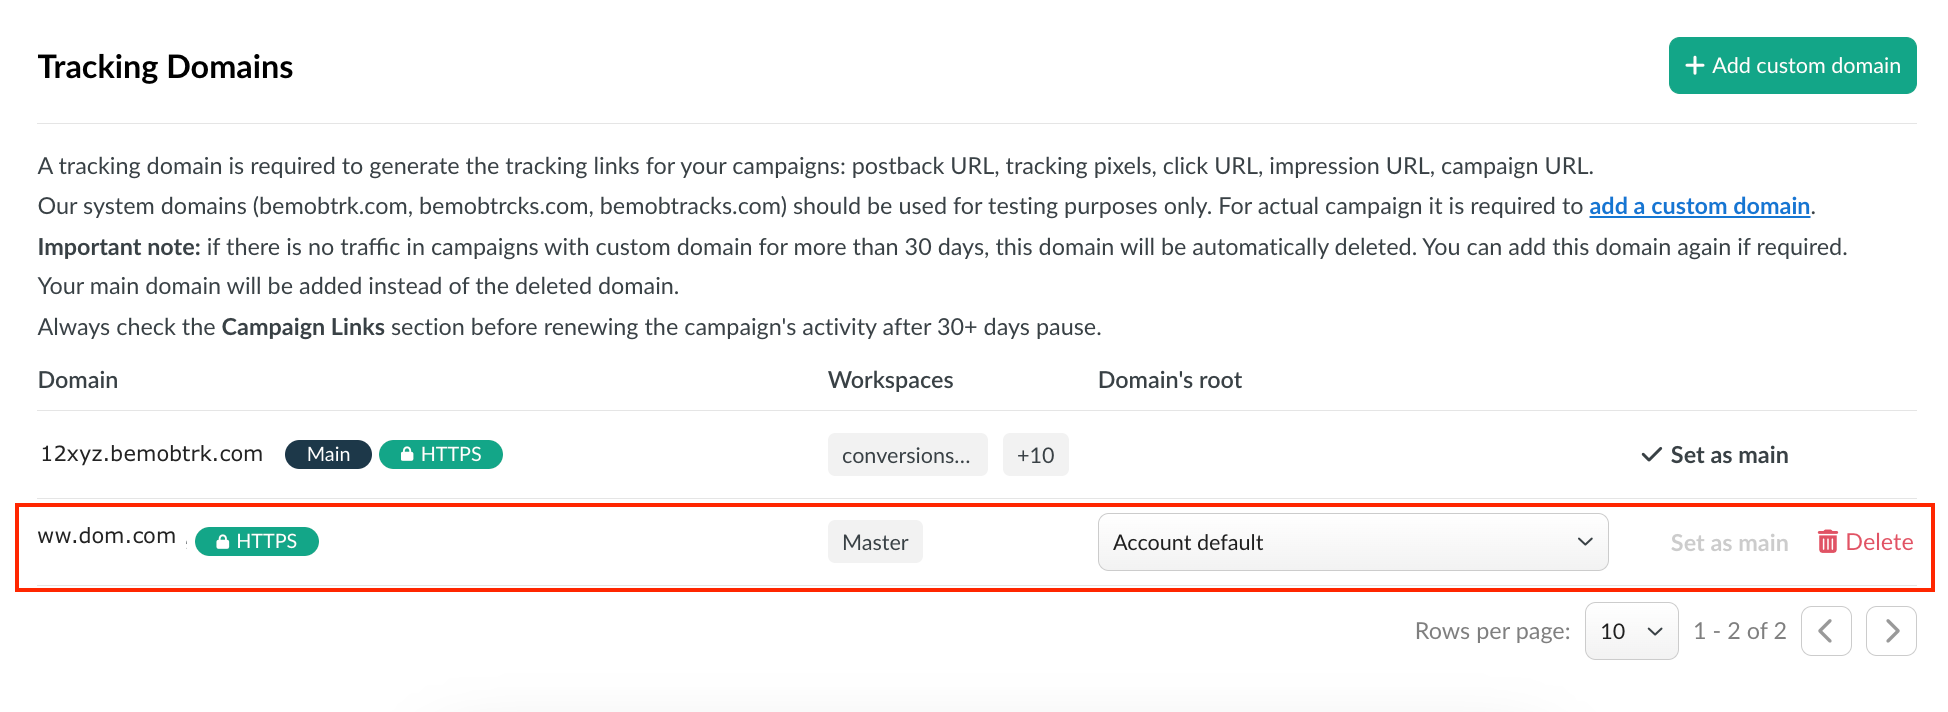
❗️ The SSL certificate will be automatically available for your custom domain within 5-20 minutes after you add the domain in BeMob. However in some cases it may take up to 24 hours to issue the SSL.
If a certificate is not available within an hour, contact our support team via live chat or at support@bemob.com.
The issuance and maintenance of SSL certificates are provided free of charge.
💡 If you want to manage DNS settings and SSL certificate issuance yourself, please contact support team via live chat or at support@bemob.com.
¶ Frequently Asked Questions
- Why didn’t I receive the registration email (.gmail.com)?
Here are the possible reasons why the email is not received:
On your Gmail account
1) The emails are going to Spam.
- Search Gmail for: from:noreply@bemob.com
- Check the Spam folder.
- If you find them there, mark them as “Not spam.”
2) A filter is automatically deleting/archiving the emails.
- Check Gmail → ⚙️ Settings → See all settings.
- Go to Filters and Blocked Addresses.
- Look for filters that:
- delete emails
- skip inbox
- forward emails
- mark as read
- Remove or edit anything affecting that sender.
3) You accidentally blocked our address
In Filters and Blocked Addresses, see if the sender is listed under blocked addresses.
Our email address is noreply@bemob.com
4) Storage is full
If your Google account storage is full, Gmail may stop receiving messages. Check your storage in Google account settings.
Once all these settings are checked, you can reapply for the account creation with the same email. Looking forward to your feedback at this point.
- Why didn’t I receive the registration email (qq.com)?
Here are the possible reasons why the email is not received:
On your qq.com account
1) The emails are going to Spam.
- Search mailbox for: from:noreply@bemob.com
- Check the Spam folder.
- If you find them there, mark them as Not spam.
2) A filter is automatically deleting/archiving the emails.
- Check qq.com → ⚙️ Settings → See all settings
- Go to Filters and Blocked Addresses
- Look for filters that:
- delete emails
- skip inbox
- forward emails
- mark as read
- Remove or edit anything affecting that sender.
3) You accidentally blocked our address
In Filters and Blocked Addresses, see if the sender is listed under blocked addresses. Our email address is noreply@bemob.com
4) Storage is full
If your mailbox storage is full, the message will not be received.
Once all these settings are checked, you can reapply for the account creation with the same email. Looking forward to your feedback at this point.
📩 Need help? Contact support via live chat or email at support@bemob.com