¶ What is Invalid Traffic?
The term of invalid traffic is determined as the artificial surge of clicks and impressions that as usual don't come from real users.
The nature of such traffic can be both accidental or related to intentional fraudulent activities. IVT is often confused with ad fraud, but not all invalid traffic is malicious. Nevertheless, detection of all forms of IVT is necessary to assure that ad budget is spent properly, and your ads are shown to relevant customers.
¶ IVT Metrics: General
With BeMob you can track the invalid traffic that appears in your campaigns. The checking is based on the IP address data associated with a visit, click or impression. This is how BeMob can determine if the IP originates from the known data centers or black lists.
Traffic From Data Centers
In general, data centers have their own dedicated IP addresses. BeMob checks if the IP of a visit, click or impression belongs to a data center. And although the IP address belonging to the data bases does not necessarily indicate that it is definitely invalid traffic, the probability increases.
Traffic From Blacklisted IPs
BeMob checks if the IP addresses of incoming traffic matches the lists of IP addresses that are blacklisted. This includes non-routable IPs, "hijacked" or leased by professional spam or cyber-crime operations IPs, IPs that are actively used by specific malwares or trojans etc.
Other IVT metrics are based on the unusual frequency and amount of events (impressions, visits, clicks) appeared in certain campaign or BeMob account in general.
Frequent Events
BeMob detects the amount of impressions, visits and clicks generated by IP addresses of incoming traffic and considers such events as suspicious if their amount becomes unusual.
Frequent Campaign Events
In case when there is more than 60 impressions, visits or clicks per minute generated by a certain IP address within a campaign, such traffic will be automatically considered by BeMob as suspicious.
Fast Clicks
This metric is dedicated to clicks data only. BeMob identifies clicks on CTA button of your landing page that are too fast — less than 800 msec between a visit and a click and considers such clicks as fraudulent.
¶ Cost and Availability
The availability and cost of metrics depends on your pricing plan.
If the metric is not included in your plan, you can purchase it as an add-on to your current plan. No need to upgrade to a higher pricing plan just because you need to activate IVT metrics.
🔑 To find out which features are already included in your pricing plan, go to the Settings / Plans Description tab.
To activate the metrics for your account, access the Subscription section. In the Features list you will see the Invalid Traffic Tracking section.
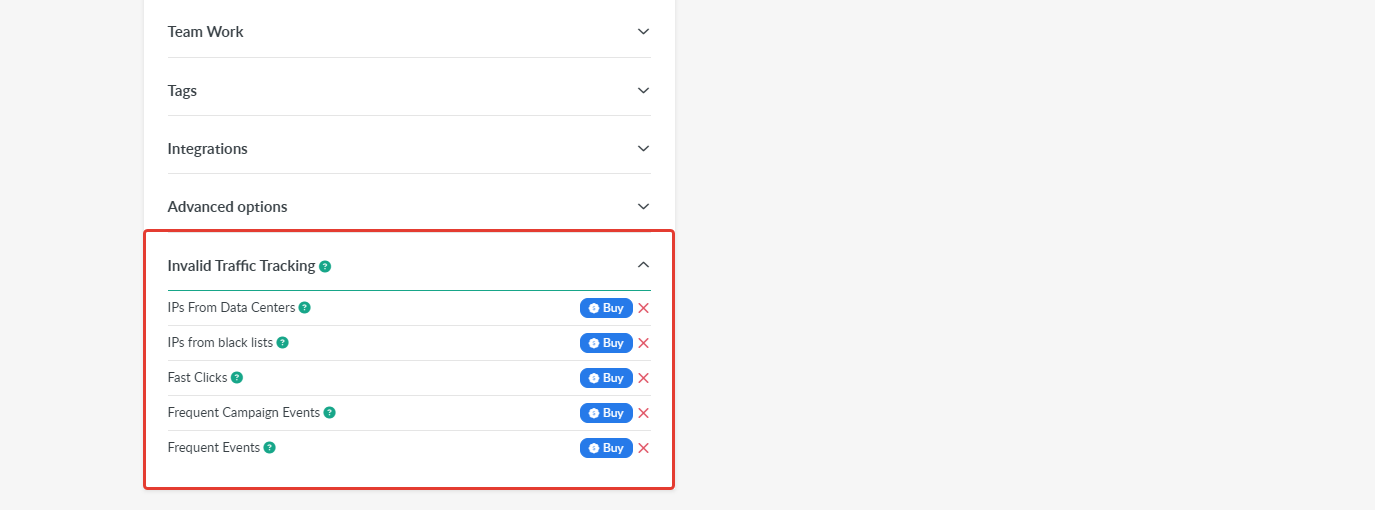
Each metric should be purchased separately. Click on Buy button next to the corresponding metric.
After the metric is purchased, you will see the Switch off button next to its name.

It means that you can deactivate it anytime straight from your BeMob panel. The remnant amount from the initially paid will be added to your account balance with BeMob and used for future purchases.
🔑 Learn more about BeMob subscription management in this guide.
The access to purchase the IVT metrics tracking is allowed for the account owner only. However once the option is purchased, the stats will be visible for all the team members depending on their access level.
The traffic distribution settings can also be accessed by all the team members unless this right is not limited on their access level. You can also create the shared reports with suspicious traffic tracking results.
If you need any help with purchasing or switching off the feature for your account, our support team is always at your disposal in the live chat.
With BeMob you can not only identify the suspicious traffic, but also route such traffic to the required destinations or even cut it off from your campaigns using the bot rules. Let’s see how it can be done 👇
¶ Suspicious Traffic in Reports
After the IVT metrics are activated the traffic that goes from blacklisted IPs or IPs from data centers will be displayed in the suspicious traffic columns of your reports.
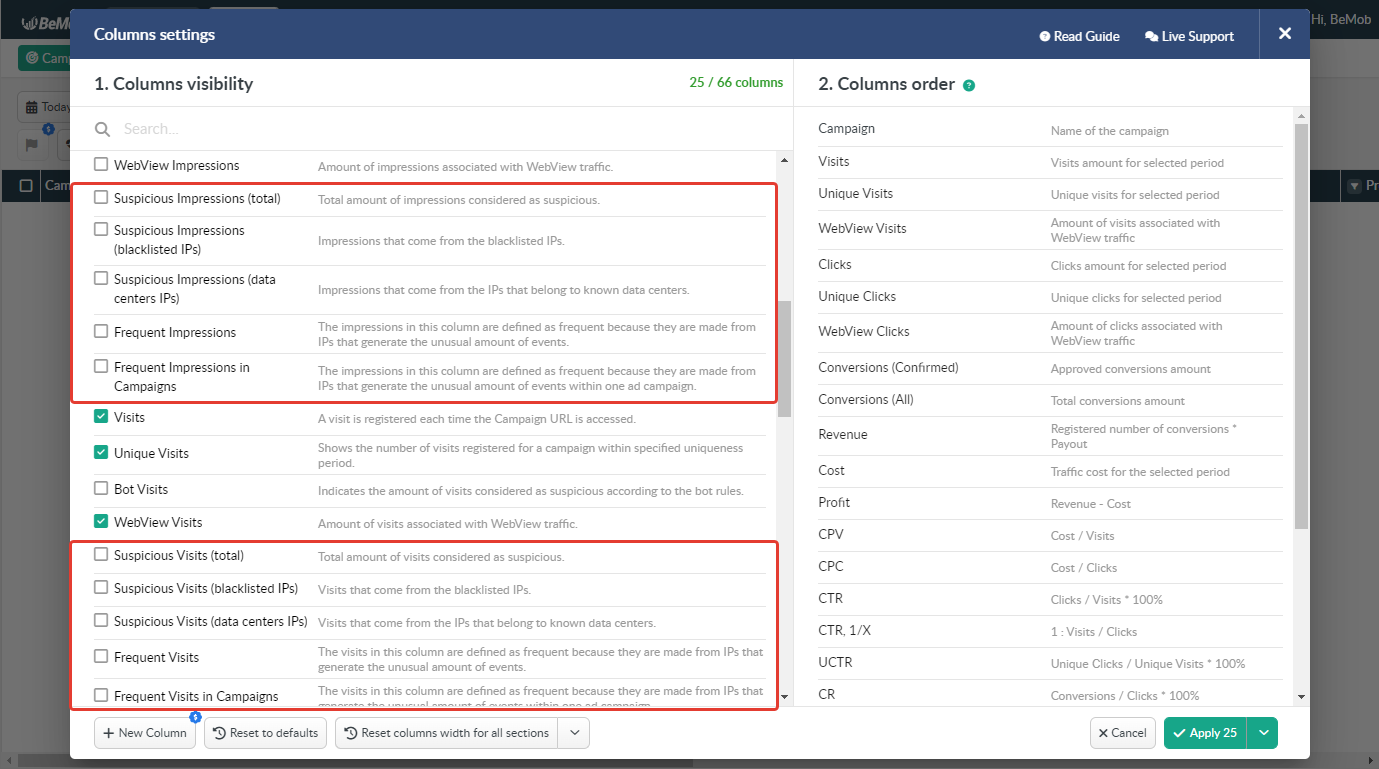
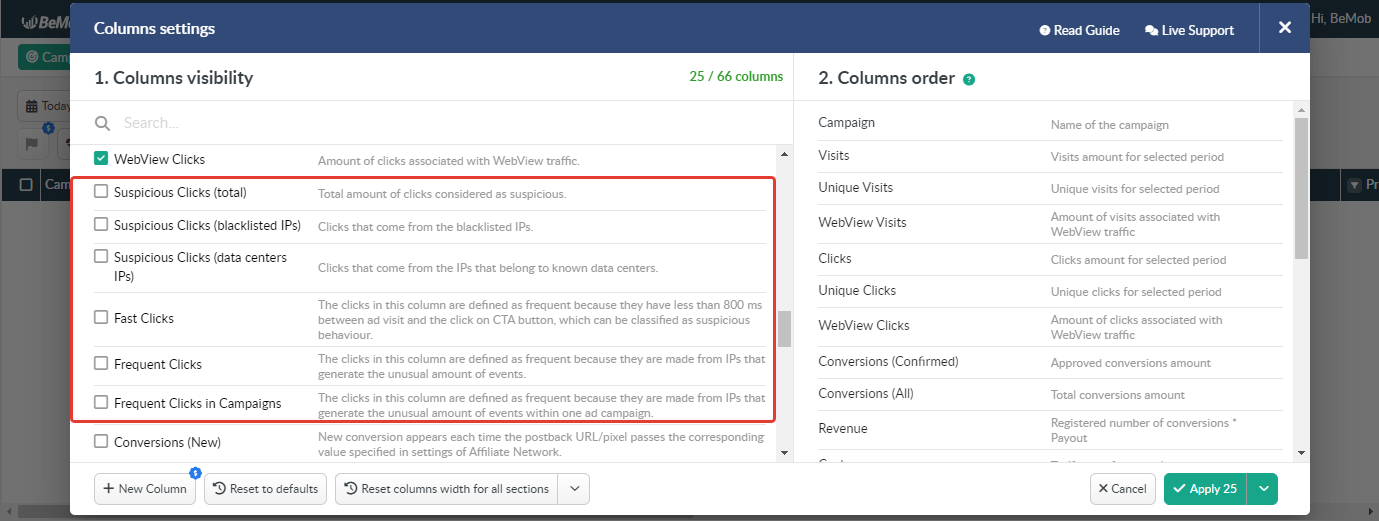
To add these columns to your reports, access the Columns settings and mark the corresponding checkboxes.

Now let’s see what each column is responsible for.
An impression is tracked when an ad banner is loading on a page.
In the Suspicious Impressions (blacklisted IPs) column you will see the amount of this type of events that came from blacklisted IPs.
In the Suspicious Impressions (data centers IPs) column the data on impressions from known data centers is registered.
Suspicious Impressions (total) calculates the amount of both impressions from blacklisted IPs and data centers IPs.
Frequent Impressions column shows the amount of impressions that belong to IP addresses generated the unusual amount of impressions.
Frequent Impressions In Campaigns column displays the amount of impressions that belong to IP addresses generated the unusual amount of impressions within one campaign.
A click is registered when a visitor arrives on your landing page and clicks the CTA button.
Suspicious Clicks (blacklisted IPs) is responsible for registering clicks that come from IP addresses from blacklists.
In the Suspicious Clicks (data centers IPs) column you will see the amount of clicks associated with the IP addresses of known data centers.
Suspicious Clicks (total) summarizes the data from Suspicious Clicks (blacklisted IPs) and Suspicious Clicks (data centers IPs).
In the Frequent Clicks column you will find the amount of clicks that belong to IP addresses generated the unusual amount of clicks.
Frequent Clicks In Campaigns column calculates the amount of clicks that belong to IP addresses generated the unusual amount of clicks within one campaign.
Fast Clicks column shows the amount of clicks which are too fast — less than 800 msec between a visit and a click.
A visit is appearing in your BeMob stats each time your campaign link is accessed.
In the Suspicious Visits (blacklisted IPs) column you will see the amount of this type of events that came from blacklisted IPs.
In the Suspicious Visits (data centers IPs) column the data on campaign visits from known data centers is registered.
Suspicious Visits (total) will show you the total amount of visits for a particular campaign that came from both data centers and blacklisted IPs.
Frequent Visits column displays the amount of visits that belong to IP addresses generated the unusual amount of visits.
Frequent Visits In Campaigns column shows the amount of visits that belong to IP addresses generated the unusual amount of visits within one campaign.
⚠️ If you’re not tracking impressions or clicks for your ad campaigns, you will see 0 in the Suspicious traffic columns.
In this case you should pay attention to the suspicious visits column only. For your convenience we recommend switching off the columns with impressions and clicks.
❇️ Note that you will be able to see the amount of traffic related to the metric you’ve only activated.
Example: you’ve purchased only the IVT metric for tracking the traffic from blacklisted IPs.
In this case you will see the numbers in the Suspicious Impressions, Visits and Clicks (blacklisted IPs) in your reports. You can also use this metric to activate the traffic distribution rule for such a traffic type.
Besides the numbers in the column with Suspicious Impressions, Visits and Clicks (total) will be equal to Suspicious Impressions, Visits and Clicks (blacklisted IPs).
In case when you purchase both tracking the traffic from blacklisted IPs and data centers, the reports will be enriched with the numbers on 2 metrics.
The Suspicious Impressions, Visits and Clicks (total) will show the sum of blacklisted IPs and data centers IPs events.
Now when we have figured out how the data on suspicious traffic will be displayed in the report, let's see what actions can be applied to this type of traffic.
¶ Distribution of Suspicious Traffic
As we mentioned above you can not only see the amount of traffic that is detected as suspicious in BeMob reports, but also use the rules for routing the suspicious traffic to dedicated offers and landing pages.
Suspicious traffic may not always be fraudulent, but the likelihood of it being converted is low.
Using the rules of traffic distribution for suspicious traffic is necessary first and foremost to optimize your advertising campaigns and improve their performance.
The traffic distribution rules can be created for new or existing campaigns.
¶ Setting a traffic distribution rule through campaign settings
To use the rule based on the suspicious traffic it is required to access the campaign settings and click on Add new rule.

Scroll down to see the Suspicious Traffic (Blacklisted IPs), Suspicious Traffic (Data centers IPs), Suspicious Traffic (Frequent Events), Suspicious Traffic (Frequent Campaign Events).
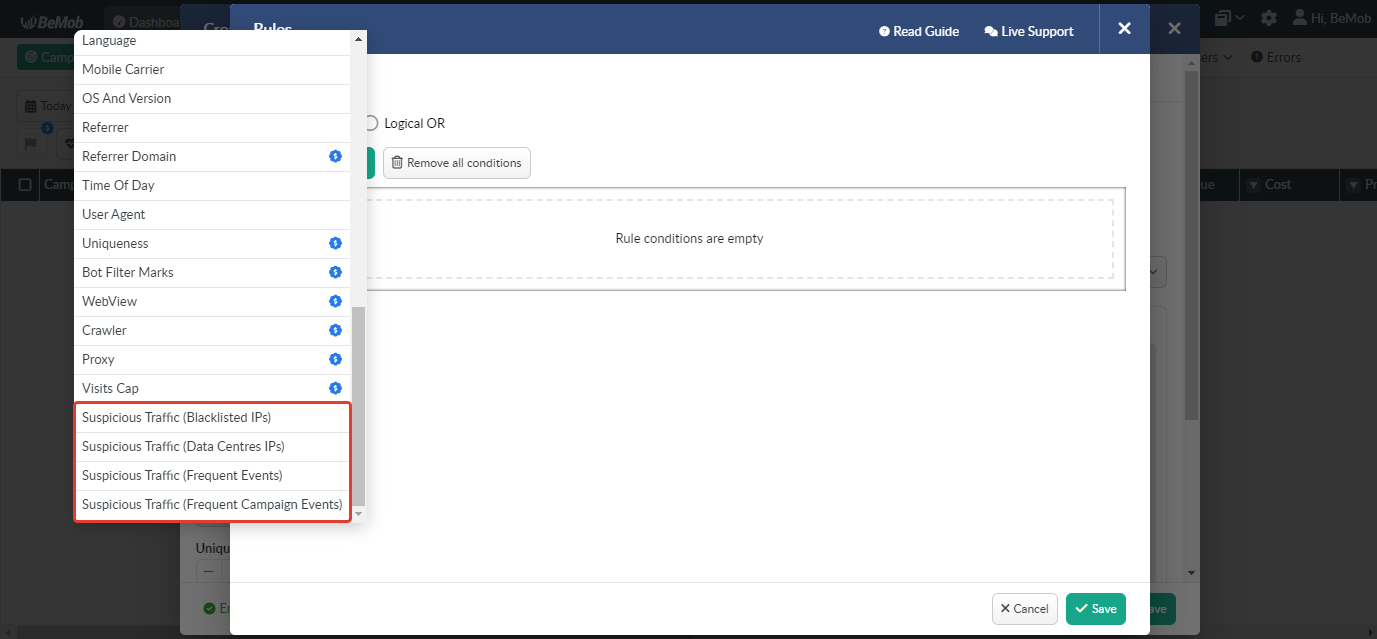
Select the required condition.

If you’re creating the condition to catch the suspicious traffic and forward it to a particular offer or offer + landing page, the settings should be following:

If you’re creating the condition to get rid of the suspicious traffic on a particular offer or landing page + offer, it is required to configure the rule as follows:

If you wish to create the traffic distribution for overall amount of suspicious traffic, it is required to set up the rule with 4 conditions as follows:
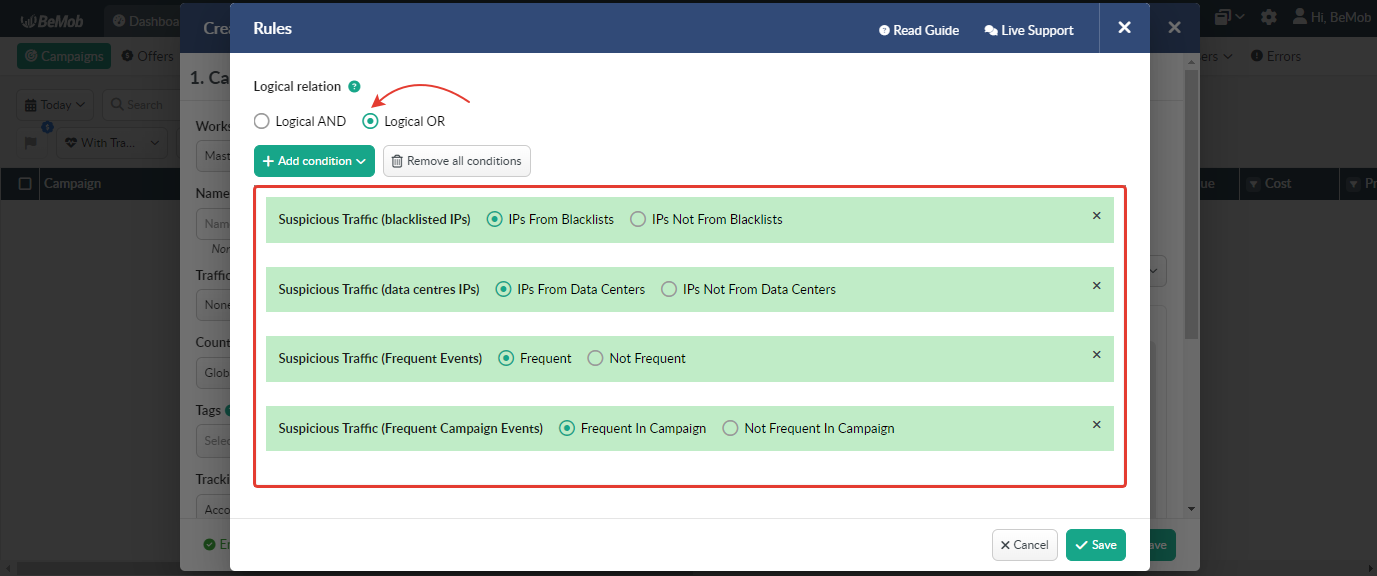
⚠️ As you can see it is also required to select the Logical OR for this rule. In this case if your traffic is either going from blacklisted or data centers IPs or IPs with unusual amount of events, it will be routed to the selected offers or landing pages + offers.
Specify the offers and landing pages (if required) to which the suspicious traffic will be forwarded if the conditions are matched.
¶ Setting a traffic distribution rule through flow settings
If you wish to create a flow with the traffic distribution based on routing the suspicious traffic to the separate offer or landing page + offer, you will need to access your current flow settings or create a new one.

All further settings are matching the steps described above. After you finish, save the settings of your flow.
💡 Learn more about available traffic destinations in BeMob in this guide.
¶ Suspicious Traffic Management via Bot Rules
If you wish to apply the global actions to the traffic that comes from blacklisted or data centers IP addresses or IPs with unusual amount of events, it can be done via setting the bot rules based on suspicious traffic.
There are 3 types of global actions available in the bot rules settings: Mark as Bot, Redirect Bot and Close Connection.
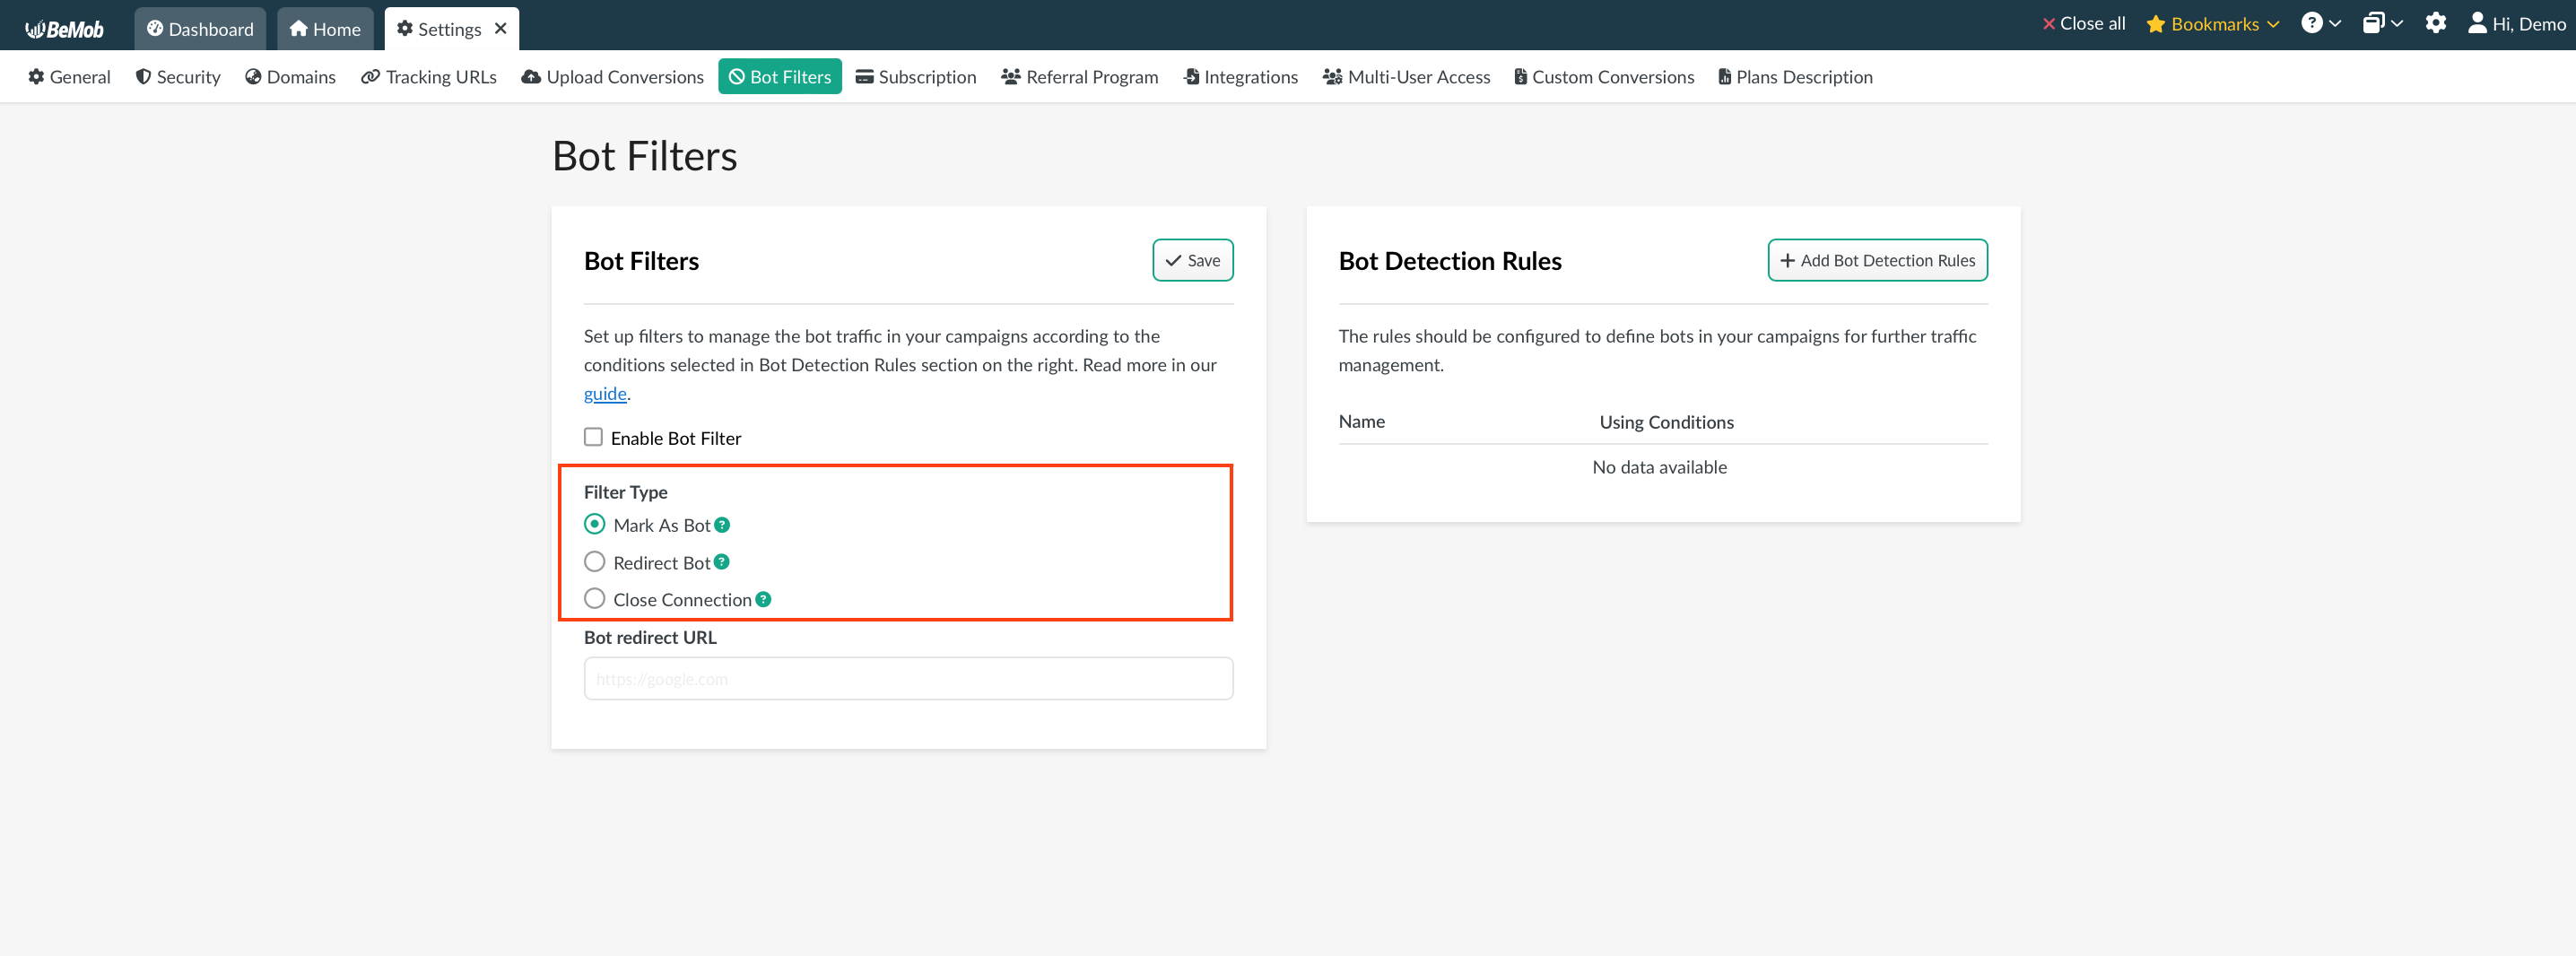
⚠️ Note that if you create a bot rule based on the suspicious traffic, it will be related to all your campaigns. One of 3 selected actions (Mark as Bot, Redirect Bot or Close Connection) will be applied to this type of traffic.
To configure the bot rule it is required to access Settings / Bot Rules.
Then click on Add bot detection button.

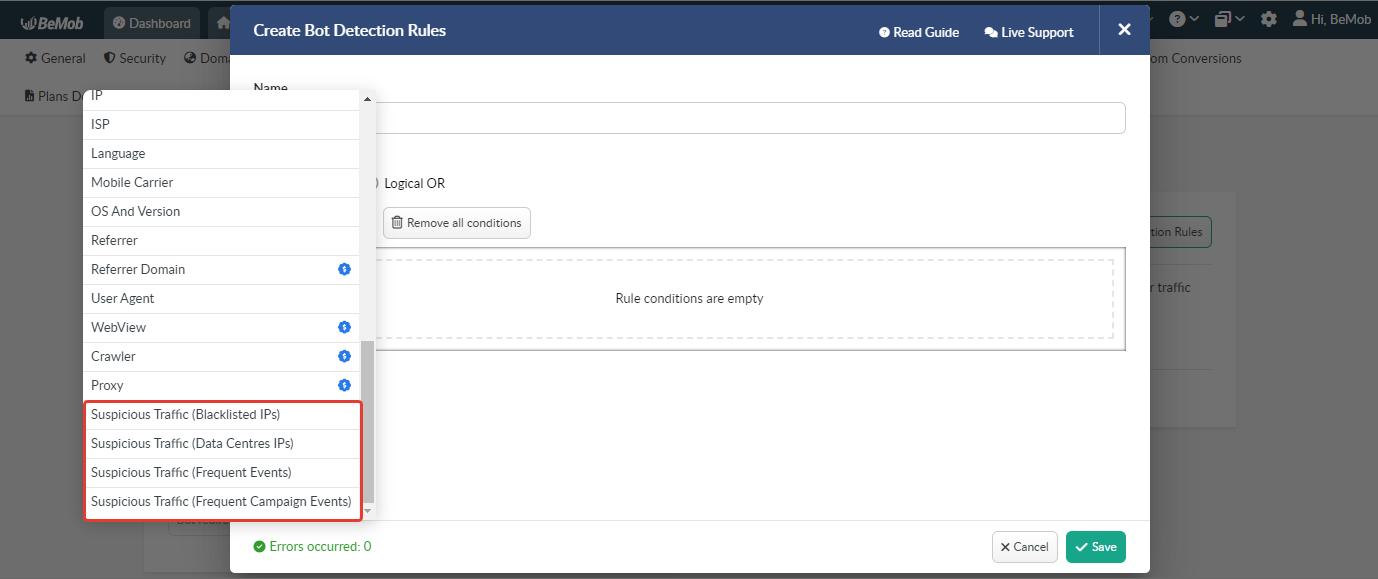
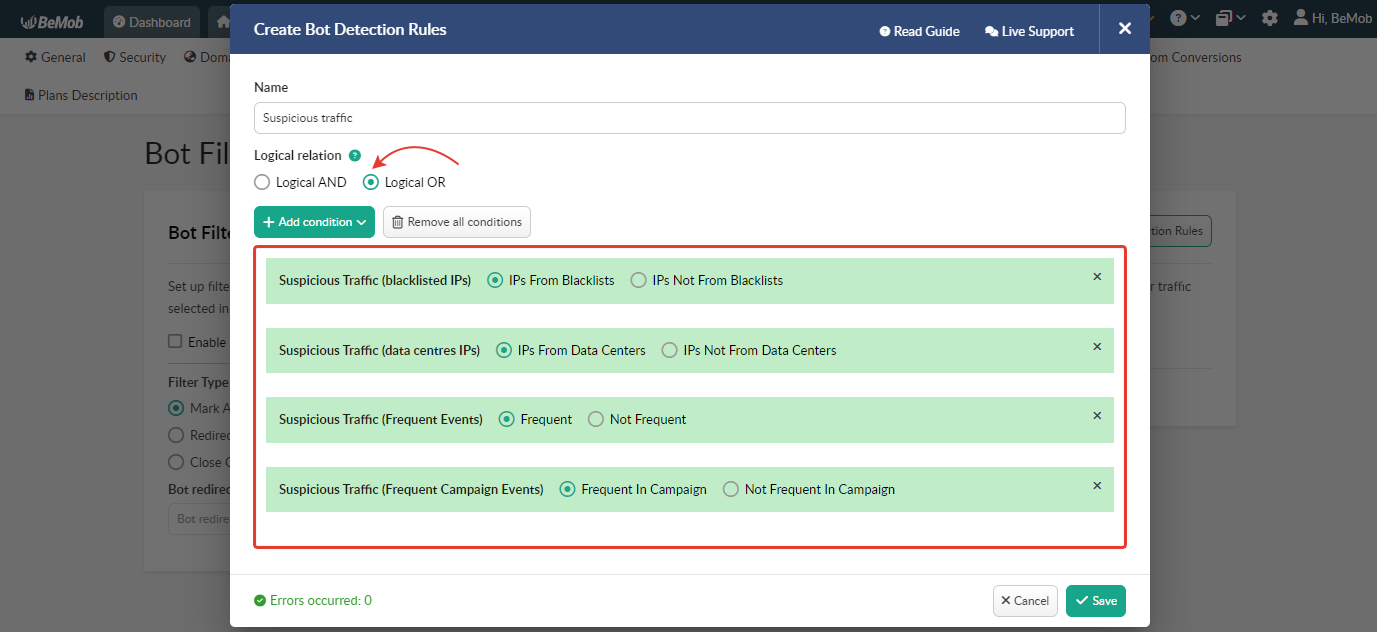
Then select the type of action you wish to perform with the suspicious traffic.
When Mark as bot selected, the suspicious traffic will be also displayed in the Bot traffic columns (Bot clicks, visits and impressions).
In this case the amount of bot traffic will be separated from the overall traffic amount as the bot traffic is calculated individually.
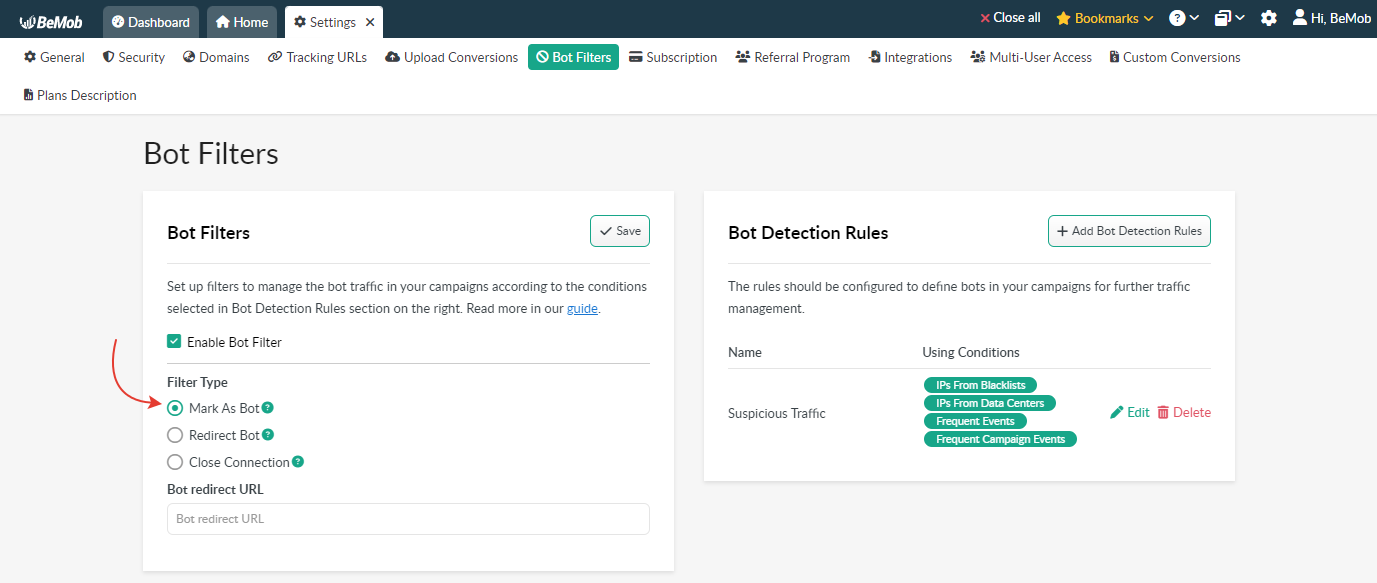
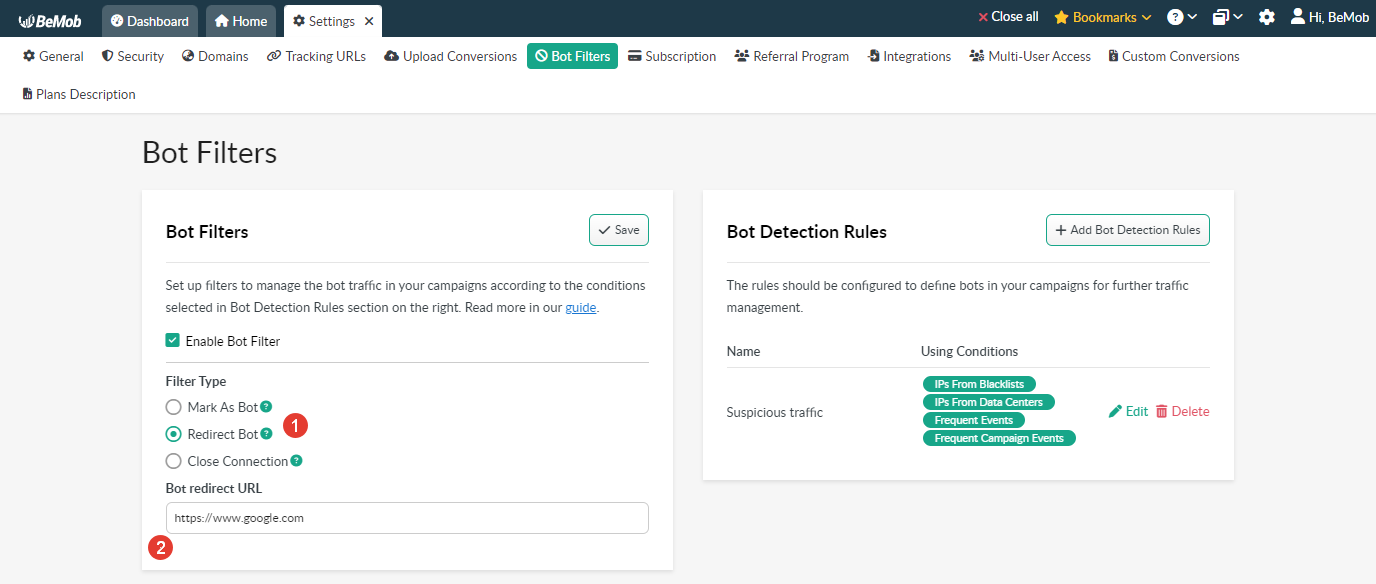
If the option to redirect bot is selected, the suspicious traffic will be forwarded to the single URL specified in the bot rules section. In this case you will no longer see the suspicious traffic in your reports as this type of traffic will not be redirected through our servers.
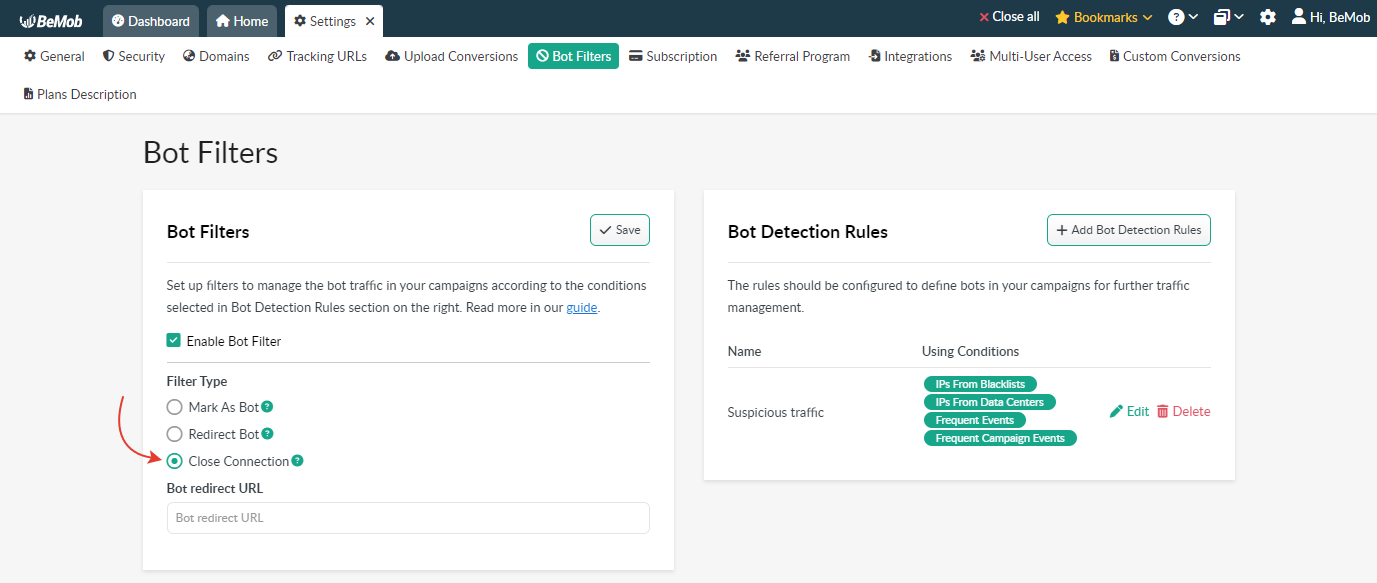
Once you select the Close connection option, this will prevent the suspicious traffic from appearing in your campaigns. With Close connection selected the suspicious traffic will also no longer be displayed in the reports as no redirect from our servers occurs.
¶ Deactivating the IVT metrics
Once you decide to stop tracking the suspicious traffic, you can switch the metric off through the Subscription settings.
Click on Switch off button for this.
⚠️ The remnant amount (from the payment day till the end of current billing period) will be forwarded to your BeMob balance. If you need any help with canceling the purchased feature, please contact our support team via live chat.
The option will be switched off immediately. After that the suspicious traffic will not be displayed in the corresponding columns of your reports and shared reports.
The traffic distribution rules will no longer be active in your campaigns, so you will need to deactivate or delete them from your campaigns or flows.
The bot rules based on the IVT metric will also stop working.