A custom tracking domain is used to generate your campaign links, including:
• Postback URLs.
• Tracking pixels.
• Click URLs.
• Impression URLs and pixels.
• Landing page pixels.
• Campaign URLs.
A custom cloaking domain hides referrer data from affiliate networks ensuring that your traffic sources are not stolen by competitors.
By adding a custom domain you can be sure that your domain is not shared with other clients, not involved in any malicious activity, and not affected by other clients’ activities.
For testing purposes, you can use BeMob system tracking domains:
When running actual campaigns, a custom domain is required.
🟢 The number of custom domains that can be added in your BeMob account depends on the pricing plan.
You can also purchase the option of adding custom domains as add-on on any pricing plan.
More details see on our pricing page.
¶ Purchasing a Custom Domain
There are many domain registrars where you can purchase a custom domain. Some popular ones include: GoDaddy, Namecheap, Cloudflare, Hostinger, Namesilo etc.
The configuration steps for adding the custom domain to BeMob are generally similar across these registrars, but we provide you with the dedicated guides for GoDaddy, Namecheap and Cloudflare at the end of this guide.
You will need to buy a domain, for example, testdomain.com and make sure that it is ready for further configurations.
To set up a custom domain (both tracking and cloaking) with BeMob, you need to configure a CNAME DNS record. This record will connect your custom domain with the BeMob system.
¶ Tracking Domain Settings
On the side of domain registrar the subdomain for the primary domain should be created. Referring to our example with testdomain.com a subdomain could be: go.testdomain.com, track.testdomain.com
Any word or phrase on your selection can be used for the first part of your domain, if this name is not used by any other user on the Internet.
However if you're planning to use this primary custom domain (e.g. testdomain.com) for tracking purposes only, then you can set it in BeMob without adding a subdomain.
1. Go to Settings → Domains section of your BeMob account.
2. Access Tracking section.
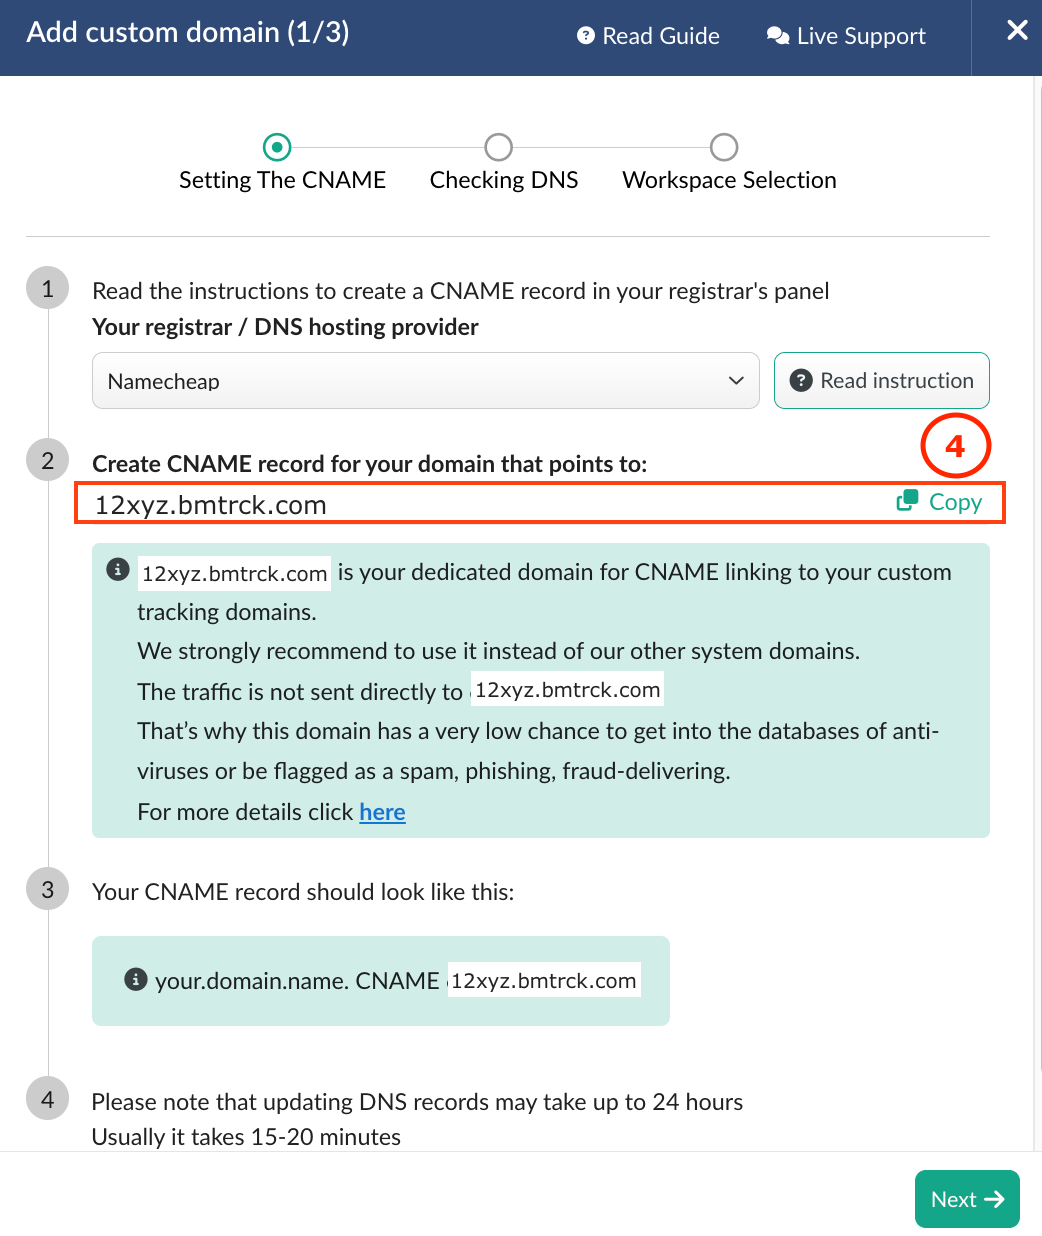
3. Click Add Custom Domain button.

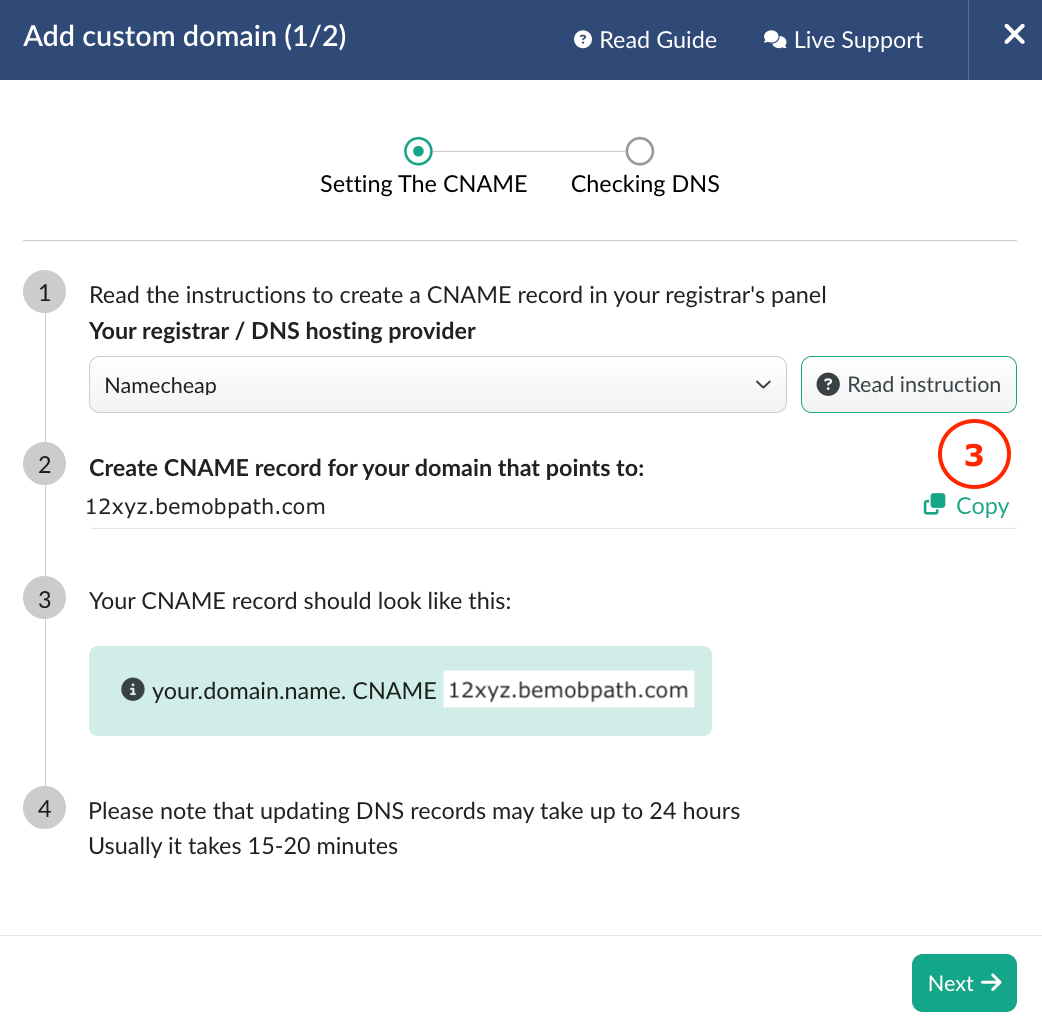
4. Copy a dedicated domain for CNAME records, e.g. 12xyz.bmtrck.com
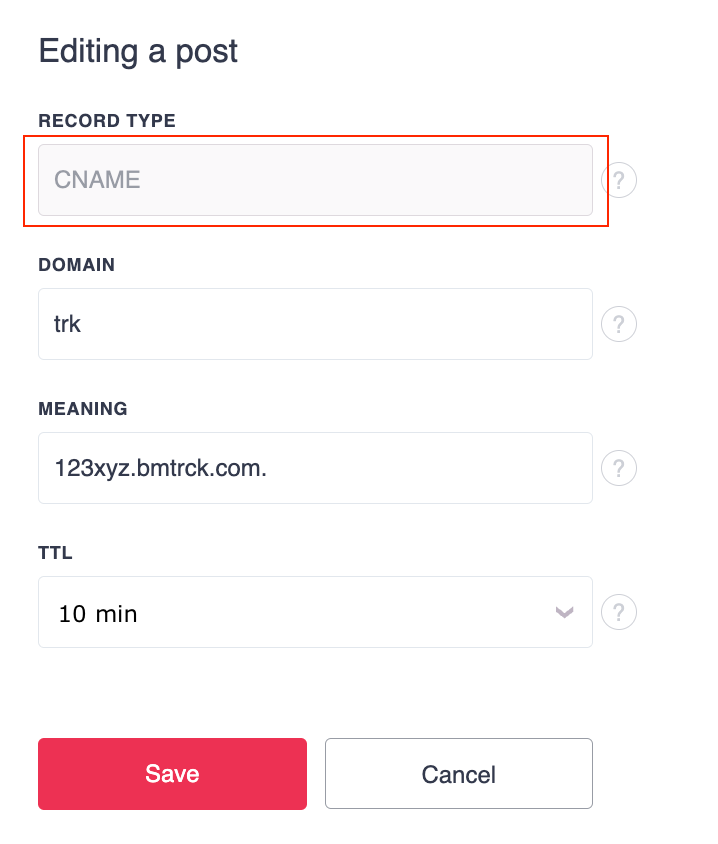
5. Go back to the registrar’s site and set up a CNAME record on the subdomain pointing to your BeMob domain.
The record type should be selected as CNAME. All other fields should be completed according to the recommendations of your registrar.
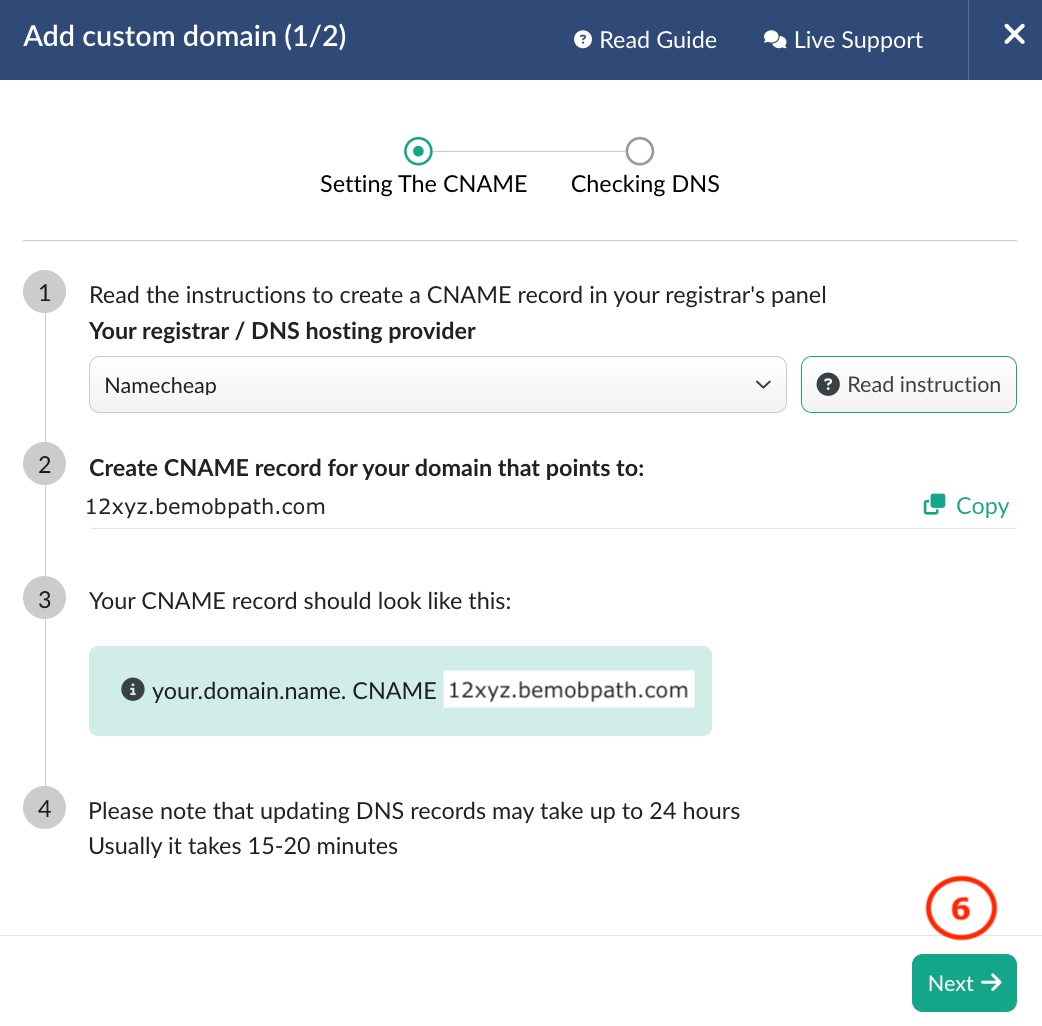
6. Copy the CNAME domain record and go back to domain settings on the side of BeMob.
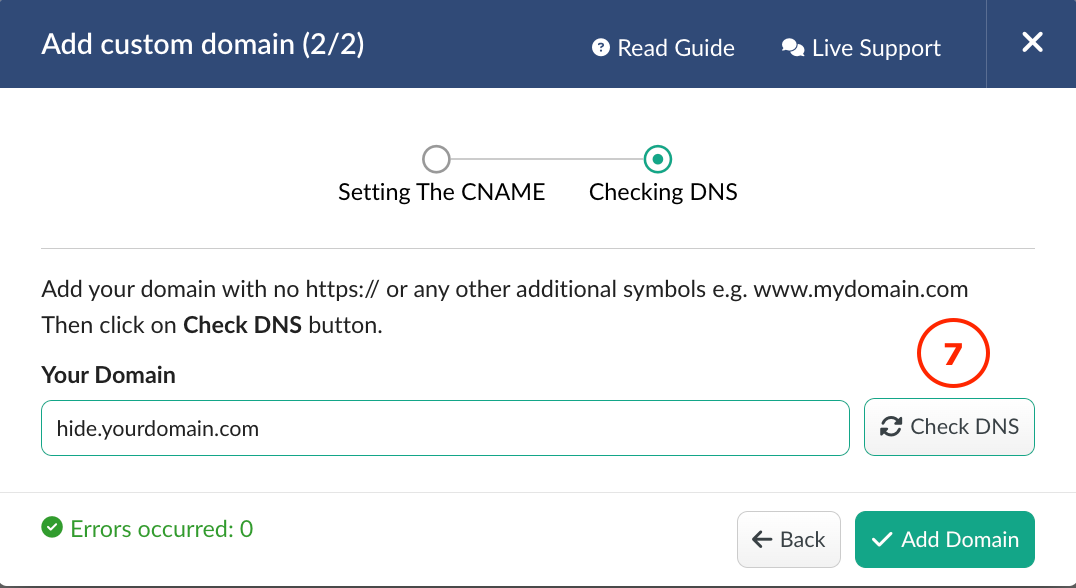
7. In the Add custom domain window click the Next button.

8. Insert your custom domain into new field and press Check DNS button.
If you domain has been configured with a dot at the end, it is required to delete it when adding the record into the domain field on the side of BeMob. No additional spaces should be added.
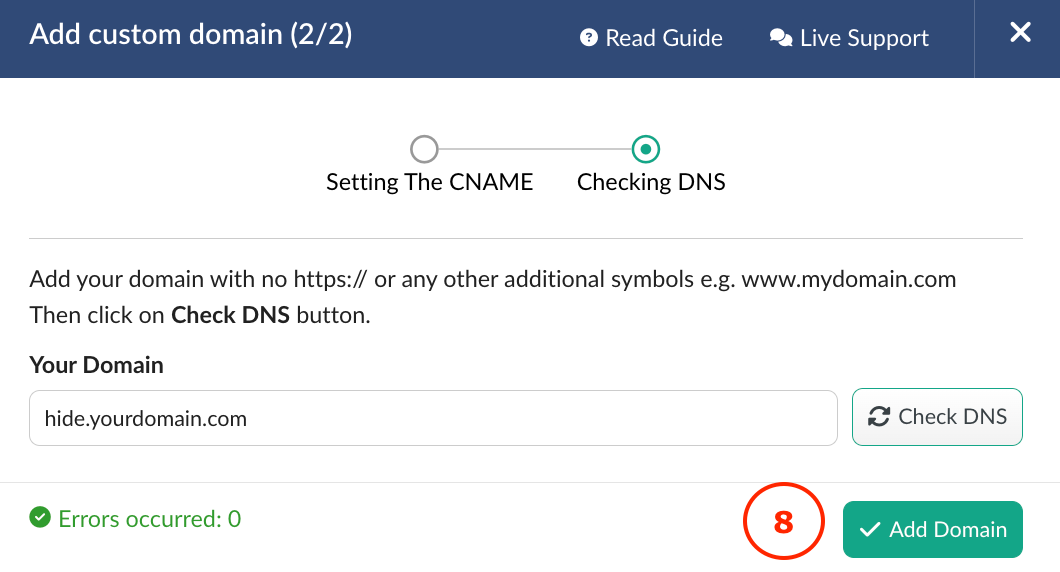
9. Click Next button.
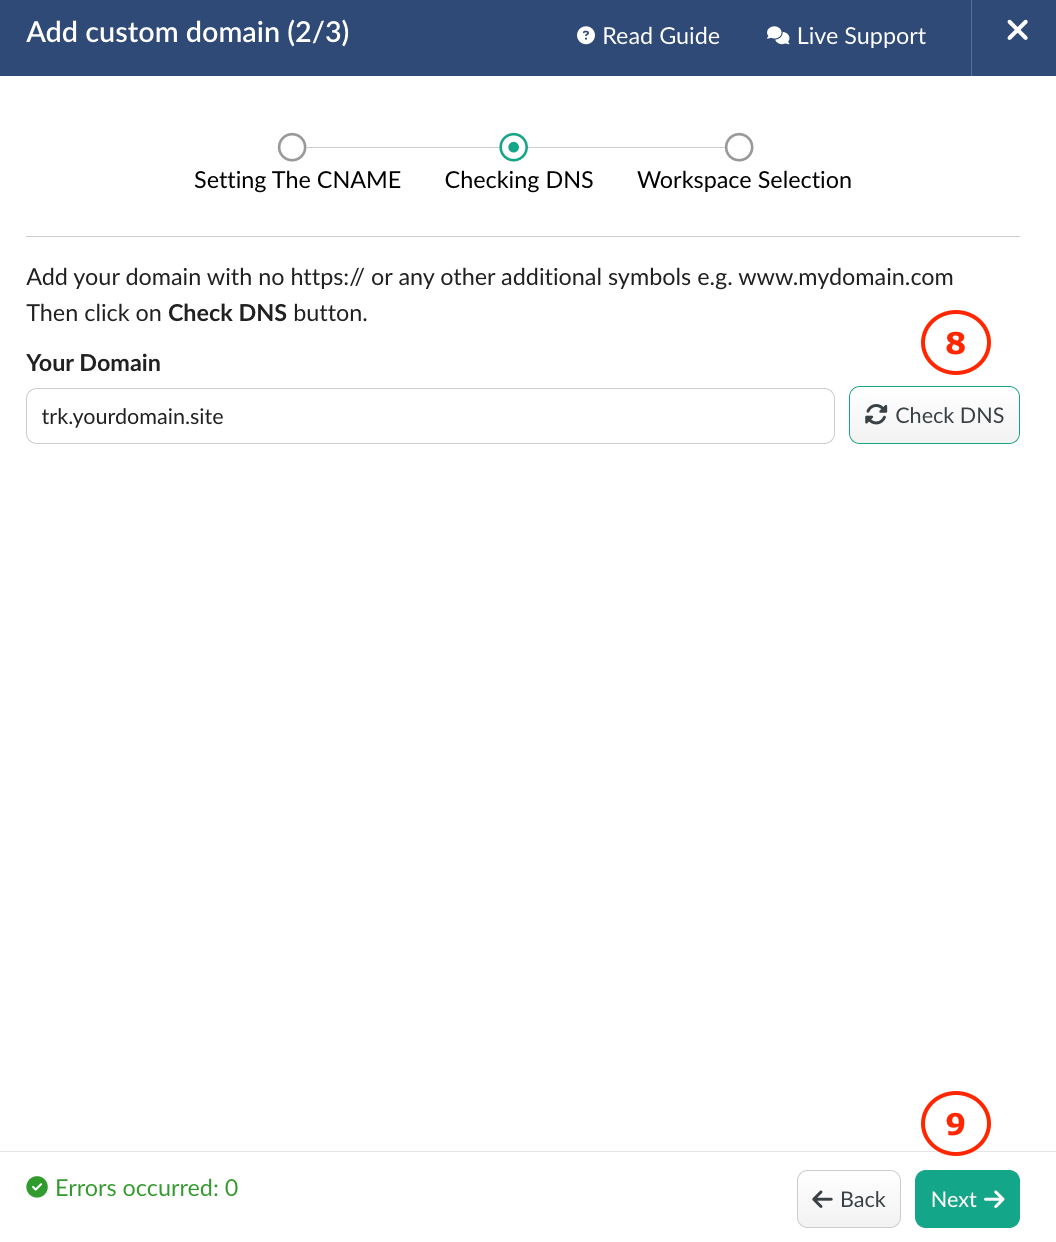
If the domain was configured incorrectly, you will not be able to proceed to the next step.
The following type of errors could occur:

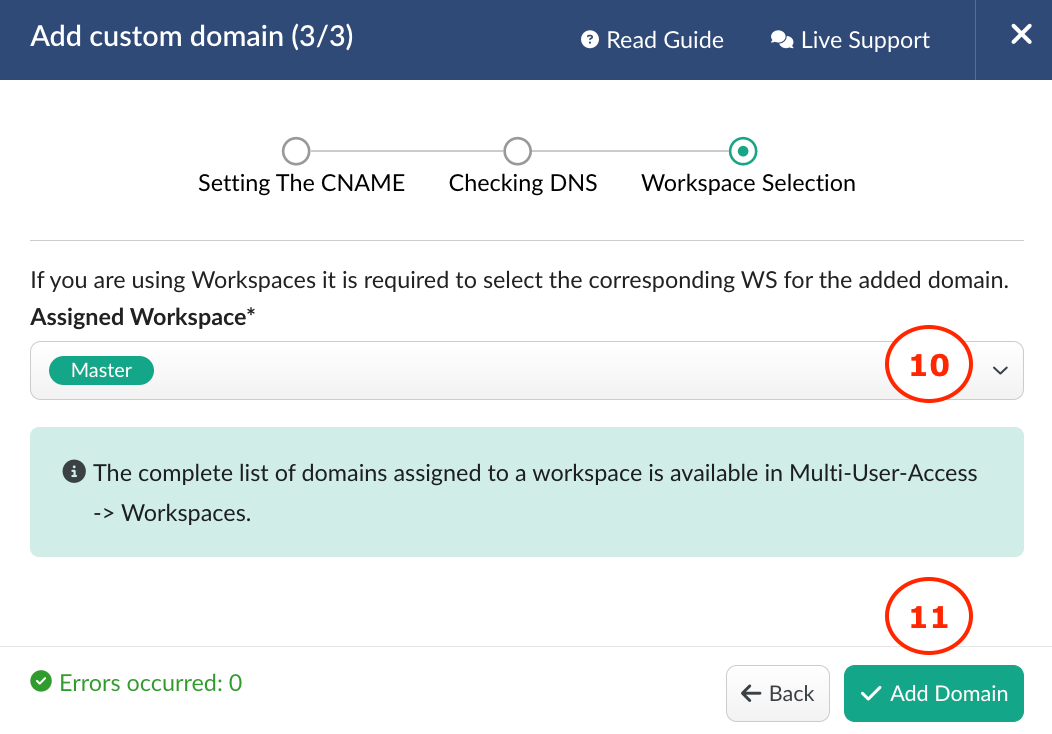
10. After clicking the Next button, you will be redirected to the Workspace Selection step.
Workspaces help separate all working processes into distinct areas. Along with User Management, this option allows you to organize and manage campaigns and elements more effectively.
If you are not actively using the workspaces option, leave the Master selection as the default.
➡️ Learn more in our Workspaces guide.
11. Click Add Domain to proceed.
12. Once the domain is added, it will appear in the list along with other system of BeMob.
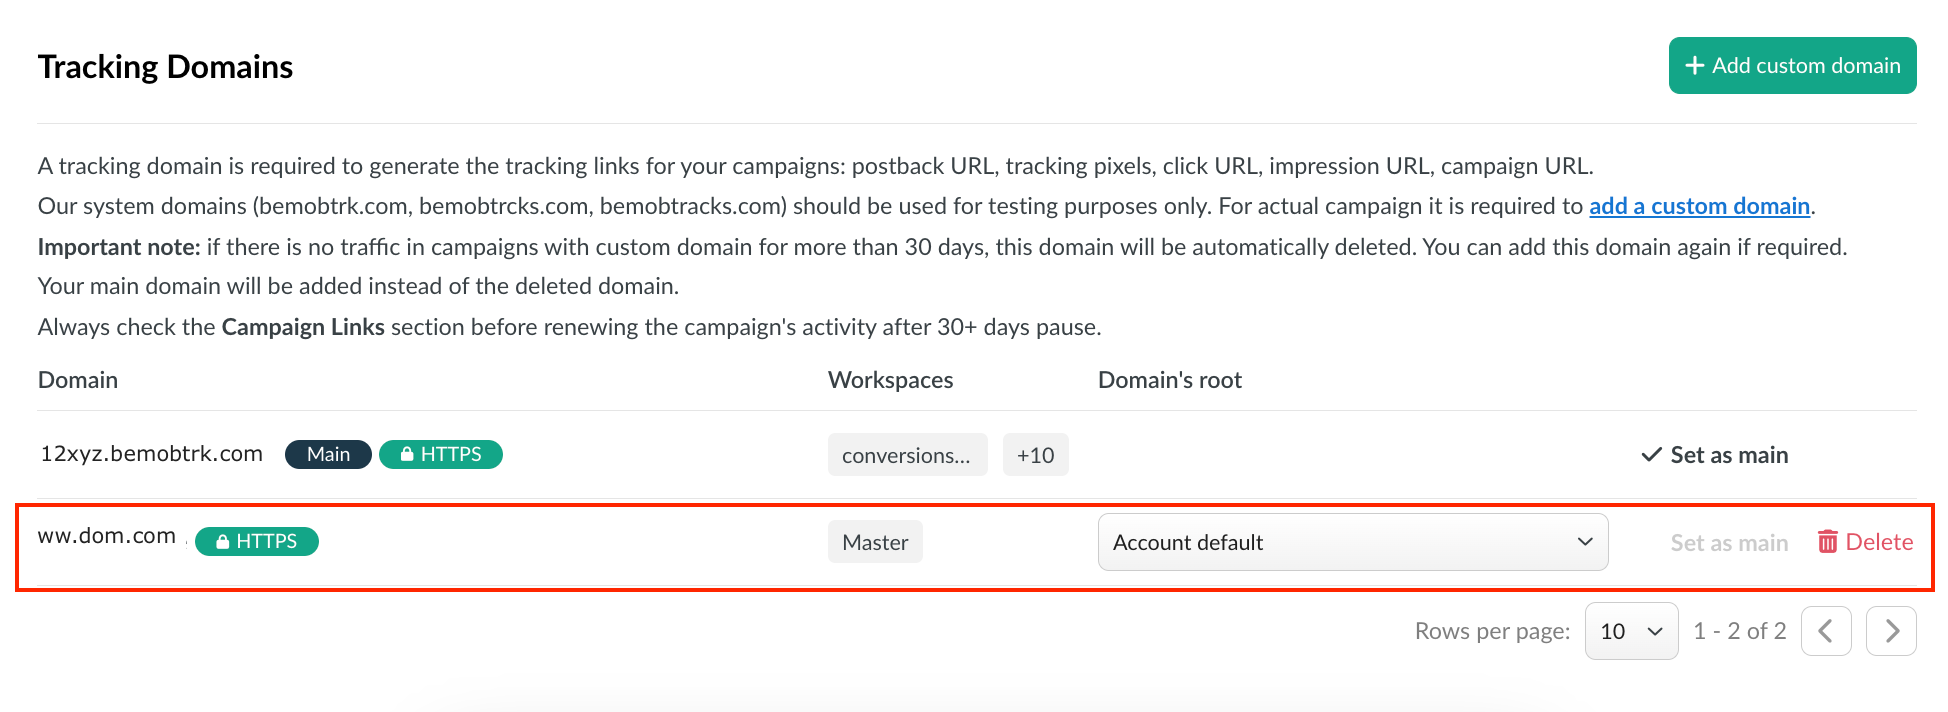
🟢 The SSL certificate will be automatically available for your custom domain within 5-20 minutes after you add the domain in BeMob. However in some cases it may take up to 24 hours to issue the SSL.
If a certificate is not available within an hour, contact our support team via live chat or at support@bemob.com.
The issuance and maintenance of SSL certificates are provided free of charge.
💡 If you want to manage DNS settings and SSL certificate issuance yourself, please contact support team via live chat or at support@bemob.com.
¶ Cloaking Domain Settings
The setup of a custom cloaking domain differs from the setup of a tracking domain only in that you need to specify the system cloaking domain for the CNAME connection to BeMob.
It is required to purchase a domain beforehand.
Follow the steps below to configure a custom cloaking domain:
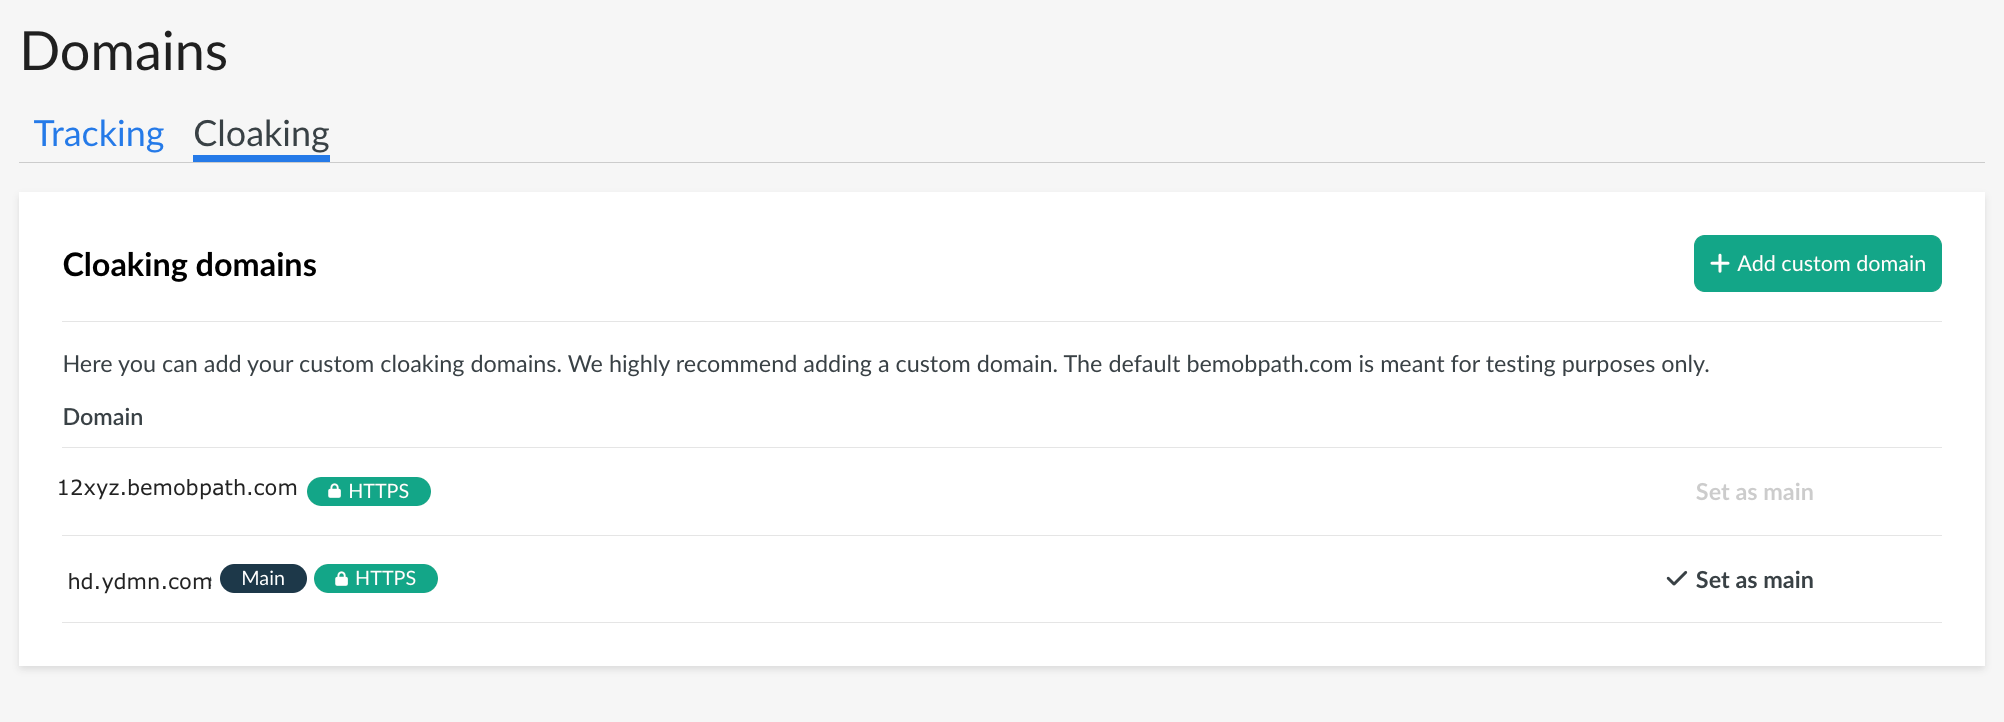
1. Access the Cloaking tab from the Domains section.
2. Click Add Custom Domain button.
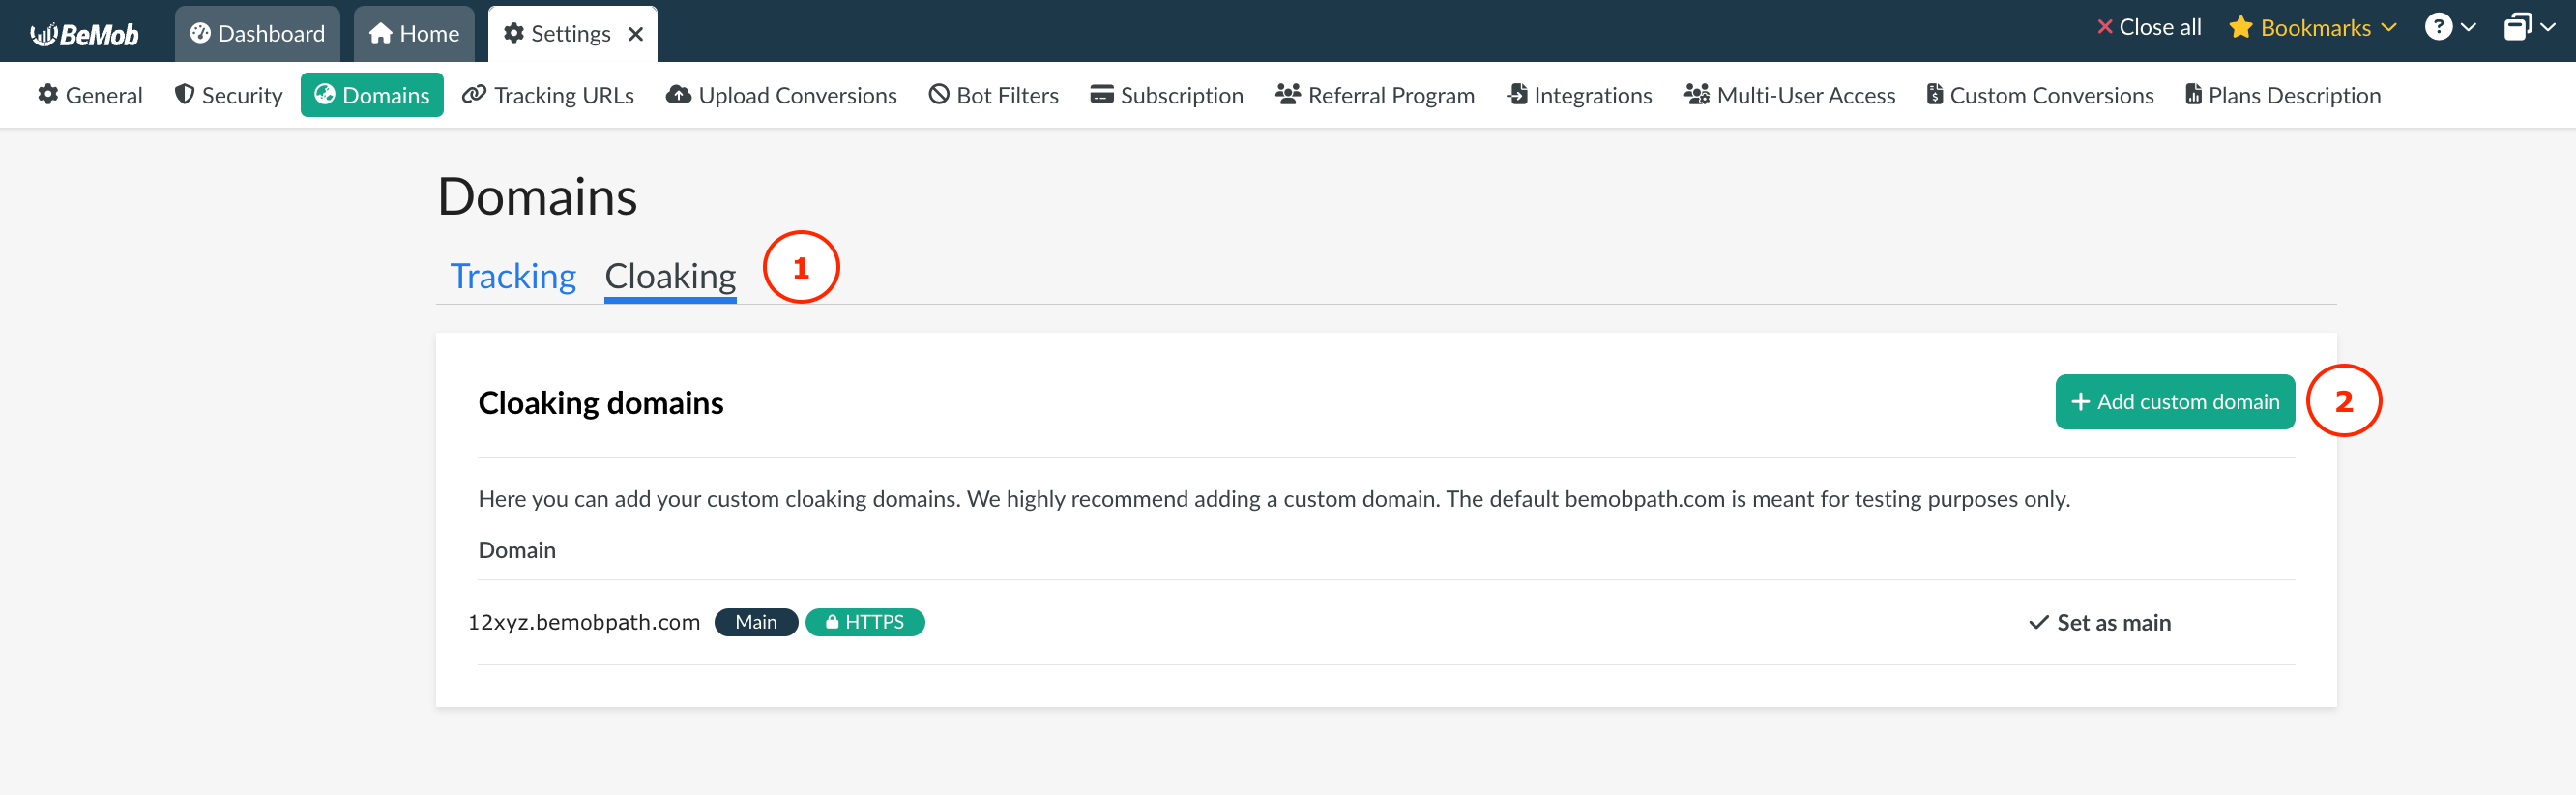
3. Copy the system cloaking domain name. It always contains the bemobpath.com part.
4. Go back to the registrar’s site and set up a CNAME record on the subdomain pointing to your BeMob domain.
The record type should be selected as CNAME. All other fields should be completed according to the recommendations of your registrar.
5. Copy the CNAME domain record and go back to domain settings on the side of BeMob.
6. In the Add custom domain window click the Next button.
7. Specify your custom cloaking domain and press Check DNS button.
If you domain has been configured with a dot at the end, it is required to delete it when adding the record into the domain field on the side of BeMob. No additional spaces should be added.
If the domain was configured incorrectly, you will not be able to proceed to the next step.
The following type of errors could occur:
8. Click Add Domain button to proceed.
9. Once the domain is added, it will appear in the list along with other domains of BeMob.
🟢 The SSL certificate will be automatically available for your custom domain within 5-20 minutes after you add the domain in BeMob. However in some cases it may take up to 24 hours to issue the SSL.
If a certificate is not available within an hour, contact our support team via live chat or at support@bemob.com.
The issuance and maintenance of SSL certificates are provided free of charge.
💡 If you want to manage DNS settings and SSL certificate issuance yourself, please contact support team via live chat or at support@bemob.com.
10. After the cloaking domain is configured, it will be possible to select it on the level of the campaign or flow settings along with the Double Meta redirect.
Double Meta should be used to hide the traffic sources and landing pages from affiliate networks. The referrer will be replaced with the cloaking domain you've configured.
More on this find in our dedicated guide on redirects.
¶ GoDaddy Domain Settings
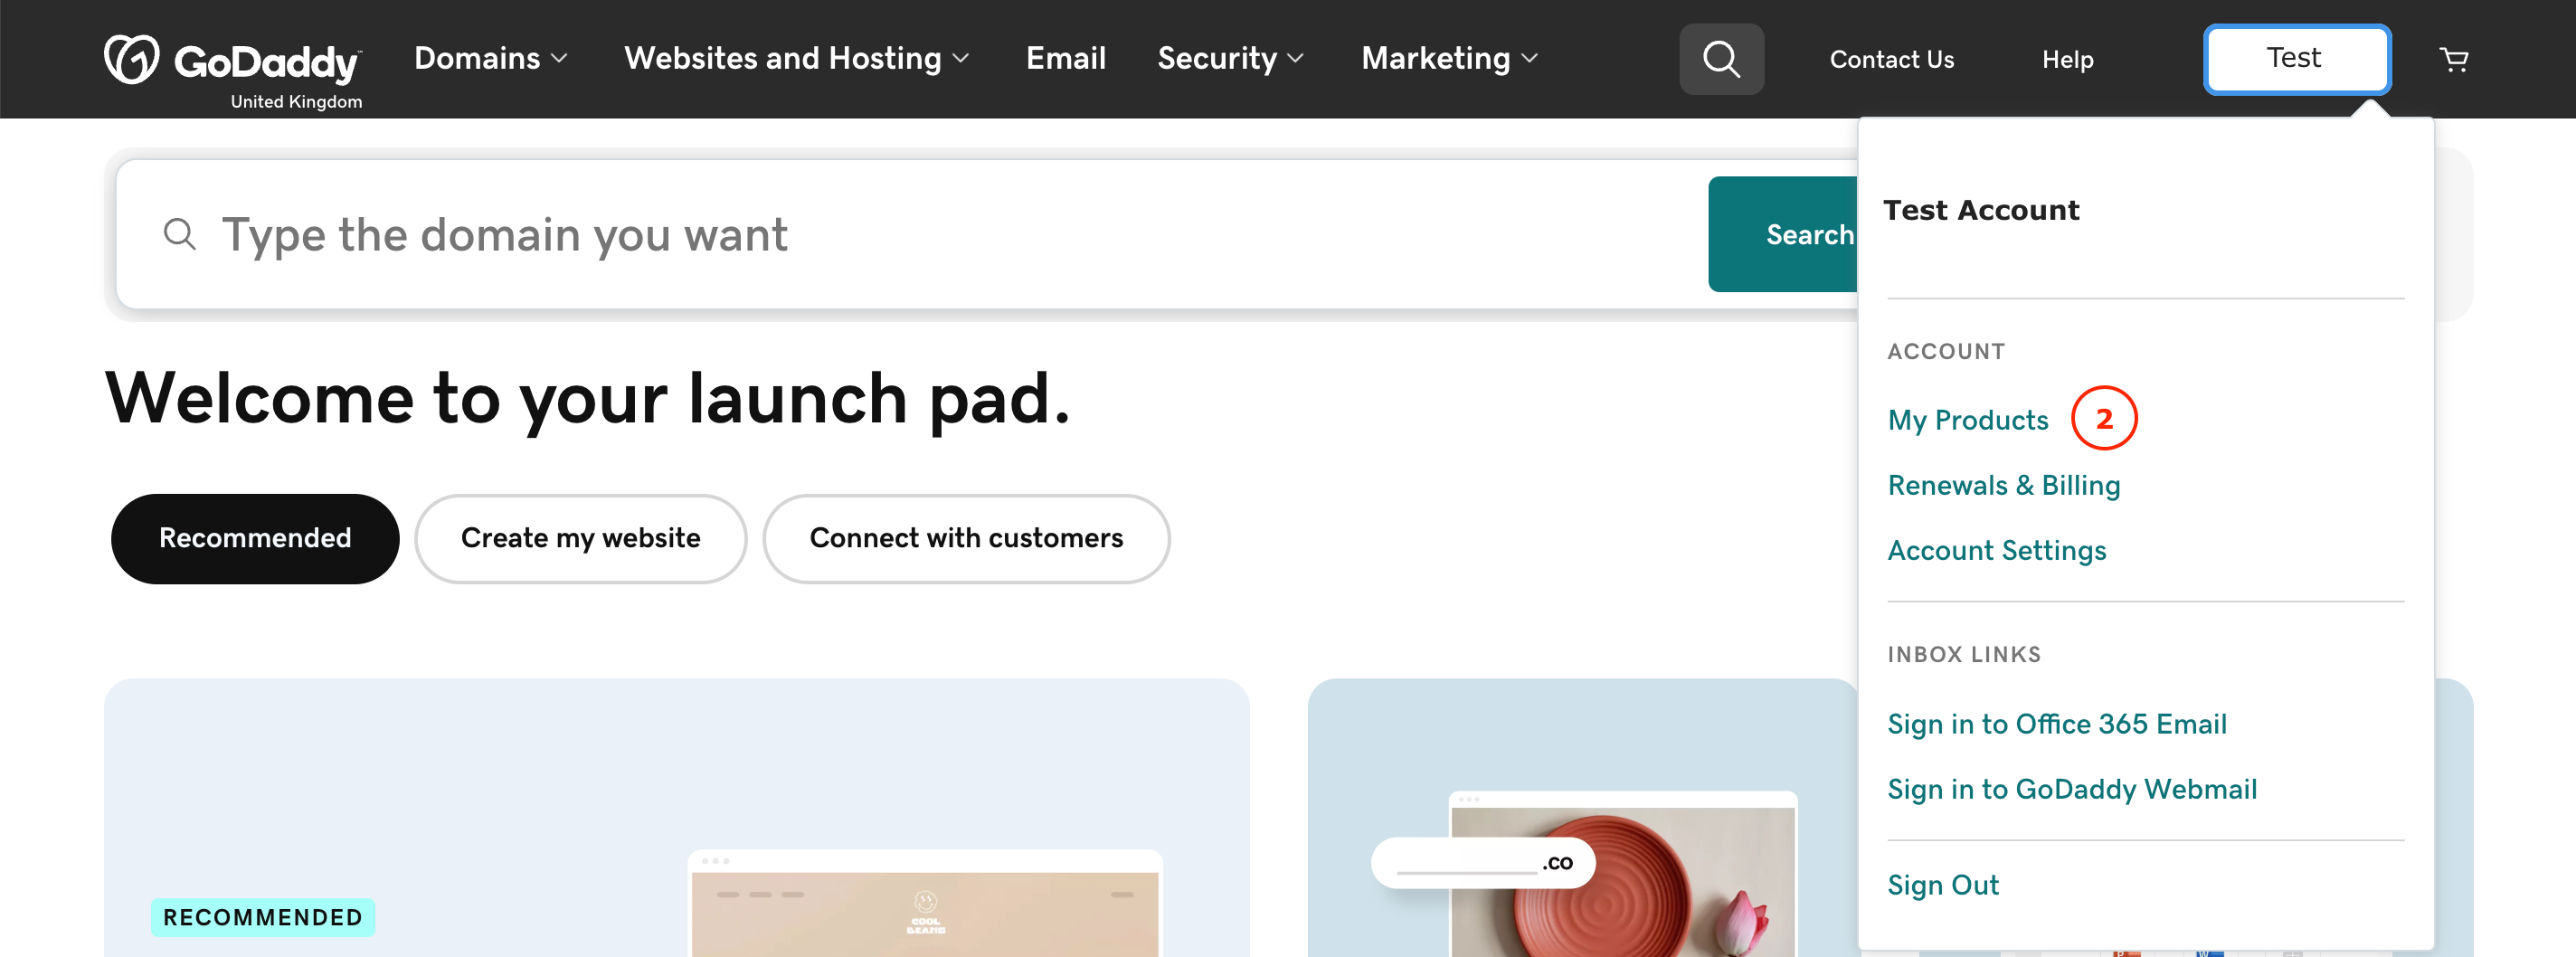
1. Purchase your domain at GoDaddy and sign into your account.
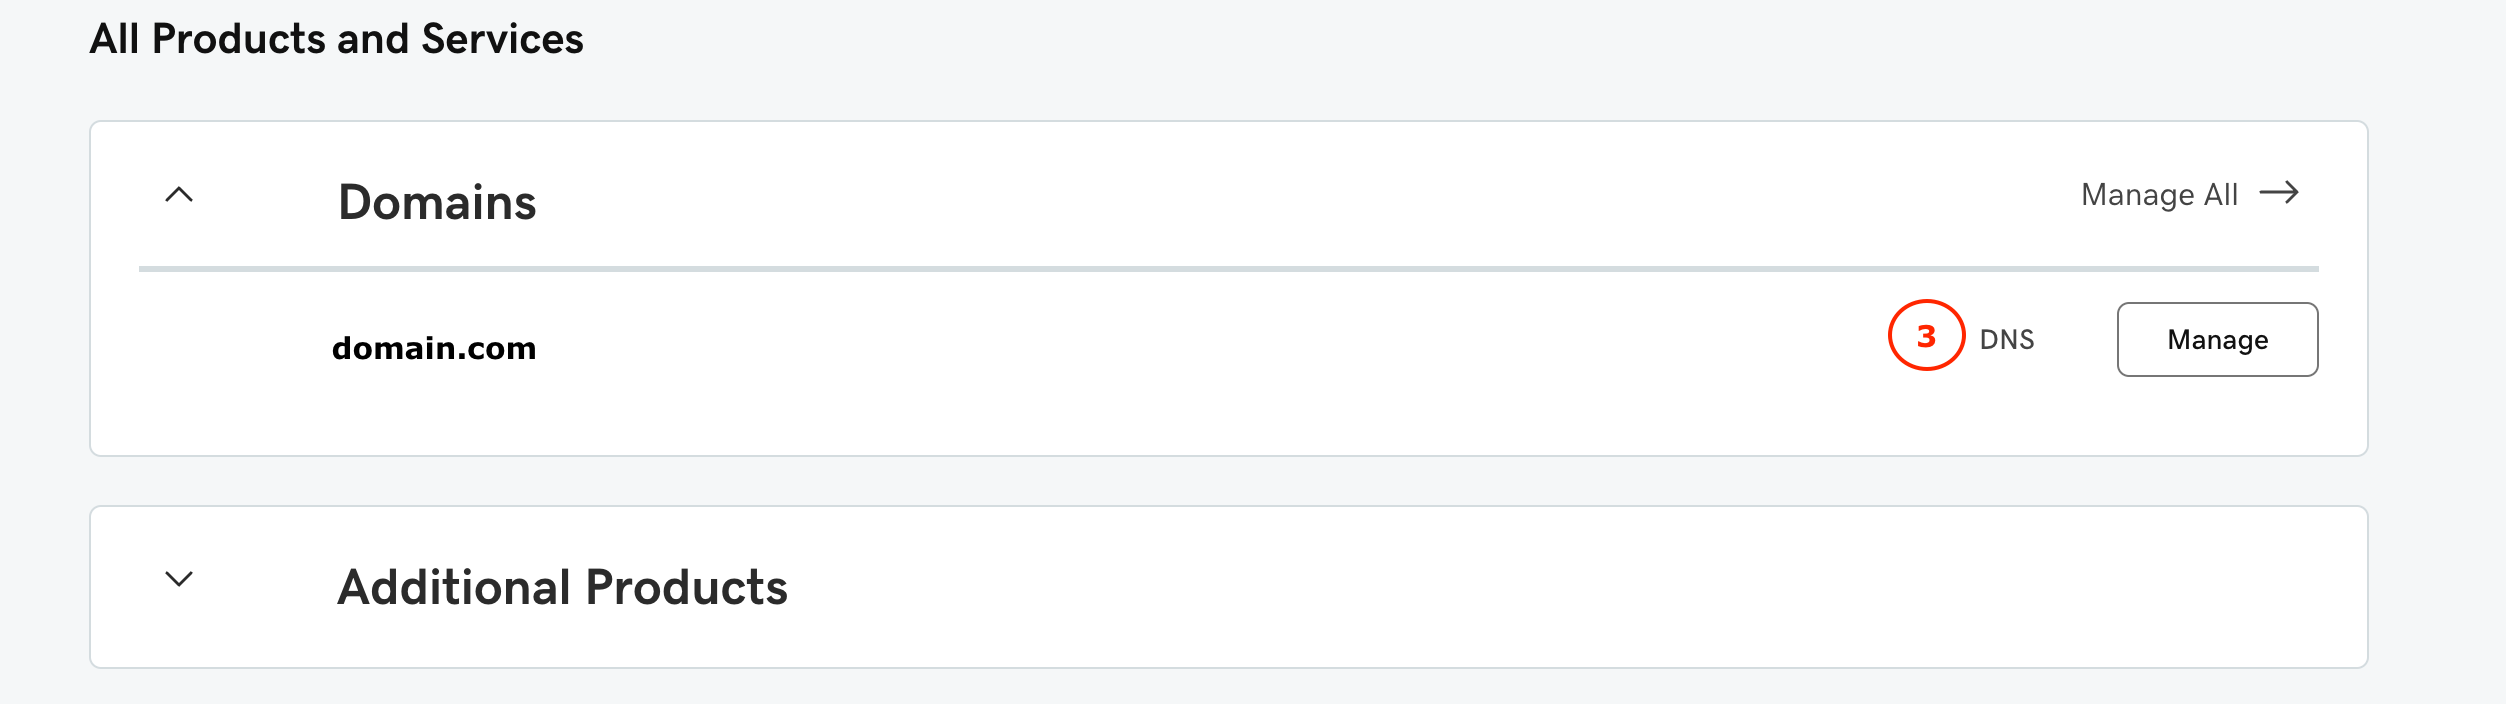
2. Access My Products tab.
3. Scroll to Domains section and click DNS.
4. Go to your BeMob account and copy the required system domain.
For tracking domain use 12xyz.bmtrck.com
For cloaking domain 12xyz.bemobpath.com
5. Return back to GoDaddy settings.
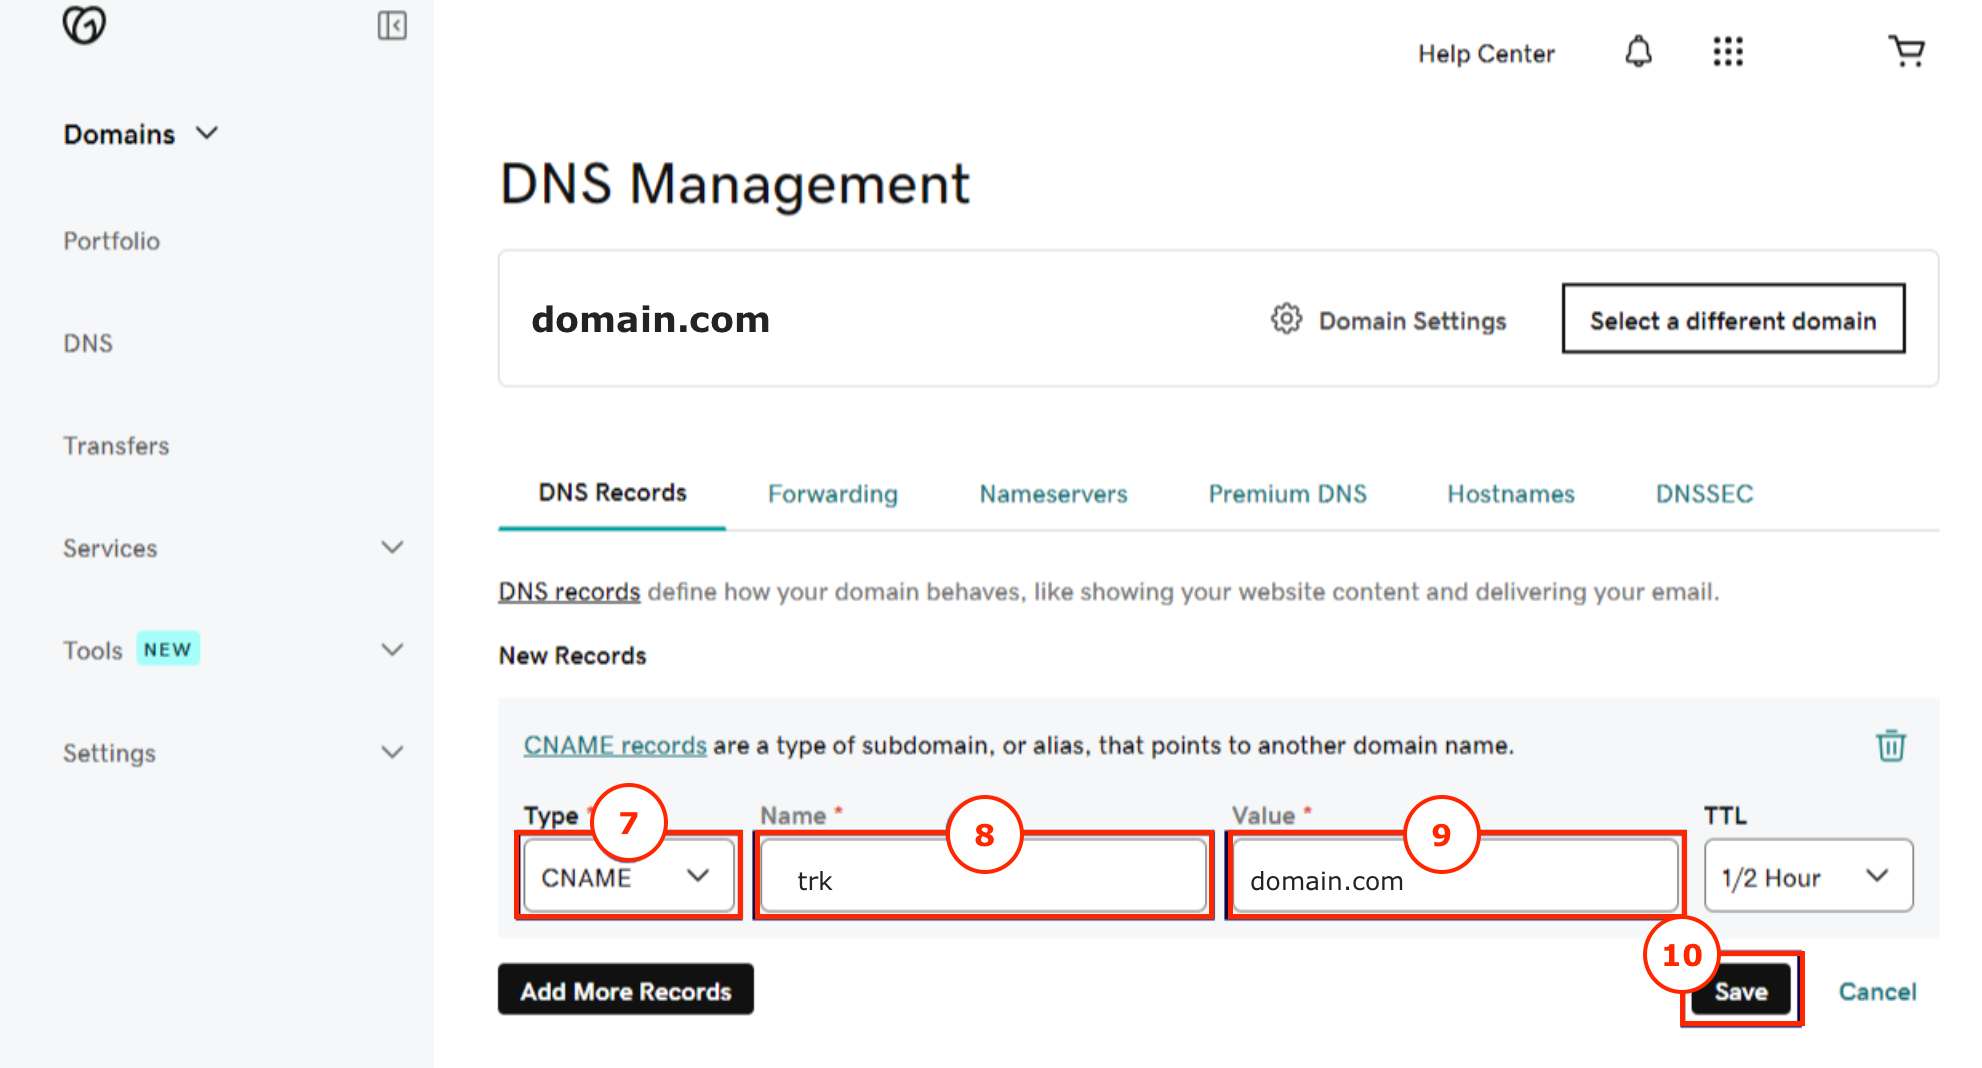
6. Click Add record.
7. Select the CNAME from the Type drop-down menu.
8. Specify any name for your subdomain, such as "trk" in the Name field.
9. Paste the BeMob dedicated domain name that into the Value field.
10. Save the settings.
Copy the domain record and go back to your BeMob account and repeat the step from the Tracking Domain Settings or Cloaking Domain Settings described above.
¶ Cloudflare Domain Settings
1. Purchase your domain from Cloudflare and sign into your account.
2. Go to DNS → Records. DNS section displays the complete list of DNS records for your domain.
3. Click Add record.

4. Go to your BeMob account and copy the required system domain.
For tracking domain use 12xyz.bmtrck.com
For cloaking domain 12xyz.bemobpath.com
5. Return back to Cloudflare settings.
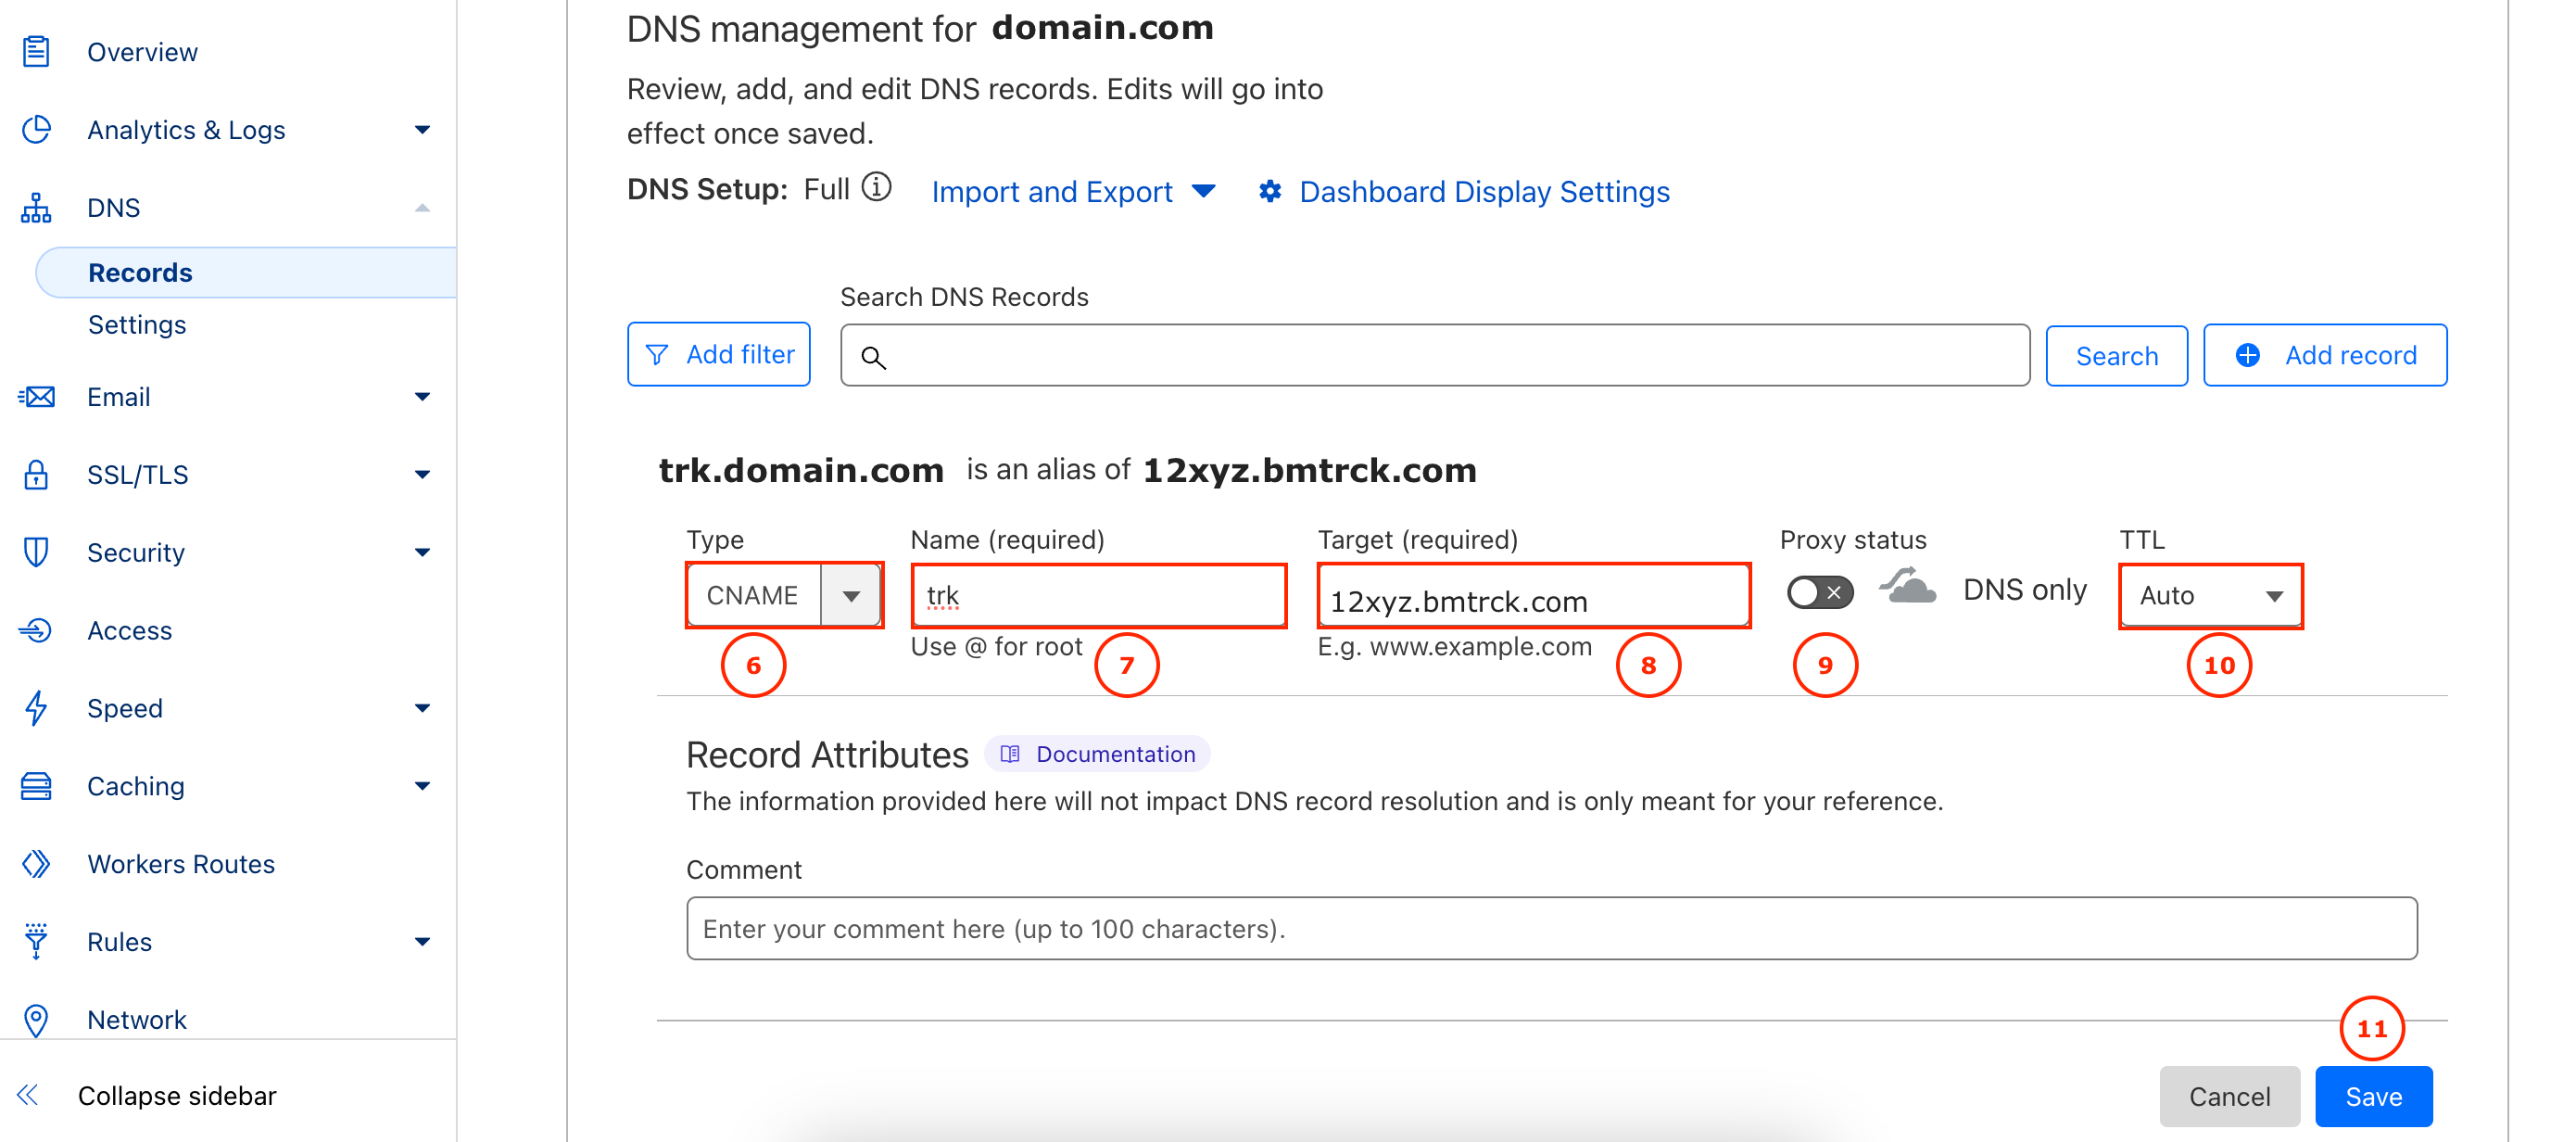
6. Select the CNAME from the Record type drop-down menu.
7. Specify your custom subdomain name in the Name field, e.g. "trk".
8. Paste the name of your domain from BeMob in the Target field.
9. Set DNS only mode. If cloud sign next to Add Record button is orange, click it to become grey.
10. Shorten the TTL for DNS settings to propagate faster or leave Auto.
11. Click Save to store the settings.
This how your CNAME record should be displayed on the side of Cloudflare:
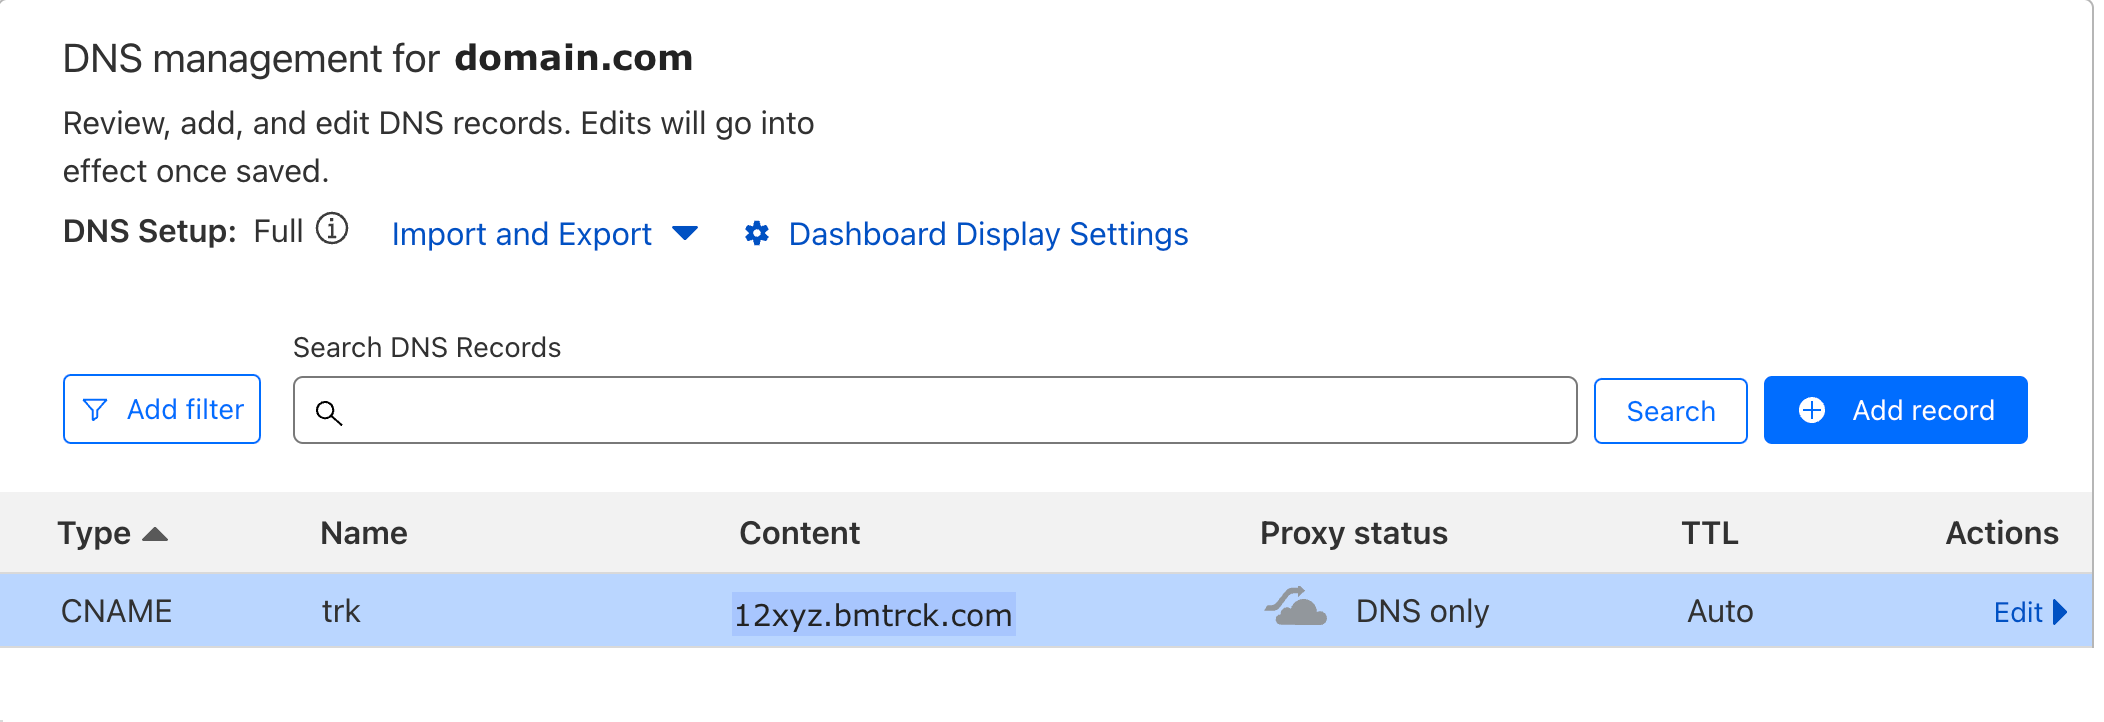
Copy the record and go back to your BeMob account and repeat the step from the Tracking Domain Settings or Cloaking Domain Settings described above.
¶ Namecheap Domain Settings
1. Purchase your domain at Namecheap and access your account.
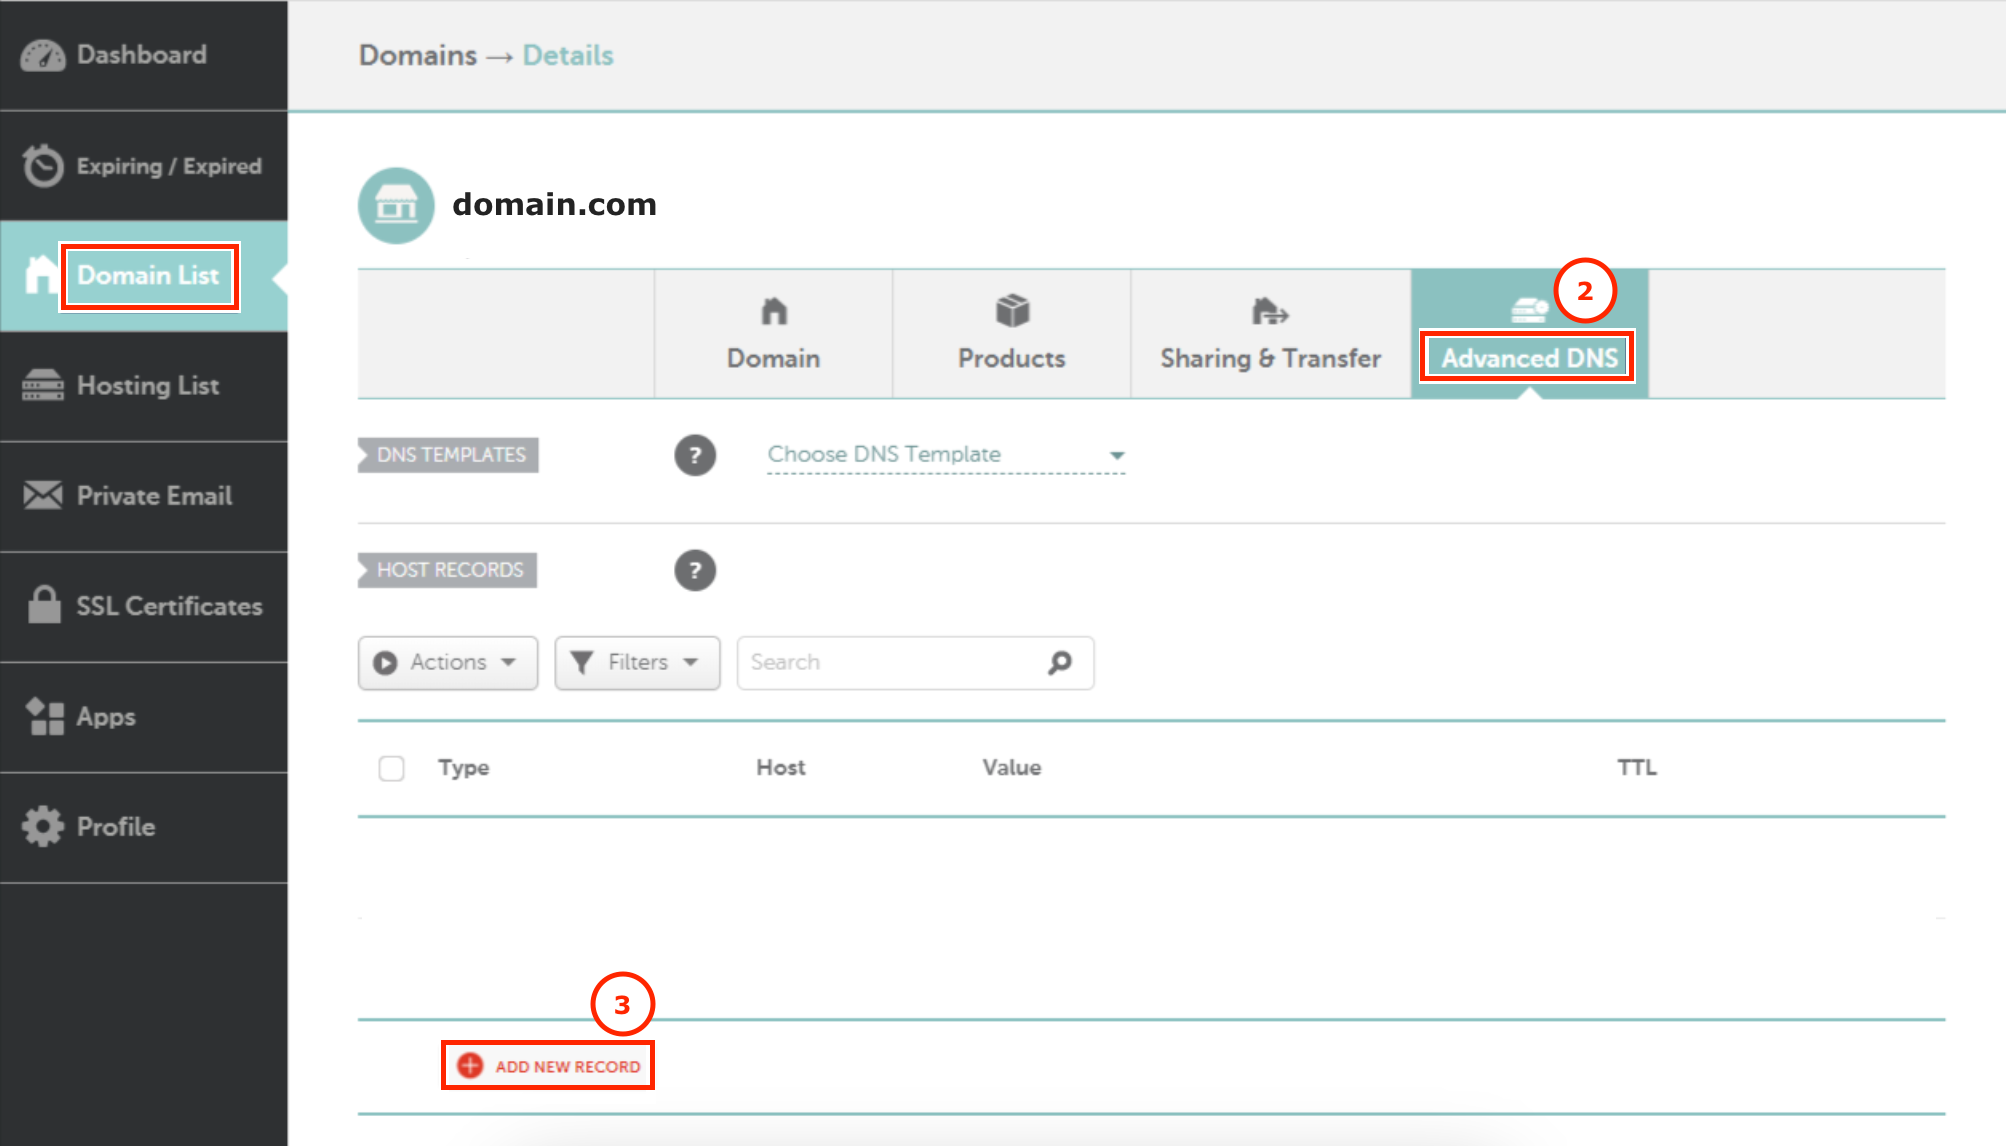
2. Go to Domains List → Advanced DNS
3. Click the Add new record button.
4. Go to your BeMob account and copy the required system domain.
For tracking domain use 12xyz.bmtrck.com
For cloaking domain 12xyz.bemobpath.com
5. Return back to Namecheap settings.
6. Select CNAME as the record type.
7. Specify your custom subdomain name in the Host field, e.g. "trk".
8. Paste the BeMob system domain name in the Value field.
9. Shorten the TTL if required or leave the default value.
10. Click Save all changes.

Copy the record and go back to your BeMob account and repeat the step from the Tracking Domain Settings or Cloaking Domain Settings described above.
¶ FAQ
¶ ❓I've added a domain, but see no SSL certificate.
The SSL certificate will be automatically available for your custom domain within 5-20 minutes after you add the domain in BeMob. However in some cases it may take up to 24 hours to issue the SSL.
If a certificate is not available within an hour, contact our support team via live chat or at support@bemob.com.
¶ ❓Сan I use proxy/CDN services (like Cloudflare proxy mode) which hide the destination server IP?
Yes, this is possible. In this case, we can disable SSL certificate issuance and DNS management for your domains (or entire account) on the BeMob side.
When this setup is used, you will not need to pay for domain slots with BeMob.
Please contact our support team via live chat or email at support@bemob.com, and we will be happy to assist you with this configuration.
📩 Need help? Contact support via live chat or email at support@bemob.com